Menu

Rainbow Cloud - Three-Layer Jelly Mousse on a Biscuit Base

Desserts Desserts for Kids Dishes for Special Occasions 300 min Medium 9 wyświetleń ~30.35 PLN - (0)
Rate:
(0)

Description

Rainbow Cloud is a dessert that delights both in taste and appearance. It is an incredibly light, fluffy, and refreshing mousse made up of three layers with different flavors and colors, set on a crunchy base of buttery biscuits. Each layer combines fruity jelly with creamy homogenized cheese, creating a perfectly balanced, delicate sweetness. This dessert is inspired by the classic 'jelly mousse,' but presented in a modern, striking way. It is perfect for children's parties, summer garden gatherings, or as a colorful accent on a sweet table. Its preparation is simple, although it requires patience due to the setting time of each layer. Served cold and decorated with fresh fruit, it is a true feast for the eyes and the palate.

Składniki (9)

Servings:
8
  • Petit beurre biscuits 200 g
  • Butter 100 g
  • Strawberry jelly 75 g
  • gooseberry jelly 1 szt.
  • lemon jelly 1 szt.
  • Gorąca woda 750 ml
  • Vanilla homogenized cheese 900 g
  • ✨ Opcjonalne
  • Świeże owoce do dekoracji 150 g
  • Listki świeżej mięty 5 g
💰 Szacowany koszt dania: ~30.35 PLN (3.79 PLN/porcję)

💡 Kliknij na składnik aby oznaczyć jako użyty

Preparation steps

Preparing the base

1

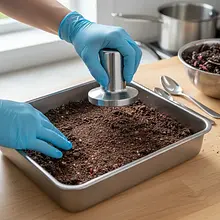
Prepare a baking pan measuring about 24x24 cm. Line it with parchment paper so that the paper extends beyond the edges of the pan - this will make it easier to remove the cake later. Place the biscuits in a sturdy ziplock bag, seal it while removing excess air, and crush them into fine crumbs using a rolling pin. You can also use a food processor or a blender, mixing in batches on high speed.

Ingredients: Petit beurre biscuits
The best option is a square baking pan or a springform pan with a diameter of 24 cm. Evenly crumbling the biscuits is key for a compact base structure. Make sure there are no large, uncrumbled pieces.
2

In a small saucepan over the lowest heat, melt the butter. Stir occasionally to prevent it from burning. As soon as the butter has melted, remove the saucepan from the heat. Do not let the butter boil. Alternatively, you can melt the butter in the microwave in a suitable container, heating in 30-second intervals.

Ingredients: Butter
Use a heavy-bottomed saucepan to melt the butter evenly. Too hot butter can 'burn' the biscuits and make the base too hard.
3

Pour the crushed biscuits into a bowl. Slowly pour in the melted butter, mixing everything thoroughly with a spoon or spatula. Stir until all the biscuit crumbs are evenly coated with butter. The consistency should resemble wet sand.

Ingredients: Petit beurre biscuits, Butter
To check if the consistency is correct, squeeze a bit of the mixture in your hand - it should hold its shape and not crumble.
4

Transfer the biscuit mixture to the prepared pan. Spread it evenly across the bottom, then press it down firmly using the flat side of a spoon or the bottom of a glass. Make sure the surface is smooth and compact. Place the pan in the refrigerator for at least 30 minutes to allow the butter to set and the base to become firm.

Thorough and strong pressing of the base will prevent it from crumbling when cutting the dessert. Do not skip the cooling stage - it is crucial for the stability of the entire structure.

First layer of mousse (strawberry)

5

While the base is cooling, prepare the first layer of the mousse. In a medium-sized bowl, pour the contents of the strawberry jelly package. Add 250 ml of hot, but not boiling water (use half the amount of water than indicated in the package instructions). Stir vigorously with a teaspoon for about 1-2 minutes until the entire powder is completely dissolved and there are no lumps.

Ingredients: Strawberry jelly, Gorąca woda
Using less water is key to ensuring the foam is stable and cuts well. Make sure there are no undissolved gelatin crystals at the bottom of the bowl.
6

Set the dissolved jelly aside to cool completely. It should reach room temperature and start to thicken slightly, achieving the consistency of a thin jelly or egg white. This may take 30 to 60 minutes. You can speed up the process by placing the bowl in a larger container with cold water.

Ingredients: Strawberry jelly
This is the most important step! The hot jelly will weigh down the cheese, and if it becomes too thick, it will create lumps. Regularly check the consistency by stirring the jelly every few minutes. It should be cool to the touch but still liquid.
7

In a large bowl, place 300g of chilled homogenized cheese. Using a mixer with whisk attachments, mix the cheese on medium speed for about 2-3 minutes until it becomes smooth, fluffy, and slightly aerated.

Ingredients: Vanilla homogenized cheese
Aerating the cheese will make the final mousse lighter and more 'fluffy'. Use the cheese straight from the fridge.
8

Without stopping the mixing on low speed, slowly pour the thickening jelly into the aerated cheese in a thin stream. Mix only until the ingredients are combined into a uniform, smooth mass with a pink color. Overmixing may cause the mixture to become runny.

Ingredients: Strawberry jelly, Vanilla homogenized cheese
This technique is called 'tempering'. It ensures a smooth consistency without lumps. If you're afraid of the mixture curdling, you can first add 2-3 tablespoons of the cheese to the jelly, mix it, and then pour this mixture into the rest of the cheese while continuously mixing.
9

Remove the chilled base from the refrigerator. Gently pour the prepared strawberry mousse onto the biscuit base and smooth the surface with a spatula. Return the mold to the refrigerator for about 60 minutes, or until the layer is completely set and feels firm to the touch.

Before pouring the next layer, gently touch the surface of the foam with your finger. If no mark is left on it, the layer is ready. Don't rush, otherwise the layers may mix.

Second layer of the mousse (gooseberry)

10

When the first layer is setting, prepare the second, green layer. Repeat steps 5-8 exactly, using gooseberry jelly and another 300g of homogenized cheese. Dissolve the jelly in 250 ml of hot water, cool it until slightly thickened, whip the cheese, and then combine both ingredients.

Ingredients: gooseberry jelly, Gorąca woda, Vanilla homogenized cheese
Remember to start preparing the second layer when the first one is almost ready to minimize waiting time. The key is perfect timing.
11

Make sure the first strawberry layer is completely set. Gently pour the green gooseberry mousse over the strawberry layer, preferably using the back of a large spoon. Smooth the surface and place it back in the refrigerator for another 60 minutes to set.

Pouring the foam by the spoonful prevents the formation of a 'hole' in the bottom layer due to the stream of liquid. It's a simple trick that ensures perfectly even layers.

Third layer of the mousse (lemon)

12

When the second layer is setting, prepare the final yellow layer. Repeat steps 5-8, this time using lemon jelly and the remaining 300g of homogenized cheese. Dissolve, cool, whip the cheese, and combine the ingredients into a smooth mixture.

Ingredients: lemon jelly, Gorąca woda, Vanilla homogenized cheese
Practice makes perfect! By the third layer, you will already be an expert in judging the perfect consistency of the setting jelly.
13

Check if the green layer is already firm. Carefully pour the yellow lemon mousse over it, smoothing the top. Now the whole thing needs to set properly. Place the cake in the refrigerator for at least 3-4 hours, preferably overnight.

Longer cooling will make the dessert more stable, and the flavors will meld together. Do not try to cut the cake earlier, as it may fall apart.

Decoration and serving

14

Before serving, gently remove the cake from the mold by grabbing the protruding edges of the parchment paper and transferring it to a serving platter or cutting board. Remove the paper. Decorate the top of the dessert with fresh fruits and mint leaves. You can arrange the fruits over the entire surface or just in the center, creating a fancy pattern. Additionally, whipped cream can be used.

Ingredients: Świeże owoce do dekoracji, Listki świeżej mięty
For cutting, use a long, sharp knife dipped briefly in hot water and dried. This simple trick will give you perfectly smooth and clean edges for each portion, showcasing the beautiful, colorful layers.

Fun Fact

💡

Gelatin, which is the base of jelly, gained immense popularity in Poland during the PRL era. It was a symbol of elegance and modernity at home parties. Desserts like 'cold legs' or fruit jellies were a must-have on every festive menu.

Best for

Tips

🍽️ Serving

The dessert tastes and looks best served straight from the fridge. It should be cut with a sharp knife, previously dipped in hot water and dried - this way the layers won't tear. Each portion can be additionally decorated with a dollop of whipped cream and fresh fruits that match the colors of the mousse layers.

🥡 Storage

Store the dessert in the refrigerator, tightly covered with plastic wrap or in a sealed container, to prevent it from absorbing odors. It can be stored for up to 3 days. Keep in mind that over time, the biscuit base may soften slightly from the moisture of the mousse, so the dessert is best enjoyed within the first 48 hours.

📸 Ugotowane przez społeczność

Zaloguj się, aby dodać zdjęcie
Dodaj zdjęcie gotowej potrawy

Po zatwierdzeniu przez moderatora otrzymasz 10 punktów doświadczenia.

🍲

Nikt jeszcze nie dodał zdjęcia. Bądź pierwszy!

Comments (0)

Be the first to comment on this recipe!

Add a comment

You might also like

Recipe Categories

Desserts
Desserts in: Christmas Eve Dinner

Desserts are a sweet ending to a meal that brings joy to both children and adults. In this category, we present recipes for a variety of sweets - from simple creams and mousses, to elegant panna cottas, and exquisite fruit tarts. Our desserts include both classics of Polish cuisine - fruit jelly,...

See all recipes in this category
Desserts for Kids
Desserts for Kids in: For Kids

Desserts for kids are sweet treats without guilt - less sugar, more flavor. Banana ice cream without sugar - frozen bananas blended to a creamy consistency. Chocolate mousse with avocado - creamy and healthy. Vanilla pudding with fruit - a childhood classic. Carrot and apple muffins - hidden vege...

See all recipes in this category

Dishes for special occasions are culinary masterpieces for birthdays, anniversaries, and holidays. Grilled beef steak with herb butter - restaurant quality at home. Beef Wellington - beef in puff pastry with duxelles. Roast duck with apples - a holiday tradition in a new edition. Pink salmon with...

See all recipes in this category

Homemade cakes and pastries are the heart of Polish culinary tradition - sweet memories from childhood. In our collection, you will find recipes for classic yeast cakes, shortcrust, sponge, and cheesecake. Apple pie, poppy seed cake, gingerbread, Easter babka, chocolate cake, and New York cheesec...

See all recipes in this category
Reklama