Traditional Sourdough Bread (small loaf for 4 servings)

Cakes and Bakes Regional Cuisine of Poland 240 min Medium 42 wyświetleń ~1.75 PLN * - (0)
Rate:
(0)
Start Cooking

Description

Traditional Polish wheat bread, soft on the inside with a crispy crust — a simple, homemade loaf prepared using a yeast starter method. This is a classic bread baked in the shape of a small loaf, perfect for warm breakfasts with cottage cheese or for sandwiches with cold cuts and pickled cucumber. It features a delicate addition of butter for softness and optional caraway seeds or a mix of grains for aroma and texture. The bread has a pleasant, slightly sweet taste due to the short fermentation of the starter; visually, it stands out with a golden, uneven crust and possibly seeds on top. The recipe is designed for 4 servings (small loaf), adapted to equipment and ingredients readily available in Poland.

Ingredients Used

Ingredients (8)

Servings:
4
  • Wheat flour type 650 500 g
  • Water 330 ml
  • Fresh yeast 20 g
  • Sugar 10 g
  • Butter 20 g
  • 🌿 Przyprawy
  • Salt 10 g
  • ✨ Opcjonalne
  • Cumin (optional) 2 g
  • Seed mix for sprinkling (optional) 30 g
💰 Szacowany koszt dania: ~1.75 PLN (0.44 PLN/porcję)
* Brak cen dla niektórych składników

💡 Kliknij na składnik aby oznaczyć jako użyty

Preparation steps

Starter

1

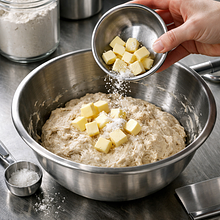
Prepare the starter: measure 100 g of wheat flour into a small bowl, add 100 ml of slightly warm water (about 35°C — it should feel pleasantly warm to the touch on the inner side of your wrist) along with 20 g of fresh yeast crumbled by hand and 5 g of sugar (from the total amount of sugar). Mix with a spoon or fork just until the ingredients are combined to form a thick, not too runny paste. Cover the bowl with a cloth and set it in a warm place for 10–15 minutes. After this time, a foam and small bubbles should appear on the surface of the starter — this is a sign of active yeast.

Use a small glass or plastic bowl. If after 15 minutes there is no foam, the yeast may be inactive — it's better to start over with a new batch of yeast. Do not use water that is too hot (above 45°C), as it will kill the yeast.

Cake

2

In a large bowl, sift the remaining flour (about 400 g). Make a wide well in the center. Pour the active starter into it. Add the rest of the water (about 230 ml), the remaining sugar (5 g), and half of the salt (5 g) spread around the edge of the bowl (the salt should not touch the starter directly at first). Start mixing with a wooden spoon from the center outwards, gradually combining the flour with the liquid until the mixture begins to come together into a loose dough.

Use a large bowl (at least 3 l). Inadequate mixing causes lumps of flour. Do not pour all the flour onto the table at once — mix in the bowl, and if you need to add more, do it in small portions.
3

Add the soft butter (20 g) cut into small pieces and the remaining salt (if not added yet). Transfer the dough to a lightly floured surface and start kneading: press the dough with your fist, fold it over itself, turn it a quarter turn, and repeat. Knead for 8–10 minutes by hand until the dough becomes smooth, elastic, and stops sticking strongly to your hands (it should be soft, slightly sticky, but not runny). If using a stand mixer, knead on medium speed with a hook for 5–7 minutes.

Use a wooden pastry board or a clean countertop. If the dough is too sticky, sprinkle the surface with a small amount of flour (a tablespoon at a time), but be careful — too much flour will make the bread heavy. If you don't have a mixer, knead by hand; if you have a mixer, use the dough hook.

First rising

4

Transfer the kneaded dough to a lightly oiled bowl (use a bit of oil or greased paper). Turn the dough once so that the entire surface gets a thin layer of fat. Cover the bowl with a tight cloth or plastic wrap and set it in a warm place (temperature around 24–26°C) for 60–90 minutes, until the volume of the dough doubles. Properly rising dough will gently spring back when pressed with a finger but will leave a slight indentation.

The best place is a turned-off oven with a warm light bulb, or near a radiator (but not directly on a hot metal element). Don't prolong the rising — the structure will collapse if the dough over-proofs.

Shaping and Proofing

5

When the dough has doubled in size, gently transfer it to a lightly floured surface. Release the air: fold the dough in half and gently press down with your hand several times to remove large air bubbles. If you are adding caraway seeds, sprinkle them on top now and lightly press them into the dough. Shape the loaf: fold the edges underneath to create a taut surface on top (this is called tightening the dough). Place the loaf in a buttered loaf pan about 20–22 cm long or on a baking sheet (if baking without a pan, shape the bread into an oval). Sprinkle the top with a mixture of seeds, if using.

For shaping, use hands lightly moistened with water or dusted with flour. Do not squeeze too hard — you want to tighten the top of the loaf, not flatten it. A loaf pan measuring 20–22 cm will yield a nice, even loaf.

Second rising

6

Cover the shaped loaf with a cloth and let it rest for 45–60 minutes in a warm place. The bread should increase in volume by about 70–90% and feel fluffy to the touch. If you are using a loaf pan, it should be filled to about 80% of its height.

Do not let it rise too long — an overgrown loaf will collapse during baking. If you prefer a darker crust, you can lightly brush the top with water before baking.

Baking

7

Preheat the oven to 220°C (top-bottom). Place a small baking tray at the bottom of the oven (this will create steam). Just before placing the loaf in, pour about 100 ml of boiling water into the hot tray (be careful of the steam!). Put the bread in the oven and bake for the first 10 minutes at 220°C with steam (this helps achieve a crispy crust), then reduce the temperature to 200°C and bake for another 25–30 minutes, until the crust is golden-brown. The total baking time should be 35–40 minutes.

Use kitchen gloves when pouring boiling water into the pan — the steam is very hot. If you are baking in a mold, you can remove the bread from the mold after 20 minutes and finish baking without it to make the bottom crispier. To check if it's baked, you can use a thermometer — the inside should be about 95–96°C; or tap the bottom of the loaf: a hollow, dull sound indicates it's done.

Cooling and Slicing

8

After baking, remove the bread from the oven and transfer it to a cooling rack. Leave the bread to cool for at least 60 minutes — cutting into a loaf that is too hot will cause the crumb to collapse and the knife to stick. Once cooled, use a long serrated bread knife and slice the bread with a steady, smooth sawing motion to achieve even slices.

The best cooling rack is metal, as it allows air to circulate under the bread. If you cut it too early, the bread will be mushy inside. Properly cooled bread has a firm crumb and a crispy crust.

Additional tips

9

If you want, you can prepare a version with wholemeal flour: replace 100–150 g of wheat flour with wholemeal flour (rye or whole wheat), but remember that you need to increase the amount of water by 10–20 ml, as wholemeal flour absorbs more liquid. Instead of seeds, you can use flour to create a pattern on top.

If you are using wholemeal flour, knead the dough a little longer (about 10–12 minutes by hand) to allow the gluten to develop better. Additionally, you can add a tablespoon of honey instead of sugar for a subtle aroma (optional).

Fun Fact

💡

In Poland, bread has always been an important element of culture and the table, a symbol of hospitality. Traditional breads were often seasoned with caraway, which in ancient times also helped with the digestion of heavier dishes.

Best for

Tips

🍽️ Serving

Serve sliced thickly with cottage cheese and freshly ground pepper, with butter and pickled cucumber, or as a base for sandwiches with homemade sausage. The bread also tastes great with thick soups (e.g. sour rye soup) and as an accompaniment to roasted meat. To make the crust even crispier, lightly toast the slices in a dry pan or toaster.

🥡 Storage

Store bread in a linen bag or wrapped in a linen cloth at room temperature (not in the fridge — it will go stale faster) for 2–3 days. To refresh stale bread: spray a slice with water and place it in an oven preheated to 180°C for 5–8 minutes. You can also slice the bread and freeze the slices in a bag, taking them out individually to thaw in a toaster or oven.

📸 Ugotowane przez społeczność

Zaloguj się, aby dodać zdjęcie
Dodaj zdjęcie gotowej potrawy

Po zatwierdzeniu przez moderatora otrzymasz 10 punktów doświadczenia.

🍲

Nikt jeszcze nie dodał zdjęcia. Bądź pierwszy!

Comments (0)

Be the first to comment on this recipe!

Add a comment

You might also like

Recipe Categories

Homemade cakes and pastries are the heart of Polish culinary tradition - sweet memories from childhood. In our collection, you will find recipes for classic yeast cakes, shortcrust, sponge, and cheesecake. Apple pie, poppy seed cake, gingerbread, Easter babka, chocolate cake, and New York cheesec...

See all recipes in this category

Traditional recipes from various regions of Poland that showcase the richness of local flavors and ingredients.

See all recipes in this category
Reklama