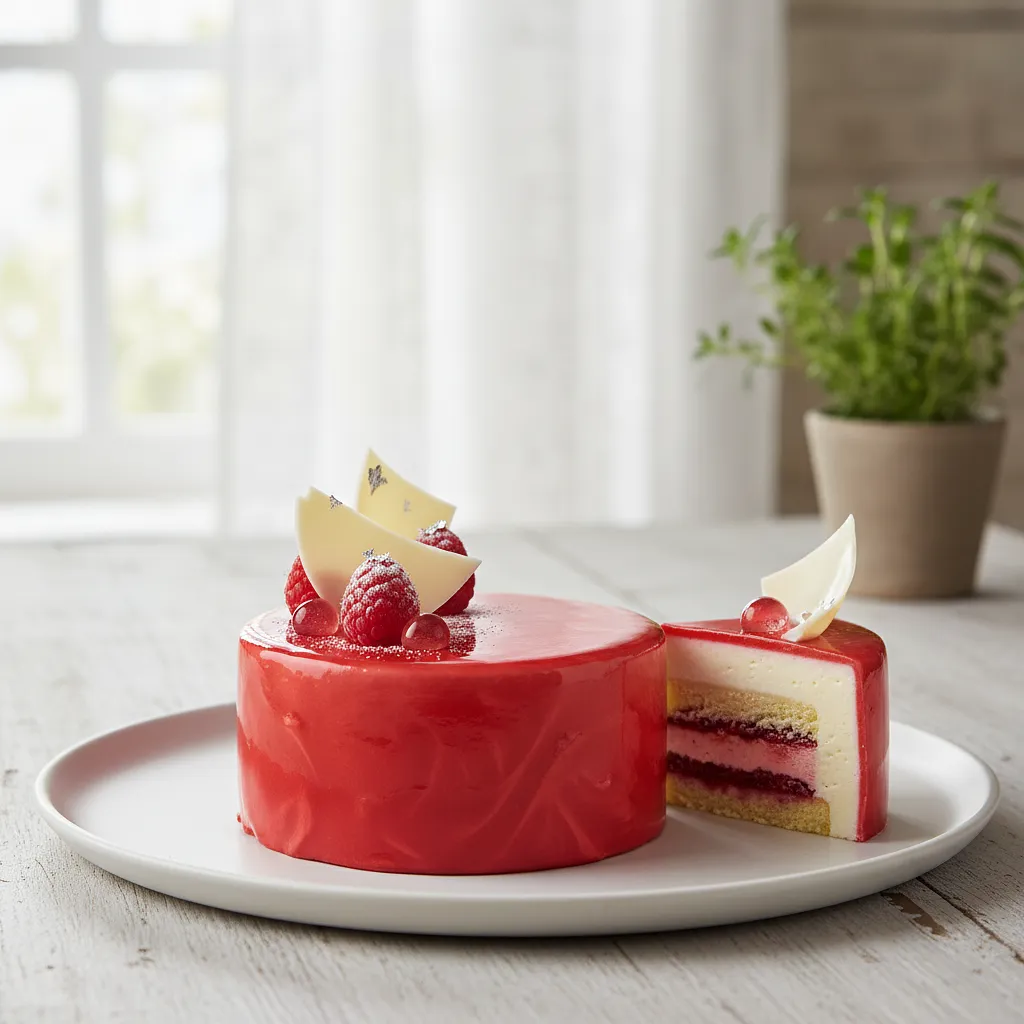
Start by preparing the filling, which needs to freeze completely. Soak the gelatin sheets (6g) in a large amount of cold water in a small bowl and set aside for 10 minutes until they swell and become soft. Meanwhile, place the raspberries (200g) and sugar (50g) in a small saucepan. Heat over medium power, stirring until the raspberries break down and the sugar completely dissolves, creating a thick sauce (about 5-7 minutes).
Description
The 'Digital Precision' entremet is a masterpiece of modern pastry, proving that baking is an art that combines flavor with science. This exquisite dessert consists of several layers that together create a harmonious and unforgettable composition. At the bottom lies a delicate, crunchy almond base that adds a delightful crunch. At its heart is an intensely fruity raspberry insert with a jelly-like consistency, providing a refreshing counterpoint to the sweetness. The entire creation is enveloped in a velvety, cloud-like mousse made from the highest quality white chocolate. Topping off the dessert is a spectacular, shiny mirror glaze that gives it the appearance of a jewel. Preparing this cake is a journey through precise pastry techniques, where an electronic scale, thermometer, and mixer become essential tools for the artist. Perfect for special occasions, to impress guests not only with flavor but also with appearance.
Składniki (17)
- Mąka pszenna tortowa typ 450 100 g
- Butter 60 g
- Powdered sugar 40 g
- Egg yolk 1.1 szt.
- Raspberries 200 g
- sugar 225 g
- Sheet gelatin 26 g
- White chocolate 300 g
- Śmietanka 36% 300 ml
- Milk 3.2% 75 ml
- Water 75 ml
- Glucose syrup 150 g
- Sweetened condensed milk 100 ml
- Red gel food coloring 2 g
- 🌿 Przyprawy
- Salt 0.0 szczypt
- ✨ Opcjonalne
- Świeże maliny do dekoracji 50 g
- Listki świeżej mięty 5 g
💡 Kliknij na składnik aby oznaczyć jako użyty
Preparation steps
Raspberry filling (to be prepared the day before)
Remove the saucepan from the heat. Drain the swollen gelatin from excess water by gently squeezing it in your hand. Add the drained gelatin to the hot raspberry mousse and whisk vigorously until it completely dissolves. To achieve a smooth consistency, strain the raspberry mixture through a fine sieve to remove the seeds. Pour the ready, smooth mousse into the prepared ring (16 cm). Place it in the freezer for at least 4 hours, preferably overnight, until a hard, frozen disc forms.
Crispy crust
Prepare the shortcrust base. In the bowl of a mixer, place flour (100g), powdered sugar (40g), and salt (1 pinch). Add very cold butter, cut into small cubes (60g). Using a 'K' beater (or rubbing with your fingers), mix on low speed until you achieve the consistency of wet sand or fine crumbs. Then add the egg yolk (20g) and mix only until the ingredients come together into a smooth dough. Do not knead for too long.
Form the dough into a ball, slightly flatten it, wrap it in plastic wrap, and place it in the refrigerator for at least 30 minutes. After chilling, roll out the dough between two sheets of baking paper to a thickness of about 3 mm. Cut out a circle from the dough with a diameter of 16 cm, using the same ring that the filling will be frozen in. Prick the dough with a fork in several places. Bake in an oven preheated to 170°C (convection) for about 12-15 minutes, until the bottom is golden. Allow to cool completely on a rack.
White chocolate mousse
Prepare the mousse. Soak the gelatin leaves (8g) in cold water. Chop the white chocolate (150g) into small pieces and place it in a large bowl. In a small saucepan, bring the milk (75ml) to a boil. In a separate bowl, whisk the egg yolks (40g) with the sugar (25g) until light and fluffy (kogel-mogel). While continuously stirring the yolks with a whisk, slowly pour in the hot milk in a thin stream. This is called 'tempering' the yolks, which prevents them from curdling.
Pour the egg-milk mixture back into the saucepan. Heat on low power, stirring constantly with a silicone spatula, until the cream slightly thickens and reaches a temperature of 82-84°C (it should coat the back of a spoon). This is the base for crème anglaise. Do not let it boil! Remove from heat, add the squeezed gelatin, and stir until dissolved. Pour the hot cream over the chopped white chocolate. Wait a minute, then mix with a spatula until you achieve a smooth, glossy emulsion. Cool to room temperature (about 30-35°C).
In the bowl of a mixer, place very cold 36% cream (300ml). Whip on medium speed until the cream thickens and forms soft but stable peaks. Be careful not to 'overwhip' it (curdle it). To the cooled chocolate mixture, add one large tablespoon of whipped cream and mix vigorously to loosen the structure. Then add the rest of the cream in two batches, gently folding from the bottom to the top each time to retain as much air as possible. The finished mousse should be fluffy and smooth.
Assembling the cake
Prepare a mold - a pastry ring with a diameter of 18 cm. Line the edges from the inside with acetate for a smooth finish. Place the ring on a board or flat plate. Pour about half of the white chocolate mousse into the bottom. Remove the frozen raspberry disk from the freezer and gently press it into the center of the mousse. Cover with the remaining mousse, leaving about 0.5 cm of space from the top. Gently place the cooled shortcrust base on top, pressing it down slightly. Place the entire thing in the freezer for at least 6-8 hours, preferably overnight. The cake must be completely frozen before pouring the glaze.
Mirror Glaze
Prepare the glaze. Soak the gelatin (12g) in cold water. In a saucepan, combine water (75ml), sugar (150g), and glucose syrup (150g). Heat while stirring until the sugar is completely dissolved, then bring to a boil and heat until it reaches a temperature of 103°C. Remove from heat. In a tall container (e.g., a liter cup), place the chopped white chocolate (150g) and condensed milk (100g). Pour the hot syrup over it. Add the squeezed gelatin and food coloring (2g).
Wait a minute, then use an immersion blender to emulsify the glaze. Hold the blender at an angle, fully submerged in the liquid, to avoid creating air bubbles. Blend on low speed until the mixture is perfectly smooth and uniform. If bubbles have formed, strain the glaze through a fine sieve. Cover the surface of the glaze with plastic wrap in contact and set aside to cool. The ideal temperature for coating the cake is 32-35°C.
Decoration and Serving
Remove the frozen cake from the freezer. Remove the ring and the ring foil. Place the cake (upside down) on a wire rack, placing a tray or large plate underneath (to catch any excess glaze). When the glaze reaches a temperature of 32-35°C, pour it evenly over the entire cake, starting from the center and moving towards the edges in a circular motion. Allow the excess glaze to drip off. Carefully transfer the cake using a large spatula to a cake stand or plate.
Place the cake in the refrigerator for at least 4 hours to completely thaw and stabilize. Before serving, decorate with fresh raspberries and mint leaves. Cut with a very sharp, long knife, dipped in boiling water and dried before each cut. Enjoy!
Fun Fact
Mirror glaze, or 'glaçage miroir', was popularized by French pastry chefs, but its roots trace back to techniques used in Russia for decorating Easter cakes. Perfect execution required knowledge of chemistry and physics, making it an ideal example of the combination of art and science in pastry making.
Best for
Tips
Serve the cake straight from the fridge. To achieve perfectly clean and even slices, use a long, sharp knife. Before each cut, dip it in boiling water for a few seconds, then quickly wipe it dry with a paper towel. The hot blade will smoothly cut through all the layers without damaging their structure. The dessert pairs wonderfully with a glass of chilled Prosecco or a cup of aromatic espresso.
The cake should be stored in the refrigerator, preferably in an airtight cake container, to avoid absorbing odors. It will maintain its freshness and ideal appearance for 2-3 days. After being covered with mirror glaze, it is not suitable for refreezing, as it will lose its characteristic shine and smoothness.
📸 Ugotowane przez społeczność
Zaloguj się, aby dodać zdjęcieDodaj zdjęcie gotowej potrawy
Po zatwierdzeniu przez moderatora otrzymasz 10 punktów doświadczenia.
Nikt jeszcze nie dodał zdjęcia. Bądź pierwszy!
Comments (0)
Be the first to comment on this recipe!
Add a comment