Menu

Fluffy Yogurt Cake with Strawberry Jelly Cold

Desserts Cakes and Bakes For Kids 240 min Easy 11 wyświetleń ~50.90 PLN - (0)
Rate:
(0)

Description

Here is a dessert that is the essence of summer – light, refreshing, and absolutely delightful. Fluffy Cold Yogurt Cake is a no-bake dessert that combines three excellent layers: a crunchy, buttery base made of biscuits, a creamy and slightly tangy layer based on thick Greek yogurt, and a shiny, fruity layer of jelly with fresh strawberries embedded in it. It’s the perfect choice for hot days, garden parties, or as a light finale to a family dinner. Its preparation is simple and does not require an oven, yet the final result is incredibly impressive. The balance of flavors – the sweetness of the biscuits, the subtle acidity of the yogurt, and the intense fruitiness of the strawberries – makes every bite pure pleasure. Visually, the cake looks stunning, with a clear division into layers, making it a centerpiece for any table.

Składniki (11)

Servings:
12
  • Butter cookies 200 g
  • Butter 100 g
  • Greek yogurt 10% 1000 g
  • Powdered sugar 150 g
  • Powdered gelatin 30 g
  • Cold water 100 ml
  • Vanilla extract 5 g
  • Fresh strawberries 500 g
  • Strawberry jelly 150 g
  • Gorąca woda 750 ml
  • ✨ Opcjonalne
  • Świeże listki mięty 5 g
💰 Szacowany koszt dania: ~50.90 PLN (4.24 PLN/porcję)

💡 Kliknij na składnik aby oznaczyć jako użyty

Preparation steps

Cookie crust

1

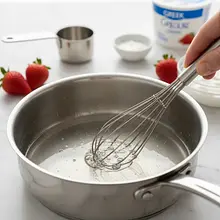
Prepare the pan. Take a 24 cm diameter springform pan. Detach the ring. Place a sheet of baking paper at the bottom, so that its edges stick out. Reattach the ring, pressing the paper down. You can trim the excess paper on the outside with scissors. This will make it easier to remove the finished cake.

Use a springform pan - this is key for easily removing the cake. If you don't have parchment paper, you can thoroughly grease the bottom and sides of the pan with butter and dust it with breadcrumbs.
2

Crush the biscuits into fine crumbs. You can do this in two ways. Method 1 (faster): place the biscuits in a food processor or blender and pulse until you achieve the consistency of wet sand. Method 2 (manual): put the biscuits in a sturdy ziplock bag, seal it while removing excess air, and roll them with a rolling pin until finely crushed.

Ingredients: Butter cookies
Make sure there are no large pieces of biscuits, as the base may be unstable. The consistency should be uniform.
3

Melt the butter. In a small saucepan over the lowest heat, warm the butter, stirring occasionally, until completely melted. Be careful not to burn it – it should be liquid, not brown. Remove from heat and set aside for 2-3 minutes to cool slightly.

Ingredients: Butter
You can also melt the butter in the microwave. Use a microwave-safe bowl and heat in 30-second intervals, stirring in between, until it is liquid.
4

Combine the ingredients and form the base. In a bowl with crushed biscuits, pour in the melted butter. Mix thoroughly with a spoon until all the crumbs are moist and the mixture resembles wet sand. Transfer the mixture to the prepared springform pan. Evenly spread it across the bottom, then press it down firmly using a glass or spoon. Place the pan in the refrigerator for at least 30 minutes to allow the base to set.

Ingredients: Butter cookies, Butter
A precise and strong pressing of the base is very important! If you do it carelessly, the base will crumble when cutting. Chilling it in the fridge will cause the butter to harden and bind everything together.

Yogurt mixture

5

Prepare the gelatin. In a small bowl, pour in the powdered gelatin and add 100 ml of cold water. Mix thoroughly and set aside for about 10 minutes. During this time, the gelatin will absorb the water and swell, forming a thick, jelly-like mass.

Ingredients: Powdered gelatin, Cold water
Never add gelatin to hot water – it will create difficult-to-dissolve lumps. Always soak it in cold liquid first.
6

Combine the filling ingredients. In a large bowl, place the chilled Greek yogurt. Add the sifted powdered sugar and vanilla extract. Using a whisk or a mixer on low speed, mix everything for about 1-2 minutes, just until the ingredients are combined into a smooth, uniform mixture. Do not whip it for too long.

Ingredients: Greek yogurt 10%, Powdered sugar, Vanilla extract
Sifting the powdered sugar will prevent lumps from forming in the mixture. Use yogurt straight from the fridge, as this will help the mixture set faster.
7

Dissolve and add the gelatin. Heat the swollen gelatin to make it liquid. You can do this in the microwave (heat for 10-15 seconds) or in a water bath (place a bowl with gelatin over a pot of hot water). Stir until it is completely liquid and clear. NOTE: Do not let it boil, as it will lose its gelling properties. To the liquid, warm gelatin, add 2-3 tablespoons of the yogurt mixture and mix vigorously (this process is called tempering). Then, in a thin stream, pour the tempered gelatin into the rest of the yogurt mixture, while continuously mixing vigorously with a whisk or mixer on low speed.

Ingredients: Powdered gelatin, Greek yogurt 10%
Tempering the gelatin is the most important step! Pouring hot gelatin directly into cold yogurt will cause 'clumps' to form and the mixture will not turn out. You need to equalize the temperatures of both ingredients.
8

Pour the mixture onto the base and chill. Remove the mold with the chilled base from the refrigerator. Pour the ready, smooth yogurt mixture onto the biscuit base. Gently smooth the surface with a spatula. Place the mold back in the refrigerator for at least 2-3 hours, or preferably until the yogurt mixture is completely set and firm to the touch.

You can gently tap the pan on the countertop to release air bubbles and achieve a perfectly smooth surface.

Strawberry layer with jelly

9

Prepare the strawberries. Wash the strawberries thoroughly under cold running water. Gently dry them with a paper towel. Remove the stems with a small knife. Cut larger fruits in half or into quarters, while smaller ones can be left whole. The goal is for the pieces to be of similar size.

Ingredients: Fresh strawberries
Make sure the strawberries are well dried. Excess water can dilute the jelly and weaken its setting.
10

Arrange the strawberries on the yogurt layer. Remove the springform pan with the set yogurt layer. Evenly distribute the prepared strawberry pieces on top. You can arrange them in a fancy pattern or simply scatter them. Gently press them into the layer so that they sink slightly.

Ingredients: Fresh strawberries
Try not to leave large gaps between the fruits so that each piece of cake has strawberries in it.
11

Prepare and cool the jelly. Pour the contents of both jelly packets into a bowl. Add 750 ml of hot, but not boiling, water. Stir vigorously with a spoon for about a minute until the entire powder dissolves and the liquid is clear. Set the jelly aside to cool completely at room temperature. It should be cool but still liquid.

Ingredients: Strawberry jelly, Gorąca woda
This is a very important step! Pouring the hot jelly over the yogurt layer will dissolve it and the layers will mix. You need to patiently wait for the jelly to cool down. This may take about an hour.
12

Pour the fruit with jelly. When the jelly is completely cold, very slowly and carefully pour it over the layer of strawberries. It's best to do this by pouring the liquid over the back of a large spoon, just above the surface of the cake. This way, the stream will be gentle and will not damage the yogurt layer.

Ingredients: Strawberry jelly
Pour the jelly slowly, starting from the edges and finishing in the center. This will minimize the risk of the fruits floating to the top.
13

Final cooling. Place the entire cake in the refrigerator for another 3-4 hours, or preferably overnight. The jelly must completely set and be firm to the touch.

Patience is the key to success. Cutting the cake too early will end in disaster. Give it time for all the layers to bind well.

Decoration and serving

14

Remove the cake from the mold. Before opening the springform pan, run a thin, sharp knife along the inner edge of the pan. This will separate the cake from the sides and prevent it from getting damaged. Then carefully unclip the ring and remove it. Transfer the cake (along with the paper on the bottom) to a serving platter.

You can gently warm the sides of the springform pan with a hairdryer for a few seconds. This will make the cake come off the pan perfectly.
15

Decorate and serve. Before serving, top the cake with fresh mint leaves. Additionally, to enhance the flavor and appearance, you can sprinkle it with white chocolate shavings. Cut the cake with a sharp knife, briefly dipped in hot water and dried – this will give you perfectly even pieces.

Ingredients: Świeże listki mięty
Always serve the cake well chilled, straight from the fridge. That's when it tastes best and retains its firm shape.

Fun Fact

💡

No-bake cakes, such as yogurt cake, gained immense popularity in the mid-20th century with the widespread availability of refrigerators and commercially available powdered gelatin. They were marketed as modern, quick, and energy-saving desserts perfect for busy homemakers.

Best for

Tips

🍽️ Serving

The yogurt cake is best served very chilled. Each piece can be additionally decorated with a dollop of whipped cream and a fresh strawberry. It pairs wonderfully with a light fruit sauce (raspberry or strawberry puree) or a few leaves of fresh lemon balm.

🥡 Storage

The cake should be stored in the refrigerator, covered with plastic wrap or in an airtight container, to prevent it from absorbing odors. It stays fresh for 3-4 days. It is not suitable for freezing, as the yogurt filling and jelly will lose their consistency after thawing.

📸 Ugotowane przez społeczność

Zaloguj się, aby dodać zdjęcie
Dodaj zdjęcie gotowej potrawy

Po zatwierdzeniu przez moderatora otrzymasz 10 punktów doświadczenia.

🍲

Nikt jeszcze nie dodał zdjęcia. Bądź pierwszy!

Comments (0)

Be the first to comment on this recipe!

Add a comment

You might also like

Recipe Categories

Desserts
Desserts in: Christmas Eve Dinner

Desserts are a sweet ending to a meal that brings joy to both children and adults. In this category, we present recipes for a variety of sweets - from simple creams and mousses, to elegant panna cottas, and exquisite fruit tarts. Our desserts include both classics of Polish cuisine - fruit jelly,...

See all recipes in this category

Homemade cakes and pastries are the heart of Polish culinary tradition - sweet memories from childhood. In our collection, you will find recipes for classic yeast cakes, shortcrust, sponge, and cheesecake. Apple pie, poppy seed cake, gingerbread, Easter babka, chocolate cake, and New York cheesec...

See all recipes in this category

Recipes for kids are tasty, healthy, and visually appealing dishes - for little picky eaters and food lovers. Colorful and fun dishes: animals made from vegetables, faces from food, and rainbow plates. Hidden vegetables: spinach in pancakes, carrots in sauce, and zucchini in batter. Energetic bre...

See all recipes in this category

Dishes for special occasions are culinary masterpieces for birthdays, anniversaries, and holidays. Grilled beef steak with herb butter - restaurant quality at home. Beef Wellington - beef in puff pastry with duxelles. Roast duck with apples - a holiday tradition in a new edition. Pink salmon with...

See all recipes in this category
Reklama