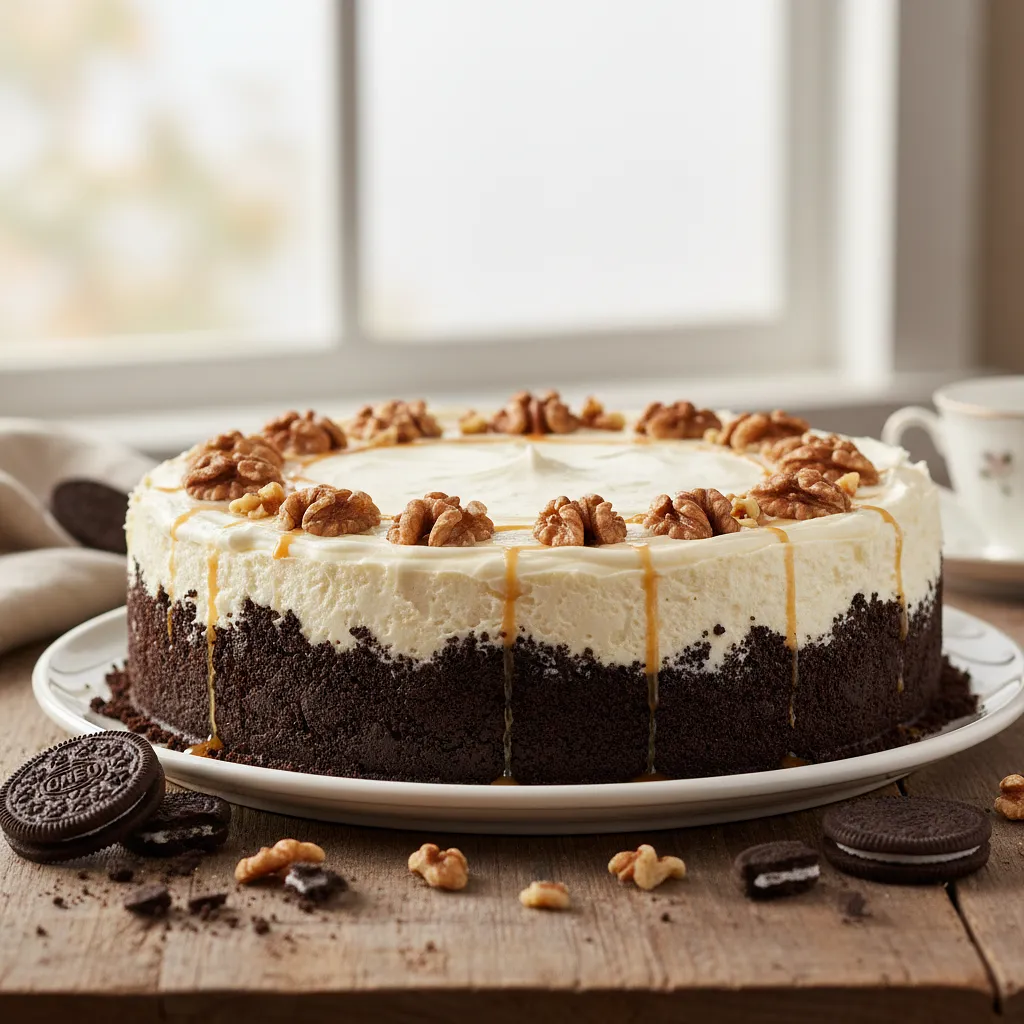
Prepare a 24 cm diameter springform pan. Open it and place a sheet of parchment paper at the bottom. Secure the springform ring so that the paper is held in place. Trim any excess paper sticking out with scissors. This will prevent the cheesecake from sticking to the bottom and make it easy to transfer to a serving platter.
Description
Here is a dessert that is the dream come true for every peanut butter and chocolate lover. Velvet No-Bake Peanut Butter Cheesecake on an Oreo Crust is a sophisticated blend of flavors and textures that doesn't require an oven. Its foundation is a crunchy, intensely cocoa-flavored crust made from Oreo cookies, which perfectly contrasts with the incredibly creamy and smooth cheese filling with a deep, nutty flavor. The whole is topped with a glossy dark chocolate glaze that cuts through the sweetness and adds elegance to the dessert. This cheesecake is not only incredibly delicious but also easy to prepare, making it the perfect choice for special occasions, gatherings with friends, or simply as a remedy for a bad day. Served cold, it melts in your mouth, leaving a lasting impression of luxury.
Składniki (12)
- Oreo cookies 300 g
- Butter 100 g
- Twaróg sernikowy z wiaderka 1000 g
- Smooth peanut butter 400 g
- Powdered sugar 150 g
- 36% heavy cream 350 ml
- Powdered gelatin 20 g
- Cold water 60 ml
- Vanilla extract 10 g
- Dark chocolate 70% 150 g
- ✨ Opcjonalne
- Salted peanuts 50 g
- Mini pretzels 30 g
💡 Kliknij na składnik aby oznaczyć jako użyty
Preparation steps
Preparing the base
Place the Oreo cookies (whole, with the cream) in a food processor or blender. Pulse for about 1-2 minutes until you achieve a wet sand consistency. If you don't have a food processor, put the cookies in a strong zip-top bag, seal it while removing the air, and crush them thoroughly with a rolling pin or meat mallet.
In a small saucepan over the lowest heat, melt the butter. Stir occasionally to prevent it from burning. As soon as the butter has melted, remove it from the heat. You can also melt the butter in the microwave by heating it in a bowl in 30-second intervals.
Pour the crushed cookies into a medium-sized bowl. Add the melted, slightly cooled butter and mix everything thoroughly with a spoon or spatula. Stir until all the crumbs are evenly moistened with the butter. The consistency should resemble wet sand that clumps together when squeezed in your hand.
Transfer the cookie dough to the prepared springform pan. Evenly spread it across the bottom, then press it down firmly using the bottom of a glass or a small measuring cup. Create an even, compact layer. Place the springform pan in the refrigerator for at least 30 minutes to allow the base to set. In the meantime, you will prepare the cheese mixture.
Preparation of the cheese filling
In a small bowl, add the gelatin and pour in 60 ml of cold water. Mix and set aside for about 10 minutes until the gelatin swells and absorbs all the water, forming a thick, sponge-like mass.
In a large, chilled bowl, place 200 ml of very cold 36% heavy cream. Whip it with a mixer on the highest speed. Start at a lower speed and gradually increase. Whip for 2-3 minutes until the cream becomes thick and stiff, forming distinct 'peaks' that do not fall. Be careful not to 'overwhip' it (curdle it). Set the whipped cream aside in the refrigerator.
In a second, very large bowl, place the cream cheese (at room temperature), smooth peanut butter, sifted powdered sugar, and vanilla extract. Mix everything together on medium speed for about 3-4 minutes, until the ingredients are perfectly combined and the mixture is smooth, creamy, and free of lumps. Scrape down the sides of the bowl during mixing.
Soak the gelatin and then gently heat it. You can do this in the microwave (5-10 seconds) or in a water bath. Stir until it becomes completely liquid and clear. ABSOLUTELY DO NOT BOIL IT, as it will lose its gelling properties. To the hot, liquid gelatin, add 2-3 tablespoons of the prepared cheese mixture and vigorously mix with a whisk. Then, pour the prepared mixture (tempered gelatin) in a thin stream into the rest of the cheese mixture, while continuously mixing on low speed.
Take the whipped cream out of the fridge. Add it to the cheese-nut mixture in two or three batches. Using a large silicone spatula, very gently fold the cream into the mixture. Make slow, circular motions from the bottom of the bowl upwards. Mix only until the ingredients are combined. The goal is to retain as much air from the whipped cream as possible, which will give the cheesecake its lightness.
Assembling and chilling the cheesecake
Take the springform pan with the chilled base out of the fridge. Transfer the entire cheese mixture onto it. Smooth the top using a spatula or the back of a spoon, trying to achieve the flattest surface possible.
Place the cheesecake in the refrigerator for at least 4-6 hours, preferably overnight. The cake must set completely before you add the topping. A well-chilled cheesecake will be stable and easy to slice.
Preparation of the glaze and decoration
When the cheesecake is well chilled and firm, prepare the topping. Break the chocolate into small pieces and place them in a heatproof bowl. In a small saucepan, heat 150 ml of heavy cream (36%). Heat it until it is very hot, but do not bring it to a boil (small bubbles will appear at the edges). Pour the hot cream over the chocolate pieces. Let it sit for 2-3 minutes without stirring.
After 2-3 minutes, start gently stirring the mixture with a whisk or a small spatula, beginning from the center of the bowl and making small, circular motions. Gradually expand your movements until all the chocolate has melted and a smooth, shiny, uniform emulsion forms. Set the ganache aside for about 10-15 minutes to cool slightly. It should still be liquid but no longer hot.
Take the set cheesecake out of the fridge. Pour the cooled ganache over the top. Gently tilt the springform pan from side to side so that the ganache evenly covers the entire surface, creating a smooth layer. You can use a spatula to help spread the ganache all the way to the edges.
Before the glaze completely sets, decorate the top of the cheesecake. Additionally, you can sprinkle it with coarsely chopped salted peanuts, arrange a few mini pretzels, or sprinkle with chocolate shavings. Arrange the decorations as you wish - you can create a wreath along the edge or an artistic mess in the center.
Place the decorated cheesecake back in the refrigerator for at least 30 minutes to allow the chocolate glaze to set completely.
To remove the cheesecake from the pan, carefully run a thin, long knife along the inner edge of the springform pan, separating the cake from the rim. Then gently unclip the latch and remove the rim. To cut the cheesecake into perfect portions, use a large, sharp knife dipped for a moment in hot water and dried before each cut. Serve immediately after taking it out of the fridge.
Fun Fact
The combination of peanut butter and chocolate is a classic of American confectionery, popularized by the company Reese's, which launched the famous 'Peanut Butter Cups' in 1928. This flavor combination is so beloved that it even has its unofficial holidays in the USA.
Best for
Tips
Serve the cheesecake always well chilled, straight from the fridge. Each piece will look stunning on its own plate. You can additionally drizzle it with caramel sauce or serve it with a scoop of vanilla ice cream to enhance the flavor experience.
Store the cheesecake in the refrigerator, in an airtight container or covered, to prevent it from absorbing odors. It will stay fresh for 4-5 days. You can also freeze it (preferably without the pretzel decoration) – cut it into portions, wrap each one in foil, and store in the freezer for up to 1 month. Thaw slowly in the refrigerator.
📸 Ugotowane przez społeczność
Zaloguj się, aby dodać zdjęcieDodaj zdjęcie gotowej potrawy
Po zatwierdzeniu przez moderatora otrzymasz 10 punktów doświadczenia.
Nikt jeszcze nie dodał zdjęcia. Bądź pierwszy!
Comments (0)
Be the first to comment on this recipe!
Add a comment