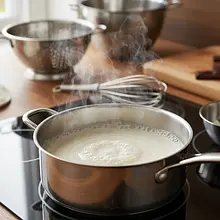
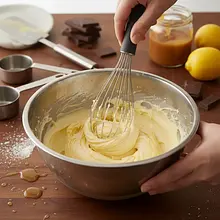
Start by preparing the pudding. In a medium saucepan, pour in 750 ml of milk and begin heating it over medium heat. In a separate bowl, place the pudding powder and sugar. Pour in the remaining 250 ml of cold milk and mix everything very thoroughly with a whisk until you achieve a smooth, uniform mixture without any lumps.
Description
Here is a no-bake cake that is the essence of delight for the palate and a true work of pastry art, achievable in the comfort of your home. 'Chocolate Fantasy' is a multi-layered dessert that combines the deep, cocoa flavor of biscuits, a velvety, vanilla pudding cream made with real butter, sweet and gooey caramel, all complemented by a refreshing, slightly tangy layer of mascarpone cream and lemon curd. The whole is topped with a rich dark chocolate glaze and crunchy almond flakes. This cake is proof that you don't need an oven to create a spectacular dessert. It is perfect for family celebrations, parties, or as a sweet reward after a tough week. Its preparation is simple, though it requires patience and chilling, but the final effect rewards every minute of waiting.
Składniki (11)
- Chocolate biscuits 400 g
- Milk 3.2% 1100 ml
- Sugar-free cream pudding 80 g
- White sugar 100 g
- Extra butter 82% 200 g
- Dulce de leche 400 g
- Serek mascarpone 500 g
- Lemon curd 200 g
- Dark chocolate 70% 150 g
- 30% heavy cream 150 ml
- ✨ Opcjonalne
- Almond flakes 30 g
💡 Kliknij na składnik aby oznaczyć jako użyty
Preparation steps
Vanilla Pudding Cream
When the milk in the pot starts to boil (you will see steam rising and small bubbles at the edges), reduce the heat to the minimum. While continuously stirring the hot milk with a whisk, slowly pour in the mixed pudding powder in a thin stream. Do not stop stirring vigorously! Cook the mixture for about 1-2 minutes until the pudding thickens noticeably and starts to 'bubble'. Remove the finished, thick pudding from the heat.
Transfer the hot pudding to a bowl. Place a piece of plastic wrap directly on the surface of the pudding so that it touches the entire surface. This will prevent a hard 'skin' from forming. Set the pudding aside to cool completely at room temperature. This will take about 1-2 hours. Do not put hot pudding in the refrigerator.
When the pudding is completely cold, prepare the cream. In a large bowl, place the butter, which should have been taken out of the fridge beforehand to reach room temperature and become soft. Using a mixer with whisk attachments, beat the butter on high speed for about 5-7 minutes until it becomes white, fluffy, and doubles in volume. Then, without stopping the mixing, add the cooled pudding one tablespoon at a time. Only add the next portion of pudding when the previous one has perfectly combined with the mixture.
Preparing the Pan and Assembling the Cake
Prepare a square baking dish measuring about 24x24 cm. Line it with parchment paper so that the paper extends beyond the edges of the dish – this will make it easier to remove the cake later. Place the first layer of biscuits on the bottom of the dish, side by side, trying to cover the entire surface. If necessary, trim the biscuits to fit the dish.
Spread half of the prepared custard cream over the arranged biscuits. Evenly distribute it using a spatula or the back of a spoon, creating a smooth layer. Place another layer of biscuits on top of the cream.
Open the can of dulce de leche. If the mixture is very thick, you can gently warm it in a water bath or for a few seconds in the microwave to make it more fluid and easier to spread. Spread the entire dulce de leche on the second layer of biscuits and distribute it evenly. Place the third layer of biscuits on top of the dulce de leche.
On the third layer of biscuits, spread the remaining part of the custard cream and smooth it out. On top of the custard cream, place the fourth and final layer of biscuits. On top, spread the entire lemon mascarpone cream and gently smooth it out, creating the final, smooth layer of the cake. Place the cake in the refrigerator for at least 30 minutes to let the cream set slightly before pouring the glaze.
Lemon Cream with Mascarpone
In a clean bowl, place the well-chilled mascarpone cheese and lemon curd. Using a mixer on medium speed, mix both ingredients just until they combine into a smooth, uniform cream. This usually takes a very short time, about 30-60 seconds. Overmixing may cause the cheese to curdle.
Chocolate Ganache and Decoration
Prepare the glaze. Break the chocolate into small pieces and place it in a heatproof bowl. In a small saucepan, heat the heavy cream until it is very hot, but do not bring it to a boil (bubbles should appear at the edges). Pour the hot cream over the chocolate pieces. Wait a minute without stirring, so the chocolate softens from the heat. After a minute, begin to gently stir the mixture with a spoon or spatula, from the center outwards, until you achieve a smooth, shiny, and uniform glaze.
Remove the cake from the fridge. Pour the slightly cooled but still liquid ganache over the top of the cake. Gently move the pan side to side to ensure the ganache evenly covers the entire surface. If you are using almond flakes, sprinkle them on top of the cake while the ganache is still wet. Place the cake in the fridge for at least 4-6 hours, preferably overnight. During this time, the biscuits will soften, and the flavors will meld together.
Fun Fact
No-bake cakes, known in Poland as 'cold cheesecakes' or 'layered cakes', gained immense popularity during the PRL era. They were a clever way to create an impressive dessert at a time when access to good ovens was limited, and ingredients like biscuits, pudding, and butter were more readily available than, for example, almond flour or exotic fruits.
Best for
Tips
The cake tastes best when well chilled. Use a long, sharp knife for cutting, dipped briefly in hot water and dried before each cut. This will ensure perfectly smooth and even pieces, showcasing all the layers. Serve with a cup of black coffee or unsweetened tea to balance the sweetness of the dessert.
Store the dough in the refrigerator, in an airtight container or covered with plastic wrap, to prevent it from absorbing odors. It can be stored for 3-4 days. With each passing day, the cookies become more moist, and the dough becomes denser and 'soaked in'.
📸 Ugotowane przez społeczność
Zaloguj się, aby dodać zdjęcieDodaj zdjęcie gotowej potrawy
Po zatwierdzeniu przez moderatora otrzymasz 10 punktów doświadczenia.
Nikt jeszcze nie dodał zdjęcia. Bądź pierwszy!
Comments (0)
Be the first to comment on this recipe!
Add a comment