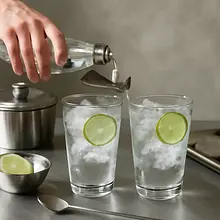
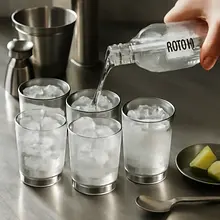
Start by chilling the glass. If you are using highball glasses or large gin glasses, place them in the refrigerator for 10–15 minutes or fill them briefly with ice and cold water for 5 minutes, then pour out the water. A chilled glass helps keep the drink cold for longer.
Description
The classic Gin & Tonic is a simple, elegant cocktail made of gin and tonic, served with ice and most often garnished with a slice of lime. It originates from 19th-century colonial Britain, where gin and tonic served as a way to consume quinine. The drink has a distinct, refreshing flavor: herbal and spicy notes of gin, the sweet-bitter note of tonic, and the fresh acidity of lime. Appearance: bright, clear, with plenty of ice and decoration, it looks elegant for New Year's Eve 2025, during which the sound of tonic bubbles and juicy garnishes add to the visual effect. Serve in highball glasses or in a large gin glass, as an aperitif or part of a cocktail menu.
Składniki (6)
- Gin 200 ml
- Tonic water 600 ml
- Ice (cubes) 400 g
- Lime 1.2 szt.
- ✨ Opcjonalne
- Cucumber (slices) 50 g
- Sprig of rosemary 1 pęczek
💡 Kliknij na składnik aby oznaczyć jako użyty
Preparation steps
Preparation
Prepare the ingredients and tools: a bottle of gin, a bottle of well-chilled tonic, a bowl of ice, a cutting board, a sharp knife for the lime, a bar jigger or a 50 ml measuring cup, 4 highball glasses, and 4 small spoons or stirrers.
Cut the lime: wash the lime under running water, dry it. Place it on a cutting board and cut it into four wedges or slice it into thin half-moons depending on your decorative preference. For 4 drinks, 4 wedges will be enough (1 wedge per glass). If you want to add a bit of juice, squeeze one wedge gently over a measuring cup.
Drink Assembly
Fill each of the 4 glasses with ice cubes to about 3/4 of the height of the glass. Do not pack the ice too tightly - the cubes should have spaces between them so that the tonic can fizz freely.
For each glass, measure out a portion of gin: for 4 servings, pour a total of 200 ml of gin, which is 50 ml for each glass. The easiest way is to use a jigger (50 ml) or measure 50 g of gin on a scale. Slowly pour the gin over the ice cubes so that the alcohol does not immediately mix with the ice.
Add tonic to each glass: for 4 servings, pour a total of 600 ml of tonic, which is 150 ml into each glass. Open the bottle of tonic just before pouring (to keep the fizz), and tilt the glass slightly, pouring the tonic slowly along the spoon or the side of the glass to minimize the loss of bubbles and avoid excessive frothing.
Finishing and decoration
Gently stir the drink 2–4 turns with a teaspoon or stirrer, just to combine the gin and tonic. Do not stir too vigorously — intense stirring increases dilution from the melting ice and will reduce the fizz of the tonic. Add a quarter of a lime to each drink and optionally cucumber slices and a sprig of rosemary, lightly crushed between your fingers (to release the aroma) and placed as a garnish.
Serving
Serve the drinks immediately after preparation, while the tonic is still highly carbonated. Place each drink on a coaster/bar mat, provide a small spoon for stirring for guests, and optionally serve additional lime wedges on the side.
Fun Fact
Gin & Tonic was created by combining gin and tonic (with quinine), which was used in colonial India as an anti-malarial remedy; it quickly became a popular aperitif due to its pleasant, refreshing taste.
Best for
Tips
Serve in chilled highballs or large gin glasses. Use thicker ice cubes (large cubes melt slower). For a more pronounced aroma, gently crush a slice of lime over the glass to release the oils. Pairs well with tapas and light appetizers.
The prepared drink is not suitable for long-term storage — tonic quickly loses its fizz. Store the bottle of tonic in the refrigerator before use. If there is some spilled gin left, store the bottle of gin in a cool, dark place. Keep ice in the freezer in a clean container.
📸 Ugotowane przez społeczność
Zaloguj się, aby dodać zdjęcieDodaj zdjęcie gotowej potrawy
Po zatwierdzeniu przez moderatora otrzymasz 10 punktów doświadczenia.
Nikt jeszcze nie dodał zdjęcia. Bądź pierwszy!
Comments (0)
Be the first to comment on this recipe!
Add a comment