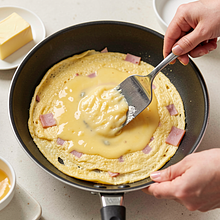
Prepare the ingredients: measure and arrange all the products within reach. Cut the ham into cubes about 5-7 mm on each side. Grate the cheese on a coarse grater. If you are using chives, wash them and chop finely. Cut the tomato into slices or cubes, if you are using it.
Description
A delicate, fluffy omelet with ham and cheese is a classic Polish breakfast prepared in just a few minutes. Eggs are beaten with a bit of milk, which makes the omelet creamier, and the addition of ham and melted cheese gives it a bold yet not overwhelming flavor. The dish is aromatic, with a golden, slightly crispy crust on the outside and a soft, creamy center. It pairs wonderfully with a slice of crunchy rye bread, fresh tomatoes, or spring green vegetables. This quick, filling, and versatile dish can be enhanced with herbs or seasonal ingredients as desired.
Ingredients Used
Ingredients (9)
- Chicken egg 3 szt. (~180 g)
- Cooked ham 100 g
- Cheese 80 g
- Milk 30 ml
- Butter 20 g
- 🌿 Przyprawy
- Salt 1 g
- Black pepper 2 szczypty (~1 g)
- ✨ Opcjonalne
- Chives 0.1 pęczków (~10 g)
- Tomato 0.5 szt. (~60 g)
💡 Kliknij na składnik aby oznaczyć jako użyty
Preparation steps
Preparation of ingredients
Preparation of the egg mixture
In a large bowl, crack the eggs (180 g or 3 eggs). Add the milk (30 ml), salt (1 g), and black pepper (1 g). First, beat the eggs with a fork, then whisk vigorously for about 20-30 seconds until the egg whites and yolks combine into a uniform, slightly frothy mixture. The mixture should be homogeneous and slightly fluffy.
Sautéing the ham
Heat a 24-26 cm skillet over medium heat. Add butter (20 g) and wait until it melts and starts to foam slightly (about 30-40 seconds). Add the diced ham (100 g) and fry for 1-2 minutes until it is lightly browned and releases its aroma. The ham does not need to be very browned — it should just be warmed through.
Frying the omelette
Reduce the heat to medium-low. Pour the beaten eggs evenly into the pan with the sautéed ham. Wait 10-15 seconds until the edges start to set. Using a spatula, gently pull the set edges towards the center, tilting the pan so that the liquid mixture flows to the sides. Cook for 2-3 minutes until the surface is almost set but still slightly wet.
Adding cheese and finishing touches
When the omelet is almost set, evenly sprinkle grated cheese (80 g) over half of the omelet's surface. You can also distribute the cheese evenly over the entire surface. Cover the pan with a lid for 30-60 seconds to allow the cheese to melt and the omelet to finish cooking inside. Then, using a wide spatula, fold the omelet in half or gently roll it up.
Seasoning and serving
Transfer the omelet to a warm plate. If you are using chives (10 g), sprinkle them over the omelet. Serve with diced tomato (60 g) and a slice of fresh bread. Season to taste with salt and pepper, if needed. Serve immediately; the omelet tastes best when it is still warm and the cheese is slightly gooey.
Variations and tips
If you want a fluffier omelet, separate the egg whites from the yolks and beat the egg whites until stiff peaks form, then gently fold them into the egg mixture. You can also add a spoonful of sour cream or buttermilk instead of milk to the mixture. For an herb version, add chopped fresh herbs (e.g., parsley).
Fun Fact
Omelet is one of the oldest dishes in the world — even the ancient Romans prepared simple egg dishes. In Poland, omelet has been served both for breakfast and as a light dinner.
Best for
Tips
Serve the omelet immediately, preferably on a warmed plate. It pairs well with dark bread, herb butter, fresh vegetables (tomato, cucumber), and sour cream or cottage cheese as a side.
Omelet is best eaten immediately; storing it in the fridge will cause it to lose its fluffiness. If you want to store leftovers, cool them quickly, transfer to an airtight container, and consume within 24 hours. Gently reheat in a pan over low heat, covered, for 1-2 minutes.
📸 Ugotowane przez społeczność
Zaloguj się, aby dodać zdjęcieDodaj zdjęcie gotowej potrawy
Po zatwierdzeniu przez moderatora otrzymasz 10 punktów doświadczenia.
Nikt jeszcze nie dodał zdjęcia. Bądź pierwszy!
Comments (0)
Be the first to comment on this recipe!
Add a comment