Menu

Sweet Intrigue of the Mother-in-Law - No-Bake Cake

Cakes and Bakes Desserts Dishes for Special Occasions 240 min Medium 4 wyświetleń ~65.75 PLN - (0)
Rate:
(0)

Description

Here’s a dessert that is a true masterpiece of flavor and elegance, and it doesn’t require an oven! "Sweet Mother-in-Law's Intrigue" is my original variation on popular no-bake cakes, created to delight and surprise. It consists of four perfectly composed layers. A crunchy base made of chocolate cookies provides a solid foundation for a velvety, slightly tangy cheese filling with an intense lemon flavor. This is the heart of the intrigue – its refreshing character wonderfully contrasts with the next layer: a delicate, sweet mousse made of white chocolate and exotic coconut. The whole is topped with a shiny, ruby jelly with fresh raspberries suspended in it, which adds not only fruity freshness but also a spectacular appearance to the dessert. This cake is perfect for family celebrations, parties, or summer afternoons. Serve it chilled, cutting with a sharp knife to fully reveal the beauty of its layers.

Składniki (12)

Servings:
10
  • Chocolate cookies (e.g. Oreo without filling or similar) 200 g
  • Butter 100 g
  • Twaróg sernikowy z wiaderka 500 g
  • Powdered sugar 150 g
  • Lemon 3 szt.
  • 36% heavy cream 400 ml
  • Powdered gelatin 25 g
  • White chocolate 200 g
  • Thick coconut milk (solid part) 200 ml
  • Raspberry jelly 75 g
  • Fresh raspberries 150 g
  • ✨ Opcjonalne
  • Fresh mint 0.3 pęczków
💰 Szacowany koszt dania: ~65.75 PLN (6.58 PLN/porcję)

💡 Kliknij na składnik aby oznaczyć jako użyty

Preparation steps

Cookie Crust

1

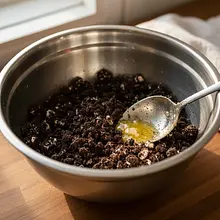
Prepare a 24 cm diameter springform pan. Line the bottom of the pan with parchment paper, securing it with the clasp. Place the chocolate cookies in a food processor or a strong blender and blend them into fine crumbs. If you don't have a blender, put the cookies in a sturdy ziplock bag and crush them thoroughly using a rolling pin. Melt the butter in a small saucepan over low heat, then let it cool slightly.

Ingredients: Chocolate cookies (e.g. Oreo without filling or similar), Butter
Use a springform pan - this is key for easily removing the cake. Make sure the cookies are really finely crushed, without larger pieces, which will ensure the consistency of the base.
2

Pour the crushed cookies into a bowl. Add the melted butter and mix thoroughly with a spoon until all the crumbs are moist and the mixture resembles wet sand. Transfer the prepared mixture to a springform pan. Using the bottom of a glass or a spoon, press down firmly and evenly to compact the base. Place the springform pan in the refrigerator for at least 30 minutes to allow the base to set.

Ingredients: Chocolate cookies (e.g. Oreo without filling or similar), Butter
It is very important to press the cookie dough firmly to the bottom. The better you compress it, the less it will crumble when cutting. Chilling the base is crucial before pouring the first layer.

Lemon Mixture

3

Start by preparing the gelatin. In a small bowl, add 15g of gelatin (about 3 level teaspoons) and pour in 4-5 tablespoons of cold water. Mix and set aside for 10 minutes to swell. In the meantime, wash and sterilize the lemons thoroughly. Grate the zest from one lemon using a fine grater, and then squeeze the juice from both lemons.

Ingredients: Powdered gelatin, Lemon
Use only cold water to soak the gelatin; hot water will cause lumps to form. Remember to grate only the yellow part of the peel; the white part (albedo) is bitter and will ruin the flavor of the mixture.
4

In a large bowl, transfer the chilled cheesecake cottage cheese. Add 100g of powdered sugar, grated lemon zest, and the squeezed juice of the lemons. Using a mixer on medium speed, mix everything for 2-3 minutes until the ingredients combine into a smooth, uniform mass. Heat the bloomed gelatin in the microwave (about 15-20 seconds) or in a water bath, just until completely dissolved. Do not let it boil!

Ingredients: Twaróg sernikowy z wiaderka, Powdered sugar, Lemon, Powdered gelatin
A water bath is a safe way to dissolve gelatin: place a bowl with gelatin over a pot of gently simmering water. Make sure the cottage cheese is at room temperature to avoid thermal shock when adding the gelatin.
5

To the melted, slightly cooled gelatin, add one large tablespoon of the cheese mixture and mix vigorously. This is called 'tempering' the gelatin. Then repeat the process with another tablespoon of the mixture. Pour the prepared mixture in a thin stream into the rest of the cheese mixture, while continuously mixing on low speed, until the ingredients are perfectly combined.

Ingredients: Twaróg sernikowy z wiaderka, Powdered gelatin
Hardening the gelatin is key! Pouring hot gelatin directly into the cold cheese mixture will cause gelatin 'clumps' to form. Work quickly, as the mixture with gelatin sets fast.
6

In a separate, clean, and dry bowl, whip 200 ml of very well-chilled heavy cream. Start at a low speed with the mixer, gradually increasing to maximum. Whip until the cream is stiff and leaves clear marks from the beaters. Add the whipped cream to the cheese mixture in two batches. Gently fold everything together with a spatula, making motions from the bottom to the top to maintain fluffiness. Pour the finished mixture onto the chilled cookie crust, smooth the surface, and place it in the refrigerator for about 1-2 hours until it sets.

Ingredients: 36% heavy cream
The bowl and the whisk attachments for whipping cream must be perfectly clean and chilled, which will speed up the whipping process. Do not whip the cream for too long, or you will make butter! Gently fold the mixtures together to avoid losing the airiness.

Coconut-Chocolate Mixture

7

When the lemon mixture sets, prepare the second layer. Soak the remaining 10g of gelatin (about 2 teaspoons) in 3 tablespoons of cold water and set aside. Break the white chocolate into small pieces and place it in a bowl. In a small saucepan, heat the solid part of the coconut milk, but do not bring it to a boil. Pour the hot milk over the chocolate, wait a minute, and then mix with a whisk until you achieve a smooth, glossy emulsion. Set aside to cool slightly.

Ingredients: Powdered gelatin, White chocolate, Thick coconut milk (solid part)
For this layer, use only the thick cream from the top of the chilled coconut milk can. The watery part can be used for smoothies or soups. The chocolate must be completely melted.
8

Dissolve the soaked gelatin as in the previous layer. Temper it by adding a tablespoon of the chocolate-coconut mixture, mix, and then pour it into the rest of the mixture, stirring vigorously. In a separate bowl, whip the remaining 200 ml of chilled heavy cream with 50g of powdered sugar until stiff peaks form. Gently fold the whipped cream into the chocolate mixture using a spatula. Remove the cake from the fridge and carefully pour the coconut mixture over the set lemon layer. Smooth it out and return it to the fridge for at least 1-2 hours.

Ingredients: Powdered gelatin, White chocolate, Thick coconut milk (solid part), 36% heavy cream, Powdered sugar
Make sure the lemon layer is well set before pouring the next mixture on top. Otherwise, the layers may mix. The chocolate mixture should not be hot when combined with the whipped cream, as the cream will melt.

Raspberry Jelly

9

When the second layer of the cake is firm, prepare the jelly. Pour the contents of the package into a bowl and add 400 ml of hot, but not boiling water (use slightly less water than indicated in the package instructions for a firmer jelly). Stir thoroughly until the powder is completely dissolved. Set the jelly aside to cool completely and until it starts to thicken slightly (it should have a consistency similar to jelly).

Ingredients: Raspberry jelly
Never pour hot jelly over the cake, as it will dissolve the top layer of cream. You can recognize the thickening jelly when, if you tilt the container, it flows slowly rather than splashing like water.
10

Take the cake out of the fridge. Evenly distribute fresh raspberries on top of the set coconut layer. Then, very carefully, using a ladle, pour the setting jelly over the fruit, starting from the edges and finishing in the center. Place the cake in the fridge for the last 2-3 hours, or preferably overnight, so that all layers set perfectly and the flavors meld together.

Ingredients: Raspberry jelly, Fresh raspberries
Gently pouring the jelly with a spoon will prevent the fruits from floating to the surface and moving around. Patience is key - the longer the cake cools, the more stable and tastier it will be.

Decoration

11

Before serving, carefully run a thin, long knife along the edges of the springform pan to separate the cake from the mold. Then gently unclip the ring. Optionally, decorate the top of the cake with fresh mint leaves. Serve well chilled.

Ingredients: Fresh mint
To achieve perfectly smooth edges, you can briefly warm the sides of the springform pan with a hairdryer before removing it. For cutting, use a long, sharp knife dipped in boiling water and dried before each cut - this will ensure even, clean portions.

Fun Fact

💡

No-bake cakes, known in England as 'icebox cakes', gained immense popularity in the 1920s and 1930s with the rise of refrigerators in homes. They were promoted as a modern and easy way to prepare an impressive dessert without the need to turn on a hot oven.

Best for

Tips

🍽️ Serving

Cut the cake into portions just before serving to maintain its perfect temperature and texture. Serve each piece on a separate plate, garnishing it with a mint leaf. It pairs wonderfully with a cup of espresso, which balances the sweetness of the dessert, or with a glass of chilled, semi-sweet sparkling wine.

🥡 Storage

Store the cake in the refrigerator, covered with plastic wrap or under a special cake dome, to prevent it from absorbing odors. It tastes best within 2-3 days of preparation. It is not suitable for freezing due to the high content of gelatin and dairy, which may lose their consistency after thawing.

📸 Ugotowane przez społeczność

Zaloguj się, aby dodać zdjęcie
Dodaj zdjęcie gotowej potrawy

Po zatwierdzeniu przez moderatora otrzymasz 10 punktów doświadczenia.

🍲

Nikt jeszcze nie dodał zdjęcia. Bądź pierwszy!

Comments (0)

Be the first to comment on this recipe!

Add a comment

You might also like

Recipe Categories

Homemade cakes and pastries are the heart of Polish culinary tradition - sweet memories from childhood. In our collection, you will find recipes for classic yeast cakes, shortcrust, sponge, and cheesecake. Apple pie, poppy seed cake, gingerbread, Easter babka, chocolate cake, and New York cheesec...

See all recipes in this category
Desserts
Desserts in: New Year's Eve

A sweet ending to the New Year's Eve dinner is a must-have that will put everyone in a joyful mood for the new year.

See all recipes in this category

Dishes for special occasions are culinary masterpieces for birthdays, anniversaries, and holidays. Grilled beef steak with herb butter - restaurant quality at home. Beef Wellington - beef in puff pastry with duxelles. Roast duck with apples - a holiday tradition in a new edition. Pink salmon with...

See all recipes in this category

European cuisine is a mosaic of culinary traditions from the Old Continent - from Spain to Scandinavia. Valencian paella and tapas from Spain - sunshine on a plate. Boeuf bourguignon and ratatouille from France - elegance and finesse. Wiener schnitzel and strudel from Austria - Central European c...

See all recipes in this category
Reklama