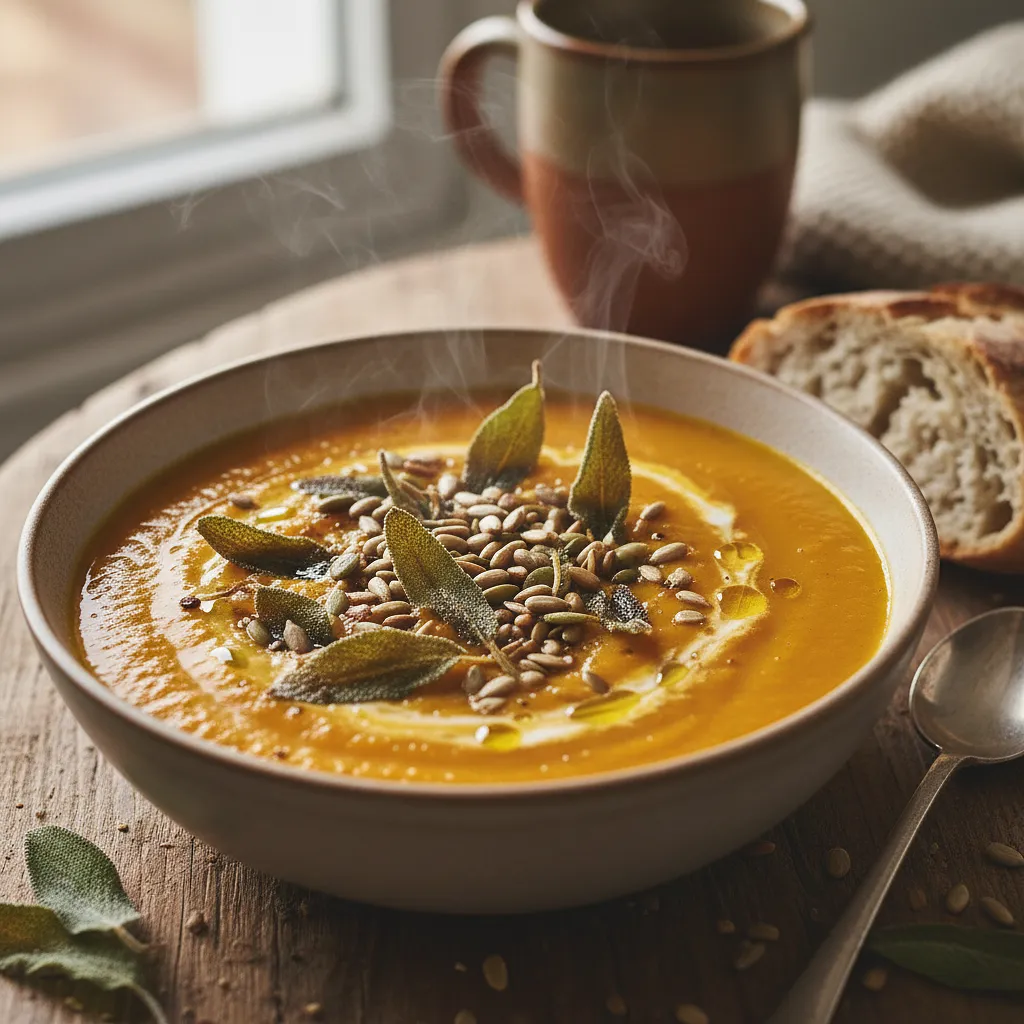
This is the essence of autumn captured in a bowl. Velvety, thick, and incredibly aromatic roasted Hokkaido pumpkin soup is a dish that warms both the body and soul. The process of roasting vegetables before cooking brings out their natural sweetness and deep, slightly nutty flavor that cannot be achieved through traditional boiling. The gentle spiciness of ginger and nutmeg perfectly balances the sweetness of the pumpkin, while the addition of coconut milk gives the soup an exotic touch and unmatched creaminess. However, the real stars are the toppings: crispy, slightly salty sage leaves fried in olive oil and toasted pumpkin seeds. They create a fantastic contrast of textures with the smooth soup. The dish is not only delicious but also beautifully presented on the plate thanks to its intense orange color. It is perfect as an elegant appetizer at a party or as a hearty, nutritious meal for a chilly autumn lunch, served with garlic croutons or fresh sourdough bread.
Preheat the oven to 200°C with the convection function (or 220°C without convection). Prepare a large baking tray and line it with parchment paper. This is a very important step that will prevent the vegetables from sticking and make cleaning up easier later.
Setting the oven to the right temperature before placing the vegetables in is key for even roasting and achieving caramelization. Parchment paper is your best friend in the kitchen!
2
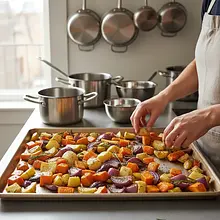
Thoroughly wash the pumpkin under running water. Since we are using Hokkaido pumpkin, you do not need to peel it. Cut it in half using a large, sharp knife. Use a spoon to remove the seeds and fibrous flesh from the inside. Then cut the pumpkin into smaller pieces about 2-3 cm thick. Peel the potatoes and onion, then cut them into similar-sized cubes. Peel the garlic, but keep the cloves whole.
Be careful when cutting hard pumpkin - the knife must be really sharp. Steadily rest the pumpkin on the board. Even pieces of vegetables will ensure that they bake at the same time.
3
Place all the chopped vegetables (pumpkin, potatoes, onion, garlic) in a large bowl. Drizzle with 2 tablespoons of olive oil, and season with salt and freshly ground pepper. If using, add the maple syrup now. Mix everything thoroughly by hand, ensuring each piece of vegetable is evenly coated with oil and seasonings.
Ingredients:
Hokkaido pumpkin, Potatoes, Onion, Garlic, Olive oil, Salt, Black pepper, Maple syrup
Mixing by hand is the best way to evenly distribute the spices. Don't be afraid to get your hands dirty - it's part of cooking! This will help the vegetables brown beautifully.
4
Spread the seasoned vegetables in an even, single layer on the prepared baking sheet. Place in the preheated oven and bake for about 35-45 minutes. Halfway through baking (after about 20 minutes), stir the vegetables with a spatula to ensure they brown evenly. The vegetables are ready when the pumpkin and potatoes are tender (you can check this by inserting a fork - it should go in easily), and their edges are slightly browned and caramelized.
Do not place the vegetables too tightly on the baking sheet. If they are overlapping, they will steam instead of roast and won't achieve a beautiful color. If necessary, use two baking sheets.
Cooking the soup
5
While the vegetables are baking, prepare the ginger. Peel it (the easiest way to do this is with the edge of a small spoon) and grate it on a fine grater. Carefully transfer the baked, hot vegetables to a large pot (with a capacity of at least 4 liters).
Ingredients:
Fresh ginger
Use a heavy-bottomed pot that distributes heat evenly and prevents the soup from burning. Be careful when transferring the hot tray from the oven.
6
Add grated ginger to the vegetables in the pot and pour in the vegetable broth. The broth should cover the vegetables. Bring everything to a boil over medium heat, then reduce the heat to low, cover the pot, and cook for about 10-15 minutes. This step will allow the flavors to meld.
Ingredients:
Vegetable broth, Fresh ginger
Do not cook the soup on too high heat; it is enough for it to gently 'flicker'. This way, the flavors will develop harmoniously and not evaporate too quickly.
7
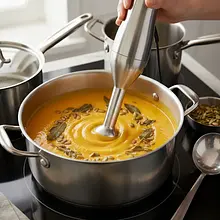
Remove the pot from the heat. Using an immersion blender, blend the soup directly in the pot until it is a perfectly smooth, velvety cream. Move the blender up and down and side to side to ensure there are no lumps. Blend patiently for 2-3 minutes. If you don't have an immersion blender, you can transfer the soup in batches to a countertop blender.
NOTE: When blending hot soup in a jug blender, fill the jug no more than halfway and remove the small plug from the lid, covering the opening with a folded kitchen towel. This will allow steam to escape and prevent the 'explosion' of hot liquid.
8
Place the pot with the blended soup back on low heat. Pour in the coconut milk and add freshly grated nutmeg. Mix thoroughly and heat for 2-3 minutes, without bringing it to a boil. Taste the soup and season with additional salt and pepper if needed.
Ingredients:
Coconut milk, Nutmeg, Salt, Black pepper
Do not cook the soup after adding the coconut milk, as it may curdle. It's just about gently heating and combining the flavors. This is the moment for the final touch to the taste - don't be afraid to add more salt if you feel something is missing.
Preparation of toppings
9
If you are using pumpkin seeds, prepare a small, dry skillet (without fat). Heat it over medium heat. Add the seeds and toast them for 2-3 minutes, stirring or shaking the skillet frequently. They will be ready when they start to gently 'pop' and release a nutty aroma. Be careful not to burn them. Once done, immediately transfer the seeds to a plate to stop the toasting process.
Ingredients:
Roasted pumpkin seeds
Do not walk away from the pan while toasting the seeds - they burn very quickly! Transferring them to a cold plate is important because the hot pan will continue to roast them even after being removed from the heat.
10
In the same pan, heat the remaining 2 tablespoons of olive oil over medium heat. Remove the sage leaves from the stems. When the oil is hot (but not smoking), carefully place the sage leaves in a single layer. Fry for about 30-60 seconds on each side, until they become crispy and slightly translucent. Remove them with a slotted spoon to a plate lined with paper towels to drain excess fat and lightly salt.
Ingredients:
Olive oil, Fresh sage, Salt
Be careful, hot oil can splatter, especially if the leaves are wet (make sure they are dry). Sage fries very quickly. If it starts to brown, it will become bitter. We want to achieve a beautiful, deep green color.
Serving
11
Ladle the hot soup into deep bowls or plates. Top each serving with a few crispy sage leaves. Sprinkle with toasted pumpkin seeds. For an extra visual and flavor effect, you can drizzle the soup with a bit of olive oil, coconut milk, or sprinkle with a pinch of chili flakes. Serve immediately.
Ingredients:
Roasted pumpkin seeds, Fresh sage
Serve the soup with crispy bread, garlic croutons, or a dollop of thick natural yogurt. The presentation is important - try to arrange the toppings in the center of the soup, creating a small 'work of art'.
Fun Fact
💡
Sage, from the Latin 'salvia', comes from the word 'salvere', which means 'to be healthy' or 'to save'. In ancient Rome, it was considered an almost sacred herb, used in medicine and rituals, and its preserving properties were utilized to extend the shelf life of meat.
Serve the soup in deep bowls, preferably warmed, to keep it hot longer. In addition to sage and seeds, it pairs wonderfully with a dollop of sour cream or Greek yogurt to balance the sweetness. You can also sprinkle it with crumbled feta cheese or croutons made from sourdough bread rubbed with garlic.
🥡Storage
Soup can be stored in the refrigerator in a tightly sealed container for up to 3 days. After cooling, it will thicken, so when reheating, you may need to add a little water or broth. The soup is perfect for freezing (without toppings). Store it in the freezer for up to 3 months. Prepare the toppings (sage and seeds) fresh just before serving.
Soups are the essence of home cooking - they warm, satisfy, and comfort in any weather. In this category, we present recipes for Polish soups - chicken broth, sour rye soup, borscht, tomato soup, cucumber soup, and pea soup. Our dishes also include cream soups, cold soups, and broths. You will fi...
Vegetarian cuisine is a wealth of flavors without meat - healthy, colorful, and filling. Plant-based proteins: lentils, chickpeas, beans, peas, and soy take center stage. Cheeses and dairy: feta, halloumi, ricotta, and mascarpone in main dishes. Eggs in various forms: omelets, frittata, shakshuka...
Lunches are the main meal of the day - filling, balanced, and full of flavor. Traditional two-course lunches: soup and a main dish in Polish tradition. Pork chop with potatoes and cabbage - a classic of Polish lunches. Dumplings with meat, cheese, and fruit - hand-formed delicacies. Beef goulash,...
Whatever you eat? This category offers a variety of recipes without a specific direction. Universal dishes: pasta, salads, sandwiches, and soups - always appropriate. Seasonal recipes tailored to the time of year and available ingredients. Balanced meals - protein, carbohydrates, and vegetables o...


Comments (0)
Be the first to comment on this recipe!
Add a comment