Menu

Chocolate-Hazelnut Babka with Crunchy Hazelnuts

Cakes and Bakes Desserts Dishes for Special Occasions 180 min Medium 8 wyświetleń ~43.18 PLN - (0)
Rate:
(0)

Description

Here is a recipe for an absolutely stunning yeast cake that will steal the heart of any sweet tooth. This is not an ordinary cake – it is a rich, buttery brioche-style dough, intricately braided with a decadent homemade cream made from dark chocolate, cocoa, and crunchy hazelnuts. A subtle hint of fresh orange zest in the dough and syrup adds an extraordinary freshness that balances the sweetness of the chocolate. The appearance of the cake, with its characteristic visible layers of filling, is as impressive as its taste. Perfectly fluffy, moist, and intensely chocolatey, it is an excellent choice for a holiday breakfast, an elegant afternoon tea with coffee, or a dessert for a special occasion. Although it requires a bit of time and patience, the end result is spectacular and worth every minute spent in the kitchen.

Składniki (15)

Servings:
8
  • Wheat flour type 550 500 g
  • Fresh yeast 25 g
  • Milk 3.2% 120 ml
  • Cukier drobny 80 g
  • Egg 2 szt.
  • Egg yolk 1.1 szt.
  • Masło 82% 150 g
  • Orange zest 5 g
  • Bitter chocolate 70% 150 g
  • Powdered sugar 50 g
  • Hazelnuts 100 g
  • Water 100 ml
  • Orange juice 50 ml
  • 🌿 Przyprawy
  • Salt 0.1 szczypt
  • Kakao ciemne 30 g
💰 Szacowany koszt dania: ~43.18 PLN (5.40 PLN/porcję)

💡 Kliknij na składnik aby oznaczyć jako użyty

Preparation steps

Yeast dough

1

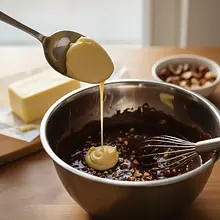
Start by preparing the yeast starter. In a small saucepan, warm the milk. It should be slightly warm, at a temperature of about 37°C – when you put your finger in it, it should feel pleasantly warm but not hot. In a large bowl, crumble the fresh yeast, add one tablespoon of sugar (from the measured 80g), and pour in the warm milk. Gently mix with a fork until the yeast is completely dissolved. Cover the bowl with a clean cloth and set it in a warm, draft-free place for about 10-15 minutes. After this time, a thick, beige foam, known as the 'cap', should appear on the surface. This is a sign that the yeast is active and ready to work.

Ingredients: Fresh yeast, Milk 3.2%, Cukier drobny
The most common mistake is using milk that is too hot, which kills the yeast. If after 15 minutes no foam appears, it means the yeast is inactive and you need to start over. You can place the bowl near a slightly warm radiator or in a turned-off oven with the light on.
2

In a bowl with the active starter, add the sifted flour, remaining sugar, eggs, yolk, salt, and freshly grated orange zest. Start kneading the dough. You can do this by hand in the bowl or on a countertop, or use a stand mixer with a dough hook. Knead for about 5-7 minutes until all the ingredients come together into a uniform, yet still slightly sticky ball.

Ingredients: Wheat flour type 550, Cukier drobny, Egg, Egg yolk, Salt, Orange zest
Use a stand mixer with a dough hook attachment – it will significantly ease and speed up the process. If you are kneading by hand, prepare for about 10-12 minutes of intense work. Don't be discouraged by the initial stickiness of the dough; it will become smoother after adding the butter.
3

Now the key moment – adding the butter. Make sure the butter is very soft, at room temperature. Add it to the kneaded dough gradually, one cube at a time (about 1 tablespoon). Only add the next portion of butter when the previous one has completely combined with the dough. Continue kneading for another 8-10 minutes. At first, the dough may seem greasy and appear to separate, but keep kneading patiently. The finished dough will be extremely smooth, elastic, shiny, and will pull away from the sides of the bowl.

Ingredients: Masło 82%
Patience is key. Do not add all the butter at once, as the dough will 'curdle' and it will be difficult to save it. Mixing with a mixer on medium speed will take about 8 minutes, by hand even 15 minutes. The finished dough should slowly return to its shape when pressed with a finger.
4

Form a smooth ball from the dough, transfer it to a large, clean bowl lightly greased with oil. Cover the bowl with plastic wrap or a damp cloth and set it in a warm place to rise for about 1.5 hours. During this time, the dough should at least double in volume.

You can also use the refrigerator rising method. After kneading, cover the bowl with plastic wrap and place it in the fridge overnight (8-12 hours). The dough will rise more slowly, but its flavor will be deeper. Before shaping, it will need to be warmed at room temperature for about 30 minutes.

Chocolate filling

5

While the dough is rising, prepare the filling. Break the chocolate into small pieces. In a small saucepan over very low heat, melt the butter. Remove from heat, add the broken chocolate, and let it sit for 2-3 minutes to soften from the heat of the butter. Then mix with a spatula until smooth and glossy. Add the sifted cocoa powder and powdered sugar to the chocolate mixture, and stir until combined. Finally, stir in the coarsely chopped, toasted hazelnuts. Set the filling aside to cool slightly – it should have the consistency of a thick spreadable paste.

Ingredients: Bitter chocolate 70%, Masło 82%, Kakao ciemne, Powdered sugar, Hazelnuts
Chocolate can also be melted with butter in a water bath (a bowl set over a pot of gently boiling water) or in the microwave (heating in short, 20-second intervals and stirring). Toasting the nuts in a dry pan for 3-4 minutes until they start to smell will significantly enhance their flavor.

Shaping the bundt cake

6

Remove the risen dough onto a lightly floured pastry board or countertop. Gently deflate it by punching it a few times with your fist. Then roll out the dough into a large rectangle measuring about 40x30 cm and about 0.5 cm thick. Try to keep the edges even.

Use a rolling pin and sprinkle the surface with a minimal amount of flour, just enough to prevent the dough from sticking. Too much flour will make the cake dry. A measuring cup or ruler can help achieve a rectangle of the right dimensions.
7

On the rolled-out dough, evenly spread the prepared and cooled chocolate filling. Use a spatula or a butter knife for this. Remember to leave about 2 cm of free margin along one of the longer sides – this will help seal the roll. Then, starting from the longer side with the filling all the way to the edge, roll the dough tightly into a log (roll).

Try to roll the roulade as tightly as possible so that the layers are distinct and well arranged when cut. You can lightly moisten the free edge of the dough with water to help it stick better.
8

This is the most important stage of shaping. Prepare a loaf pan (about 25 cm long) by greasing it with butter and lining it with baking paper. Place the roll on a cutting board. Using a very sharp knife, cut the roll in half lengthwise along its entire length. You will get two long strips of dough with visible layers of filling. Lay both strips next to each other, cut side up. Now braid them together, placing one strip over the other, like a braid. Try to keep the layers of chocolate facing up at all times. Gently transfer the finished 'braid' to the prepared pan.

Use a really sharp knife to ensure a clean cut and avoid tearing the dough. When braiding, do not squeeze the dough too tightly. If the braid is too long for the pan, you can gently fold its ends underneath.
9

Cover the loaf pan with a clean cloth and set aside for the second rise for about 30-45 minutes. The dough should noticeably rise and fill the pan. In the meantime, preheat the oven to 180°C (fan) or 190°C (top-bottom).

The second rising is shorter, but just as important. Do not let the dough overproof, as it may collapse during baking. It should rise to the edges of the pan.

Baking and soaking

10

Place the mold with the risen cake in the preheated oven. Bake for about 35-45 minutes. After 20 minutes of baking, if the top of the cake starts to brown too much, loosely cover it with a piece of aluminum foil. To check if the cake is done, insert a wooden skewer into the center – it should come out dry.

Every oven bakes differently, so keep an eye on the time. A toothpick inserted into the cake may be slightly moist from the melted chocolate, but there should be no raw batter on it.
11

At the end of baking the cake, prepare the syrup. In a small saucepan, place water, the remaining sugar (about 2 tablespoons), and freshly squeezed orange juice. Heat over medium heat, stirring, until the sugar completely dissolves. Bring to a boil and cook for 1-2 minutes until the syrup thickens slightly. Remove from heat.

Ingredients: Water, Cukier drobny, Orange juice
The syrup should be hot or warm when you soak the cake with it. You can add a teaspoon of orange liqueur to enhance the aroma.
12

As soon as you take the hot cake out of the oven, immediately brush the top with the prepared orange syrup. Use a kitchen brush for this. Soak it generously, allowing the syrup to soak into the cake. Leave the cake in the pan for about 15-20 minutes, then gently remove it to a rack to cool completely.

Soaking the hot cake with hot syrup is the key to achieving a moist and shiny bundt cake. Don't skip this step! Start slicing the bundt cake only when it is completely cold; otherwise, it may crumble.

Fun Fact

💡

Babka, known worldwide as 'babka', has its roots in Jewish tradition in Poland and Ukraine in the early 19th century. It was originally baked from leftover challah dough and spread with jam or cinnamon. The chocolate version only became popular thanks to Jewish immigrants in New York.

Best for

Tips

🍽️ Serving

Babka tastes best at room temperature. Serve it sliced into thick pieces. It is delicious on its own, but you can also serve it with a dollop of sour cream, Greek yogurt, or a scoop of vanilla ice cream. It pairs wonderfully with a cup of strong coffee or black tea.

🥡 Storage

Store the cake in an airtight container or wrapped in plastic wrap at room temperature for 3-4 days. Thanks to the syrup, it stays fresh for a long time. It can also be frozen – either whole or in portions. Before serving, simply thaw at room temperature.

📸 Ugotowane przez społeczność

Zaloguj się, aby dodać zdjęcie
Dodaj zdjęcie gotowej potrawy

Po zatwierdzeniu przez moderatora otrzymasz 10 punktów doświadczenia.

🍲

Nikt jeszcze nie dodał zdjęcia. Bądź pierwszy!

Comments (0)

Be the first to comment on this recipe!

Add a comment

You might also like

Recipe Categories

Homemade cakes and pastries are the heart of Polish culinary tradition - sweet memories from childhood. In our collection, you will find recipes for classic yeast cakes, shortcrust, sponge, and cheesecake. Apple pie, poppy seed cake, gingerbread, Easter babka, chocolate cake, and New York cheesec...

See all recipes in this category
Desserts
Desserts in: Christmas Eve Dinner

Desserts are a sweet ending to a meal that brings joy to both children and adults. In this category, we present recipes for a variety of sweets - from simple creams and mousses, to elegant panna cottas, and exquisite fruit tarts. Our desserts include both classics of Polish cuisine - fruit jelly,...

See all recipes in this category

Dishes for special occasions are culinary masterpieces for birthdays, anniversaries, and holidays. Grilled beef steak with herb butter - restaurant quality at home. Beef Wellington - beef in puff pastry with duxelles. Roast duck with apples - a holiday tradition in a new edition. Pink salmon with...

See all recipes in this category
Reklama