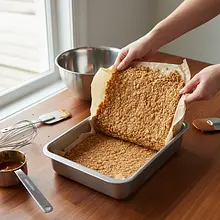
Start by preparing the baking pan and the oven. Preheat the oven to 180°C with the convection function (or 190°C without convection). Prepare a square or rectangular baking pan, e.g. measuring 20x30 cm. Line it with parchment paper in such a way that the paper extends beyond the edges of the pan – this will create 'handles' that will make it much easier to remove the finished cake later.
Description
Here is a recipe for absolutely decadent, multi-layered bars that can easily replace your favorite store-bought sweets. They are a homemade interpretation of the famous 'Millionaire's Shortbread'. The foundation is a buttery, slightly salty, and wonderfully crunchy base made from oats and flour, which provides the perfect contrast to the next layer. The heart of the bar is a thick, gooey, homemade caramel with roasted pecans that melts in your mouth, releasing deep notes of toffee and vanilla. Topping it all off is a thick layer of velvety dark chocolate, accented with a pinch of sea salt that enhances the sweetness of the caramel and adds a sophisticated flavor. The bars look incredibly appetizing, with clearly visible layers, making them the perfect dessert for special occasions, home gatherings, or as an elegant, edible gift.
Składniki (13)
- Butter 270 g
- Muscovado brown sugar 300 g
- Wheat flour type 450 120 g
- Mountain oats 100 g
- Baking powder 5 g
- Sweetened condensed milk 400 ml
- Golden syrup 2 łyżki
- Pecan nuts 150 g
- Vanilla extract 5 g
- Dark chocolate 70% 200 g
- Coconut oil 15 ml
- 🌿 Przyprawy
- Salt 0.1 szczypt
- ✨ Opcjonalne
- Flaky sea salt 0.3 łyżeczek
💡 Kliknij na składnik aby oznaczyć jako użyty
Preparation steps
Preparing the base
In a large bowl, combine the dry ingredients for the base. Add the all-purpose flour, oats, 100g of Muscovado brown sugar, baking powder, and 2 pinches of salt. Mix everything thoroughly with a whisk or spoon to ensure the ingredients are evenly distributed. This will give the base a uniform texture.
Melt 150g of butter in a small saucepan over low heat or in the microwave. Do not let it boil; it should only be liquid. Pour the melted butter into a bowl with the dry ingredients. Using a fork or your fingertips, mix and rub the mixture until all the ingredients are combined and have the consistency of wet sand. There should be no visible dry spots of flour.
Pour the prepared mixture into a lined baking dish. Spread it evenly across the entire surface. Then, using the bottom of a glass or your hand, press the mixture firmly and evenly into the bottom of the dish. It is important that the base is compact and does not crumble after baking. Place the dish in the preheated oven and bake for 20-25 minutes, until the base turns golden brown and smells nutty. After baking, remove from the oven and set aside to cool completely.
Caramel with Nuts
While the base is cooling, prepare the caramel filling. In a heavy-bottomed saucepan, place 120g of butter, 200g of Muscovado brown sugar, the entire can (400ml) of sweetened condensed milk, and 2 tablespoons of golden syrup (or honey). Set the saucepan over medium heat.
Heat the mixture, stirring constantly with a wooden spoon or silicone spatula, until the butter and sugar are completely dissolved. Then increase the heat and bring the mixture to a boil. From the moment it boils, cook for 5-7 minutes, continuing to stir. The caramel is ready when it thickens noticeably, starts to pull away from the edges of the saucepan while stirring, and takes on a deep golden-brown color. It should have the consistency of very thick pudding.
Remove the saucepan from the heat. Be careful, the mixture is very hot. Immediately add the chopped pecans and a teaspoon of vanilla extract. Stir vigorously to evenly distribute the additions in the caramel.
Quickly pour the hot caramel mixture over the completely cooled oat base. Using a silicone spatula or the back of a spoon, spread the caramel evenly over the entire surface. Set the pan aside for at least 1 hour at room temperature for the caramel to slightly set and cool.
Chocolate glaze and assembly
When the caramel layer is cool to the touch and set, prepare the glaze. Break 200g of dark chocolate into small pieces and place it in a heatproof bowl. Add a tablespoon of coconut oil. Melt the chocolate in a water bath (placing the bowl over a pot of gently simmering water, ensuring the bottom of the bowl does not touch the water) or in the microwave (heating in 30-second intervals and stirring each time). Stir until the chocolate is smooth and shiny.
Pour the melted chocolate over the caramel layer. Gently tilting the pan from side to side, allow the chocolate to evenly cover the entire surface. You can also use a spatula to smooth it out. If using, sprinkle the top with a pinch of flaky sea salt while the chocolate is still liquid.
Place the entire mold in the refrigerator for at least 2 hours, preferably for 3-4 hours, until all layers are completely set. The chocolate on top should be firm to the touch.
When the dough is well chilled, remove it from the mold by grabbing the protruding ends of the parchment paper and transferring it to a cutting board. Prepare a large, sharp knife. Dip the blade of the knife in hot water, wipe it dry with a paper towel, and then with a decisive motion, cut the dough. Repeat the process of heating and wiping the knife before each cut. Cut into 16-20 rectangular bars.
Fun Fact
This recipe is a variation of the Scottish dessert 'Millionaire's Shortbread'. Its name comes from the fact that it is so rich and decadent in flavor that it evokes luxury and wealth. The first mentions of it appeared in Scottish magazines in the 1970s.
Best for
Tips
The bars taste best at room temperature when the caramel is soft and chewy. Take them out of the fridge about 20-30 minutes before serving. They pair perfectly with a cup of bitter coffee or black tea, which balance their sweetness.
Store the bars in an airtight container in the refrigerator. This will keep them fresh and maintain the right consistency for up to a week. You can stack them in layers, placing parchment paper between each layer to prevent them from sticking together.
📸 Ugotowane przez społeczność
Zaloguj się, aby dodać zdjęcieDodaj zdjęcie gotowej potrawy
Po zatwierdzeniu przez moderatora otrzymasz 10 punktów doświadczenia.
Nikt jeszcze nie dodał zdjęcia. Bądź pierwszy!
Comments (0)
Be the first to comment on this recipe!
Add a comment