Menu

Chocolate-Honey Spartak Cake with White Chocolate Cream and Raspberries

Wegetariańskie Cakes and Bakes Desserts Dishes for Special Occasions 240 min Hard 9 wyświetleń ~71.98 PLN - (0)
Rate:
(0)

Description

The Spartak cake is a true gem of Eastern European pastry, a cake with a rich history and an even richer flavor. In my original version, the classic, paper-thin honey-cocoa layers are filled with a velvety, luxurious cream made from mascarpone cheese and real white chocolate. This combination creates an extraordinary contrast – the deep, slightly savory taste of the cake with hints of coffee and honey perfectly complements the delicate sweetness of the cream. A surprise that breaks the richness of flavors and adds a refreshing note is a thin layer of homemade raspberry jam hidden in the heart of the cake. On the outside, the cake is enveloped in a sprinkle of cake crumbs, giving it a distinctive, rustic appearance. Each bite is a journey through different textures and flavors: from the soft, moist layers, through the silky cream, to the fruity explosion of raspberries. This cake is not just a dessert, but a true work of art, perfect for the most festive occasions.

Składniki (14)

Servings:
12
  • Mąka pszenna tortowa typ 450 500 g
  • Masło 82% 100 g
  • Cukier drobny 200 g
  • Natural multifloral honey 120 g
  • Large chicken eggs 2 szt.
  • Unsweetened dark cocoa 50 g
  • Baking soda 10 g
  • Instant coffee 5 g
  • Serek mascarpone 500 g
  • Śmietanka 36% 400 ml
  • White chocolate 200 g
  • Powdered sugar 50 g
  • Smooth raspberry jam 150 g
  • ✨ Opcjonalne
  • Świeże maliny do dekoracji 125 g
💰 Szacowany koszt dania: ~71.98 PLN (6.00 PLN/porcję)

💡 Kliknij na składnik aby oznaczyć jako użyty

Preparation steps

Preparation of honey-cocoa cake

1

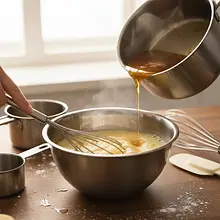
Prepare a water bath. Pour water into a larger pot to a height of about 3-4 cm and bring it to a boil. Reduce the heat so that the water is just gently simmering. Place a smaller pot or metal bowl on top of the larger pot, ensuring that the bottom does not touch the water. Add butter, sugar, and honey to the bowl. Heat, stirring occasionally with a spatula, until all the ingredients melt and combine into a smooth, liquid mixture. This should take about 5-7 minutes.

Ingredients: Masło 82%, Cukier drobny, Natural multifloral honey
A water bath is key to preventing the honey and sugar from burning. Make sure the bowl is heatproof. Do not allow the water to boil vigorously.
2

In a small bowl, whisk the eggs with a fork to combine the yolks with the whites. To the hot honey mixture, while continuously stirring vigorously with a whisk, slowly pour in the beaten eggs in a thin stream. Quick mixing will prevent the eggs from curdling. Cook the mixture in a water bath for another 2-3 minutes, until it thickens slightly. Remove the bowl from the pot.

Ingredients: Large chicken eggs
This is a critical moment. If you pour in the eggs too quickly or without stirring, you'll end up with scrambled eggs. Act quickly and stir vigorously.
3

In a separate, large bowl, sift the flour, cocoa powder, baking soda, and instant coffee. Sifting will aerate the ingredients and eliminate lumps. Mix the dry ingredients with a spoon. Add half of the dry ingredients to the hot egg and honey mixture and stir with a spatula until combined. Then add the rest and mix again. The batter will be very sticky and thick.

Ingredients: Mąka pszenna tortowa typ 450, Unsweetened dark cocoa, Baking soda, Instant coffee
Use a large bowl to comfortably mix the dough. Don't worry that the dough is very sticky - after chilling, it will become firm and pliable.
4

Transfer the sticky dough onto a large piece of plastic wrap. Shape it into a flat disk, wrap it tightly in the wrap, and place it in the refrigerator for at least 2 hours, preferably overnight. Chilling the dough is absolutely necessary for it to be rollable.

Flattening the dough into a disk will speed up the cooling process. The longer the dough is in the fridge, the easier it will be to work with.

Baking the layers

5

Preheat the oven to 180°C (fan) or 200°C (top-bottom). Take the chilled dough out of the fridge and divide it into 8 equal parts using a kitchen scale or by eye. Shape each part into a ball. Keep the remaining balls in the fridge to prevent them from warming up too much while you work.

Using a kitchen scale will ensure that all layers have the same thickness. Prepare a few sheets of baking paper to speed up the process.
6

Take one ball of dough, place it on a sheet of parchment paper. Slightly flatten it. Cover with a second sheet of paper and roll it out into a very thin crust about 1-2 mm thick. The dough should be almost transparent. Trace a circle with a diameter of 22-24 cm using a plate or the edge of a springform pan as a template. Cut off the excess dough with a knife, but leave it on the paper next to the circle - it will bake together with the crust and will be used for decoration.

Rolling between two sheets of paper prevents the dough from sticking to the rolling pin. Don't worry if the dough isn't perfectly round; you'll trim the excess anyway.
7

Transfer the paper with the baked layer and scraps onto a baking sheet. Bake in a preheated oven for 5-7 minutes. The layers bake very quickly! The finished layer should be matte and slightly firmer at the edges. Be careful not to burn it. Right after removing it from the oven, it is soft, but it hardens within a few seconds. Move the paper with the baked layer onto a cooling rack.

Keep an eye on the oven, as the thin crust can easily burn. It's best to bake one layer at a time to have full control. In the meantime, you can roll out the next portion of dough.
8

Repeat the rolling and baking process for all 8 portions of dough. Set aside all the baked layers and scraps to cool completely. Once the scraps are cold and hard, transfer them to a sturdy ziplock bag and crush them finely with a rolling pin or place them in a food processor and blend into a fine crumb.

The baked layers are very fragile, handle them gently. Set them aside in a safe place where they won't break.

Preparation of white chocolate and mascarpone cream

9

Break the white chocolate into small pieces. Melt it in a water bath or in the microwave (in short intervals of 20-30 seconds, stirring each time). The melted chocolate should be smooth and liquid. Set it aside to cool for about 15-20 minutes. It should be at room temperature but still liquid. If it is too warm, it will weigh down the cream.

Ingredients: White chocolate
Be careful not to overheat the white chocolate, as it can easily burn and seize. Stir it frequently while melting.
10

In a large mixing bowl, place very well-chilled 36% cream. Whip it on high speed until it becomes thick and stiff, forming what is known as 'soft peaks'. Be careful not to 'overwhip' it (it will turn into butter).

Ingredients: Śmietanka 36%
The bowl and the mixer attachments can also be chilled, which will make whipping easier. The whipping process usually takes 3-5 minutes.
11

In a second bowl, place the mascarpone cheese (also straight from the fridge) and the sifted powdered sugar. Mix on medium speed just until the ingredients combine into a smooth mixture, about 30 seconds. Then, while continuing to mix on low speed, slowly pour in the cooled white chocolate. Mix briefly, just until a uniform consistency is achieved.

Ingredients: Serek mascarpone, Powdered sugar, White chocolate
Do not mix the mascarpone for too long, as it may curdle. The combination with chocolate should be quick and efficient.
12

Add the whipped cream to the mascarpone and chocolate mixture in three batches. Gently fold in each batch using a spatula, making motions from bottom to top to retain as much air in the cream as possible. Do not use the mixer anymore. The finished cream should be smooth, fluffy, and stable.

Ingredients: Śmietanka 36%
Gentle mixing with a spatula is key to achieving a light and fluffy texture for the cream. Overly vigorous mixing will cause the cream to 'deflate' and lose volume.

Assembling the cake

13

Prepare a platter or plate on which you will serve the cake. Place a small teaspoon of cream in the center so that the first layer doesn't move. Place the first layer of cake on top. Spread a thin layer of cream evenly on it (about 3-4 tablespoons). Cover with the second layer, press down lightly, and spread cream again. Repeat this process until you have used all 7 layers.

Divide the cream into 8 equal parts (7 for layering, 1 for the top and sides) so that it is enough for the entire cake. Use a spatula to evenly spread the cream.
14

On the third and fifth layer (or as desired), after applying the cream, spread an additional very thin layer of raspberry jam. This will create a fruity 'break' in the cake.

Ingredients: Smooth raspberry jam
Do not apply too thick a layer of jam, so the cake does not become unstable. A light touch on the surface of the cream is enough.
15

Place the last, eighth layer. Use the remaining cream to spread on the top and sides of the cake, trying to smooth the surface. It doesn't have to be perfectly smooth, as the whole thing will be covered with crumbs.

Use a long, flat spatula to make it easier to smooth the sides of the cake. A rotating plate or cake stand makes this task much easier.
16

Cover the entire cake, top and sides, with the crumbs you prepared earlier. Gently press the crumbs with your hand against the sides of the cake to make sure they stick well. The easiest way to do this is to place a larger amount of crumbs under your hand and 'pat' them into the cream.

Place parchment paper or foil under the cake stand to easily clean up any crumbs that fall. It's a bit of a messy job, but the result is worth it!

Cooling and Decoration

17

Place the finished cake in the refrigerator for at least 12 hours, preferably 24 hours. This step is absolutely crucial! During this time, the hard layers will absorb moisture from the cream, soften, and blend into a perfect whole.

Do not skip the cooling stage. The cake eaten immediately after assembly will be hard and dry. Patience will be rewarded with an incredible taste and texture.
18

Before serving, decorate the cake. Arrange fresh raspberries on top, creating a wreath or any pattern you like. You can also lightly dust the entire cake with additional cocoa to enhance the color contrast.

Ingredients: Świeże maliny do dekoracji
Additionally, to enhance the flavor, you can add fresh raspberries. Decorate just before serving to ensure the fruits look fresh and appetizing.

Fun Fact

💡

The name of the cake 'Spartak' has nothing to do with the ancient gladiator. It most likely comes from the football club Spartak Moscow, popular during the Soviet era. The red and white colors of the club were meant to symbolize the chocolate layers and white cream, although over time many variations of this dessert have emerged.

Best for

Tips

🍽️ Serving

The cake tastes best well chilled, straight from the fridge. Use a very sharp, long knife, dipped for a moment in hot water and dried before each cut. This will ensure perfectly even and clean portions, showcasing the beautiful layers. Serve with a cup of black coffee or unsweetened tea, which will perfectly balance the sweetness of the dessert.

🥡 Storage

Store the cake in the refrigerator, in an airtight cake container, to prevent it from absorbing other odors. It can be stored for up to 3-4 days. With each passing day, the layers become increasingly moist and the flavors meld better - many believe it is best on the second or third day.

📸 Ugotowane przez społeczność

Zaloguj się, aby dodać zdjęcie
Dodaj zdjęcie gotowej potrawy

Po zatwierdzeniu przez moderatora otrzymasz 10 punktów doświadczenia.

🍲

Nikt jeszcze nie dodał zdjęcia. Bądź pierwszy!

Comments (0)

Be the first to comment on this recipe!

Add a comment

You might also like

Recipe Categories

Homemade cakes and pastries are the heart of Polish culinary tradition - sweet memories from childhood. In our collection, you will find recipes for classic yeast cakes, shortcrust, sponge, and cheesecake. Apple pie, poppy seed cake, gingerbread, Easter babka, chocolate cake, and New York cheesec...

See all recipes in this category
Desserts
Desserts in: Christmas Eve Dinner

Desserts are a sweet ending to a meal that brings joy to both children and adults. In this category, we present recipes for a variety of sweets - from simple creams and mousses, to elegant panna cottas, and exquisite fruit tarts. Our desserts include both classics of Polish cuisine - fruit jelly,...

See all recipes in this category

Dishes for special occasions are culinary masterpieces for birthdays, anniversaries, and holidays. Grilled beef steak with herb butter - restaurant quality at home. Beef Wellington - beef in puff pastry with duxelles. Roast duck with apples - a holiday tradition in a new edition. Pink salmon with...

See all recipes in this category
Reklama