Menu

Intensely Chocolatey Banana Brownies with Peanut Butter

Wegetariańskie Desserts Cakes and Bakes Dishes for Special Occasions 90 min Medium 10 wyświetleń ~34.56 PLN - (0)
Rate:
(0)

Description

This is not your ordinary brownie. It is a decadent, incredibly moist and chewy cake, where the deep flavor of dark chocolate intertwines with the natural sweetness of ripe bananas. Each bite is a perfect balance between intense cocoa and fruity notes. The addition of a swirl of peanut butter on top introduces a surprising sweet-salty accent and a creamy texture that is addictive. The brownie has a characteristic cracked crust and an incredibly soft, sticky interior. It is the perfect dessert to lift your spirits, pairing wonderfully with a scoop of vanilla ice cream, a dollop of sour cream, or simply a glass of cold milk. This cake proves that simple combinations of flavors can create something absolutely extraordinary.

Składniki (11)

Servings:
9
  • Bitter chocolate (min. 70% cocoa) 180 g
  • Butter (82% fat) 120 g
  • Eggs (size L) 3 szt.
  • Unrefined brown sugar 150 g
  • Very ripe bananas 2 szt.
  • Wheat flour type 450 90 g
  • Creamy peanut butter (100% nuts) 80 g
  • 🌿 Przyprawy
  • Bitter cocoa 2 łyżki
  • Sól drobnoziarnista 0.4 łyżeczek
  • ✨ Opcjonalne
  • Vanilla extract 5 g
  • Walnuts or pecans 50 g
💰 Szacowany koszt dania: ~34.56 PLN (3.84 PLN/porcję)

💡 Kliknij na składnik aby oznaczyć jako użyty

Preparation steps

Preparation

1

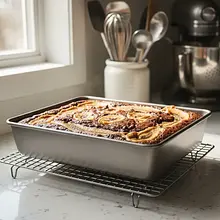
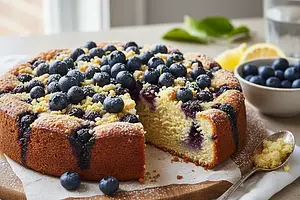
Preheat the oven to 180°C with the top and bottom heating function. Prepare a square baking pan measuring about 20x20 cm. Grease the bottom and sides of the pan with a thin layer of butter, then line it with parchment paper so that the paper extends beyond the edges of the pan. This will make it much easier to remove the finished cake.

Use a metal or glass pan. Silicone pans may cause the edges of the cake to be less baked. The protruding 'ears' of parchment paper act as handles.

Chocolate batter

2

Break the dark chocolate into small pieces and cube the butter, then place them in a heatproof bowl. Prepare a water bath: set the bowl over a pot of gently simmering water (the bottom of the bowl should not touch the water). Heat, stirring occasionally with a silicone spatula, until the ingredients are completely melted and combined into a smooth, glossy mixture. Remove the bowl from the pot and set aside to cool slightly for about 10 minutes.

Ingredients: Bitter chocolate (min. 70% cocoa), Butter (82% fat)
Alternatively, you can melt the chocolate with butter in the microwave, heating in 30-second intervals and stirring each time to avoid burning. The mixture must cool down so it doesn't cook the eggs in the next step.
3

In a large bowl, place the eggs and brown sugar. Using a hand mixer or a stand mixer with a whisk attachment, beat the ingredients on high speed for about 3-4 minutes. The mixture should become noticeably lighter, fluffy, and triple in volume. When you lift the beaters, it should flow from them in a thick, ribbon-like stream.

Ingredients: Eggs (size L), Unrefined brown sugar
This step is crucial for achieving the characteristic cracked crust on the brownies. Properly aerating the eggs with sugar creates a thin meringue on top during baking.
4

To the fluffy egg mixture, while continuously mixing on low speed, slowly pour in the cooled chocolate-butter mixture in a thin stream. If you are using vanilla extract, add it at this point. Mix only until the ingredients are combined into a uniform, smooth mixture.

Ingredients: Vanilla extract
Make sure the chocolate mixture is not hot, just slightly warm. Too hot can cause the egg whites to curdle, creating unwanted lumps. Do not mix for too long to avoid losing the fluffiness of the egg mixture.
5

Sift the flour, cocoa, and salt directly into the bowl with the wet ingredients. Using a large silicone spatula, gently mix the dry ingredients with the batter. Make motions from the bottom to the top, folding the batter from the bottom of the bowl. Mix only until there are no visible traces of flour. If you are using optional nuts, add them now and mix.

Ingredients: Wheat flour type 450, Bitter cocoa, Sól drobnoziarnista, Walnuts or pecans
Sifting the ingredients prevents lumps and additionally aerates them. The key to moist brownies is to avoid overmixing after adding the flour. Mixing too long activates gluten, which can make the batter tough and chewy.

Preparation of the banana layer and assembly

6

In a separate small bowl, place the peeled, ripe bananas. Use a fork to mash them into a smooth mixture. Small lumps are highly desirable - they will add an interesting texture to the cake. Set aside.

Ingredients: Very ripe bananas
Do not use a blender to mash the bananas, as it can make them too watery. A regular fork will work perfectly.
7

Pour about 2/3 of the prepared chocolate mixture into a lined baking pan. Smooth the surface with a spatula. Then, gently spoon a layer of mashed bananas onto the chocolate mixture, trying to spread it evenly. Cover the bananas with the remaining 1/3 of the chocolate mixture.

Do not mix the layers together. We want to achieve a clear layering of the cake with the banana filling, which will ensure extra moisture in the middle of the brownie.
8

If the peanut butter is very thick, heat it in the microwave for 10-15 seconds to make it more fluid. Using a teaspoon, place dollops of peanut butter on top of the cake. Then, using a toothpick or the tip of a knife, gently drag through the dollops, creating fancy patterns and swirls. Do not mix too vigorously to keep the pattern clear.

Ingredients: Creamy peanut butter (100% nuts)
The goal is to create a marbled effect, not to fully combine the peanut butter with the batter. Just a few gentle swirls are enough to achieve a beautiful visual effect.

Baking and Cooling

9

Place the pan in the preheated oven and bake for 30-35 minutes. The edges of the cake should be set and slightly pulling away from the pan, but the center should remain slightly moist and 'underdone'. To check if it's ready, insert a wooden skewer into the center – it should come out coated with moist crumbs, not raw batter.

Don't bake the brownies too long! This is the most common mistake that leads to dry cake. It's better to take them out a moment too early than too late. The cake will continue to cook in the hot pan while cooling.
10

Remove the pan from the oven and place it on a metal rack to cool completely (at least 2 hours). This is an absolutely crucial step! Hot brownie is very delicate and will crumble when cutting. Only after it has cooled completely will it achieve the right, firm, and gooey consistency.

Patience is a virtue here. Do not try to cut the warm cake. Once cooled, you can grab the protruding ends of the parchment paper and lift the entire brownie out of the pan, then cut it into squares with a sharp, long knife.

Fun Fact

💡

Legend has it that brownies were created by mistake in 1893 at the Palmer House hotel in Chicago. The famous socialite, Bertha Palmer, asked the hotel’s pastry chef for a dessert smaller than a piece of cake, but with a similar texture, that would fit in a lunchbox. The pastry chef, while making a chocolate cake, forgot to add baking powder, resulting in a flat, dense, and moist cake - the first brownie.

Best for

Tips

🍽️ Serving

Brownies taste best at room temperature. To enhance their qualities, you can serve them slightly warmed (10-15 seconds in the microwave) with a scoop of vanilla ice cream or salted caramel. They also pair wonderfully with a spoonful of Greek yogurt or sour cream, which will balance the sweetness. Sprinkling the top with a pinch of flaky sea salt before serving will beautifully highlight the chocolate flavor.

🥡 Storage

Store the brownie in an airtight container at room temperature for up to 3 days. In the refrigerator, it will stay fresh for up to a week, but it's best to take it out beforehand to return it to room temperature and softness before serving. It can also be frozen, cut into portions and wrapped in plastic wrap - it will last in the freezer for up to 3 months.

📸 Ugotowane przez społeczność

Zaloguj się, aby dodać zdjęcie
Dodaj zdjęcie gotowej potrawy

Po zatwierdzeniu przez moderatora otrzymasz 10 punktów doświadczenia.

🍲

Nikt jeszcze nie dodał zdjęcia. Bądź pierwszy!

Comments (0)

Be the first to comment on this recipe!

Add a comment

You might also like

Recipe Categories

Desserts
Desserts in: Christmas Eve Dinner

Desserts are a sweet ending to a meal that brings joy to both children and adults. In this category, we present recipes for a variety of sweets - from simple creams and mousses, to elegant panna cottas, and exquisite fruit tarts. Our desserts include both classics of Polish cuisine - fruit jelly,...

See all recipes in this category

Homemade cakes and pastries are the heart of Polish culinary tradition - sweet memories from childhood. In our collection, you will find recipes for classic yeast cakes, shortcrust, sponge, and cheesecake. Apple pie, poppy seed cake, gingerbread, Easter babka, chocolate cake, and New York cheesec...

See all recipes in this category

Dishes for special occasions are culinary masterpieces for birthdays, anniversaries, and holidays. Grilled beef steak with herb butter - restaurant quality at home. Beef Wellington - beef in puff pastry with duxelles. Roast duck with apples - a holiday tradition in a new edition. Pink salmon with...

See all recipes in this category
Reklama