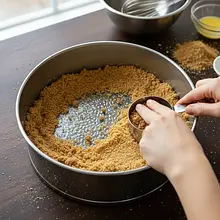
Prepare a 24 cm diameter springform pan. Line the bottom of the pan with parchment paper. To ensure the paper adheres perfectly, place a sheet on the bottom of the springform pan, then attach and close the ring. Trim any excess paper that extends outside with scissors.
Description
Discover a recipe for a dessert that will transport you right into the heart of sunny summer! This fluffy no-bake cheesecake is the essence of elegance and refreshment, a perfect choice for hot days and special occasions. On a crunchy, buttery base of biscuits rests a velvety, cloud-like cheese filling with a delicate vanilla aroma, complemented by the freshness of lemon zest. The true crown of this creation is a layer of glossy, transparent jelly with a hint of dry Prosecco, in which halves of juicy, ripe strawberries are suspended. This cake requires no baking, making it incredibly easy to prepare, and the visual effect will delight every guest. Serve it chilled, as the grand finale of a festive dinner, the star of a garden party, or simply – as a luxurious moment of pleasure just for yourself. It tastes as exquisite as it looks!
Składniki (13)
- Butter cookies 200 g
- Butter 100 g
- Twaróg sernikowy z wiaderka 1000 g
- 30% heavy cream 250 ml
- Powdered sugar 150 g
- Powdered gelatin 20 g
- Water 350 ml
- Vanilla extract 5 g
- Fresh strawberries 500 g
- Galaretka truskawkowa w proszku 75 g
- Prosecco 250 ml
- ✨ Opcjonalne
- Lemon zest 5 g
- Fresh mint 0.2 pęczków
💡 Kliknij na składnik aby oznaczyć jako użyty
Preparation steps
Preparing the base
Place the biscuits in a sturdy ziplock bag. Seal it, removing excess air. Using a rolling pin, crush the biscuits into fine crumbs. Alternatively, you can grind them in a food processor or blender with an 'S' blade for about 30-45 seconds.
Place the butter in a small saucepan and melt it over low heat. Stir occasionally to prevent it from burning. Once the butter is completely melted, remove it from the heat. Crumble the biscuits into a medium-sized bowl, then pour the melted butter over them. Using a spoon or spatula, mix thoroughly until all the crumbs are moist. The consistency should resemble wet sand.
Transfer the biscuit mixture to the prepared springform pan. Spread it evenly, then press it down firmly to the bottom of the pan. You can do this using the bottom of a glass or a small measuring cup – this will ensure the base is compact and even. Place the springform pan in the refrigerator for at least 30 minutes to allow the base to set.
Preparation of the cheese filling
In a small bowl, place the powdered gelatin. Pour 100 ml of hot (but not boiling, about 80°C) water over it. Whisk vigorously with a small whisk or fork for about a minute, until all the gelatin lumps are completely dissolved. Set aside to cool slightly.
In a large mixing bowl, place the well-chilled heavy cream. Whip it on high speed, starting from medium and gradually increasing the speed. Whip until the cream becomes thick and stiff, forming what is known as 'stiff peaks' (when you lift the beaters, the cream will form peaks that do not fall).
In a separate, very large bowl, place the cream cheese (it should be at room temperature), sifted powdered sugar, vanilla extract, and optionally, grated lemon zest. Mix everything on low speed with a mixer just until the ingredients are combined into a smooth, uniform mass, for about 1-2 minutes.
Now the key moment - tempering the gelatin. In a bowl with slightly cooled but still liquid gelatin, add one large tablespoon (about 50g) of the prepared cheese mixture. Mix thoroughly until a smooth emulsion forms. Then repeat this step by adding another tablespoon of the mixture. Pour the prepared gelatin mixture in a thin stream into the rest of the cheese mixture, while continuously mixing on low speed.
Add the whipped cream to the cheese mixture with gelatin. Using a large silicone spatula, gently combine both mixtures. Make slow, circular motions from the bottom of the bowl upwards. Mix only until the mixture is uniform. The goal is to retain as much air as possible from the whipped cream.
Remove the springform pan with the chilled base from the fridge. Pour the prepared cheese mixture onto the base and smooth the top using a spatula or the back of a spoon. Place the cake in the fridge for at least 2-3 hours, preferably 4, so that the cheese mixture sets well before adding the fruit and jelly on top.
Preparation of the fruit layer and jelly
When the cheese mixture has set, prepare the strawberries. Gently wash them under running water and dry them on a paper towel. Remove the stems. Cut larger strawberries in half, while smaller ones can be left whole. Arrange the fruits on the set cheese mixture, cut side down, creating a decorative pattern.
Pour the contents of the jelly package into a bowl. Add 250 ml of hot water and stir vigorously until the powder is completely dissolved. Then pour in 250 ml of cold Prosecco (or cold water/apple juice). Stir again. Set the jelly aside at room temperature to cool completely.
When the jelly is completely cold but still liquid, very carefully pour it over the strawberries arranged on the cheesecake. To avoid disturbing the fruit or the cheese mixture, pour it slowly in a thin stream, preferably over the back of a large spoon held just above the surface of the cake. Place the cake back in the refrigerator for another 2-3 hours, or until the jelly is completely set.
When the jelly has completely set, carefully remove the cake from the mold. Run a thin, sharp knife along the inner edge of the springform pan to separate the cake from the rim. Then gently unfasten the clasp and remove the rim. Optionally, decorate the cake with fresh mint leaves.
Fun Fact
No-bake cheesecakes gained immense popularity in the USA in the 1930s with the invention and popularization of refrigerators and ready-made mixes for jellies and puddings. They were promoted as quick and modern desserts that do not require the use of an oven, which was a great advantage on hot summer days.
Best for
Tips
Serve the cheesecake always well chilled, straight from the fridge. Use a long, sharp knife for cutting, dipping it in hot water and drying it off before each cut. This will give you perfectly smooth and even pieces. The dessert pairs wonderfully with an extra serving of fresh fruit or a dollop of whipped cream.
Store the cake in the refrigerator, preferably covered (e.g., in a cake container), to prevent it from absorbing odors. It will stay fresh for 2-3 days. After that time, the biscuit base may become softer. The dessert is not suitable for freezing due to the presence of gelatin and jelly, which lose their structure after thawing.
📸 Ugotowane przez społeczność
Zaloguj się, aby dodać zdjęcieDodaj zdjęcie gotowej potrawy
Po zatwierdzeniu przez moderatora otrzymasz 10 punktów doświadczenia.
Nikt jeszcze nie dodał zdjęcia. Bądź pierwszy!
Comments (0)
Be the first to comment on this recipe!
Add a comment