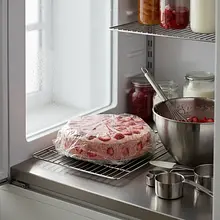
Start by preparing the oven and the baking pan. Set the oven to 170°C with the top and bottom heating function. Prepare a 24 cm round cake pan. Line the bottom of the pan with parchment paper - trace the shape of the bottom on the paper, cut out a circle, and place it in the center. Important: do not grease the sides of the pan! This way, the sponge will be able to 'climb' the walls and rise evenly.
Description
Here is a cake that is the essence of summer captured in a sweet form. A delicate, fluffy sponge cake, layered with a velvety white chocolate cream, which hides a surprising, refreshing hint of fresh basil. This combination may seem unusual, but I guarantee it is absolutely phenomenal – the herbal freshness of basil perfectly enhances the sweetness of strawberries and the creaminess of white chocolate. Each bite is a journey through summer flavors. The cake is light, not too sweet, and its interior is filled to the brim with juicy, fresh strawberries. It is perfect as the star of a summer garden party, a birthday, or simply as a refined dessert for afternoon coffee. Its appearance is also stunning – the classic white of the cream provides a perfect backdrop for the intense red of the strawberries and the greenery of the decorations.
Składniki (17)
- Eggs 6 szt.
- Mąka pszenna tortowa typ 450 200 g
- Cukier drobny do wypieków 13.3 łyżek
- Potato flour 50 g
- Baking powder 5 g
- Serek mascarpone 500 g
- Śmietanka 36% 400 ml
- White chocolate 200 g
- Fresh basil 1 pęczek
- Powdered sugar 50 g
- Water 100 ml
- sugar 30 g
- Lemon juice 15 ml
- Fresh strawberries 700 g
- 🌿 Przyprawy
- Salt 0.0 szczypt
- ✨ Opcjonalne
- Listki świeżej mięty 10 g
- White chocolate chips 20 g
💡 Kliknij na składnik aby oznaczyć jako użyty
Preparation steps
Preparing the Sponge Cake
In a large bowl, combine the dry ingredients. Add the all-purpose flour, potato flour, and baking powder. Use a fine sieve and sift all the ingredients together at least twice. This step aerates the flour and prevents lumps from forming, which is crucial for the fluffiness of the sponge cake.
Now it's time for the most important element - the eggs. Carefully separate the egg whites from the yolks. Make sure that not a bit of yolk gets into the egg whites, as even a small amount of fat will prevent them from whipping properly. Place the egg whites in a large, ideally clean and dry bowl (preferably metal or glass). Set the yolks aside in a separate, smaller bowl.
In a bowl with egg whites, add a pinch of salt. Start beating them with a mixer on medium speed. When the foam becomes white and thick (known as 'soft peaks' - when you lift the beaters, the foam forms a peak that bends), begin to add sugar, one tablespoon at a time, without stopping the mixing. After each added tablespoon, mix for about 30 seconds. Once all the sugar is added, increase the mixer speed to the highest and beat for another 2-3 minutes, until the foam is very thick, stiff, and glossy. Properly whipped foam should not fall out of the bowl when turned upside down.
Reduce the mixer speed to the minimum. Add one yolk at a time to the glossy egg white foam, mixing only until the ingredients are combined, about 15 seconds after each added yolk. Do not mix too long to avoid destroying the air bubbles in the foam.
Set aside the mixer. Now you will work by hand. Add the sifted flour mixture to the egg mixture in three batches. After each batch, very gently fold the mixture using a large silicone spatula. Make movements from the bottom of the bowl upwards, scooping the mixture from the bottom and sides, and folding it over the top. Mix only until no traces of flour are visible. The goal is to disturb the fluffy structure of the batter as little as possible.
Pour the prepared batter immediately into the prepared springform pan. Gently smooth the surface with a spatula. Place the pan in the preheated oven and bake for about 30-35 minutes. After about 30 minutes, check the cake with a wooden skewer – inserted into the center of the sponge, it should come out dry, without traces of raw batter. If it is wet, bake for another 5 minutes and check again.
After baking, immediately remove the sponge cake from the oven. Being careful with the hot pan, drop it onto the countertop or floor from a height of about 30-40 cm. This will break the air bubbles and prevent the sponge cake from collapsing. Then, set the cake in the pan aside to cool completely, preferably on a metal rack. Once cooled, gently separate the sides of the sponge cake from the pan using a thin knife and remove the ring.
Preparation of Basil Cream
In a small saucepan, heat 200 ml of 36% cream until very hot, but do not bring it to a boil. Remove from heat. Wash and dry the basil leaves, then add them to the hot cream. Cover the saucepan and let it sit for about 30 minutes to allow the basil to release its aroma. After this time, pour the cream with basil into a blender and blend until smooth. Strain everything through a very fine sieve to remove any leaf remnants. Pour the resulting aromatic basil cream into a bowl.
Add the remaining 200 ml of cold 36% cream to the poured basil cream. Mix, cover the bowl with plastic wrap, and place it in the refrigerator for at least 4 hours, preferably overnight. The cream must be ice-cold to whip perfectly.
Chop the white chocolate into small pieces. Prepare a water bath: pour a little water (about 2-3 cm) into a small pot and bring it to a boil. Place a bowl (metal or glass) on top of the pot, ensuring it does not touch the surface of the water. Add the chopped chocolate to the bowl and stir until completely melted and smooth. Remove the bowl from the pot and set the chocolate aside to cool. It should reach room temperature but still be liquid.
In a large bowl, place well-chilled mascarpone cheese and sifted powdered sugar. Mix on medium speed for about 1-2 minutes, just until the ingredients are combined and a smooth, creamy consistency is achieved. Do not mix for too long, as the mascarpone may curdle.
Take the ice-cold basil cream out of the fridge. Pour it into a tall container and whip it with a mixer on high speed until a thick, stiff cream forms. Be careful not to 'overwhip' the cream (that is, not to turn it into butter). The finished whipped cream should hold its shape and not drip from the beaters.
In a bowl with mascarpone, add the cooled, liquid white chocolate and mix briefly on low speed until combined. Then, in two batches, add the whipped basil cream. Gently fold everything together using a spatula, making movements from the bottom to the top, so that the cream remains fluffy. Place the finished cream in the refrigerator for about 30 minutes to slightly thicken before assembling the cake.
Preparing the Syrup
In a small saucepan, bring water and sugar to a boil. Stir until the sugar is completely dissolved. Remove from heat, add freshly squeezed lemon juice, and mix. Set the syrup aside to cool completely. Never soak the sponge cake with hot syrup, as it will become soggy.
Assembling the Cake
Wash the strawberries, gently dry them, and remove the stems. Slice about 500g of strawberries into pieces about 0.5 cm thick – these will be used to layer the cake. Set aside the remaining 200g whole or cut in half for decorating the top.
Place the completely cooled sponge cake on a cutting board. Use a long serrated knife (e.g., for bread) to cut it into three equal layers. To do this evenly, first gently score the sponge cake all around at the desired height, then deepen the cut while rotating the cake until you cut through it completely. Repeat the process to obtain the third layer.
On a platter or flat plate where you will serve the cake, place the first layer of sponge cake. Evenly soak it with 1/3 of the prepared syrup, using a brush or teaspoon. Spread about 1/3 of the basil cream and smooth it into an even layer. On top of the cream, densely arrange half of the sliced strawberries.
Gently cover the layer of strawberries with the second layer of sponge cake and press down lightly. Repeat the entire process: soak the layer with 1/3 of the syrup, spread another 1/3 of the cream, and arrange the remaining sliced strawberries on top.
Place the last, third layer of sponge cake. Soak it with the remaining syrup. Spread a thin layer of cream on the top and sides of the cake. This is called a 'crumb coat,' which will bind all the crumbs. Put the cake in the refrigerator for 30 minutes.
After cooling, remove the cake and cover it with the remaining cream. Use a long, straight spatula (known as an offset spatula) to smooth the top and sides. To achieve a smooth surface, dip the spatula in hot water, wipe it dry, and glide it over the cream. You can also create a decorative, irregular texture using the back of a spoon.
On top of the cake, arrange the reserved strawberries (whole or halved) to create a fancy composition. Additionally, you can decorate the cake with fresh mint leaves for a color contrast and sprinkle with white chocolate shavings to enhance the texture.
Place the finished cake in the refrigerator for at least 3-4 hours, preferably overnight. This time is essential for the cream to set, the sponge to absorb moisture, and for all the flavors to blend perfectly. The cake will be stable and easy to slice.
Fun Fact
Basil, now considered a symbol of Italian cuisine, originates from India, where it was regarded as a sacred plant. In ancient Greece, it was called 'royal herb'. Its fresh, slightly peppery aroma pairs perfectly not only with tomatoes but also with sweet fruits like strawberries, creating surprising and sophisticated flavor combinations.
Best for
Tips
The cake tastes best when well chilled. Use a long, sharp knife for cutting, dipping it in boiling water and drying it off before each cut. This will give you perfectly even and clean pieces. The cake pairs wonderfully with a glass of chilled Prosecco or a light, fruity white wine.
Store the cake in the refrigerator, in an airtight cake container, to prevent it from absorbing the odors of other products. It tastes best within 2-3 days of preparation. Due to the high content of fresh fruits and cream-based frosting, the cake is not suitable for freezing.
📸 Ugotowane przez społeczność
Zaloguj się, aby dodać zdjęcieDodaj zdjęcie gotowej potrawy
Po zatwierdzeniu przez moderatora otrzymasz 10 punktów doświadczenia.
Nikt jeszcze nie dodał zdjęcia. Bądź pierwszy!
Comments (0)
Be the first to comment on this recipe!
Add a comment