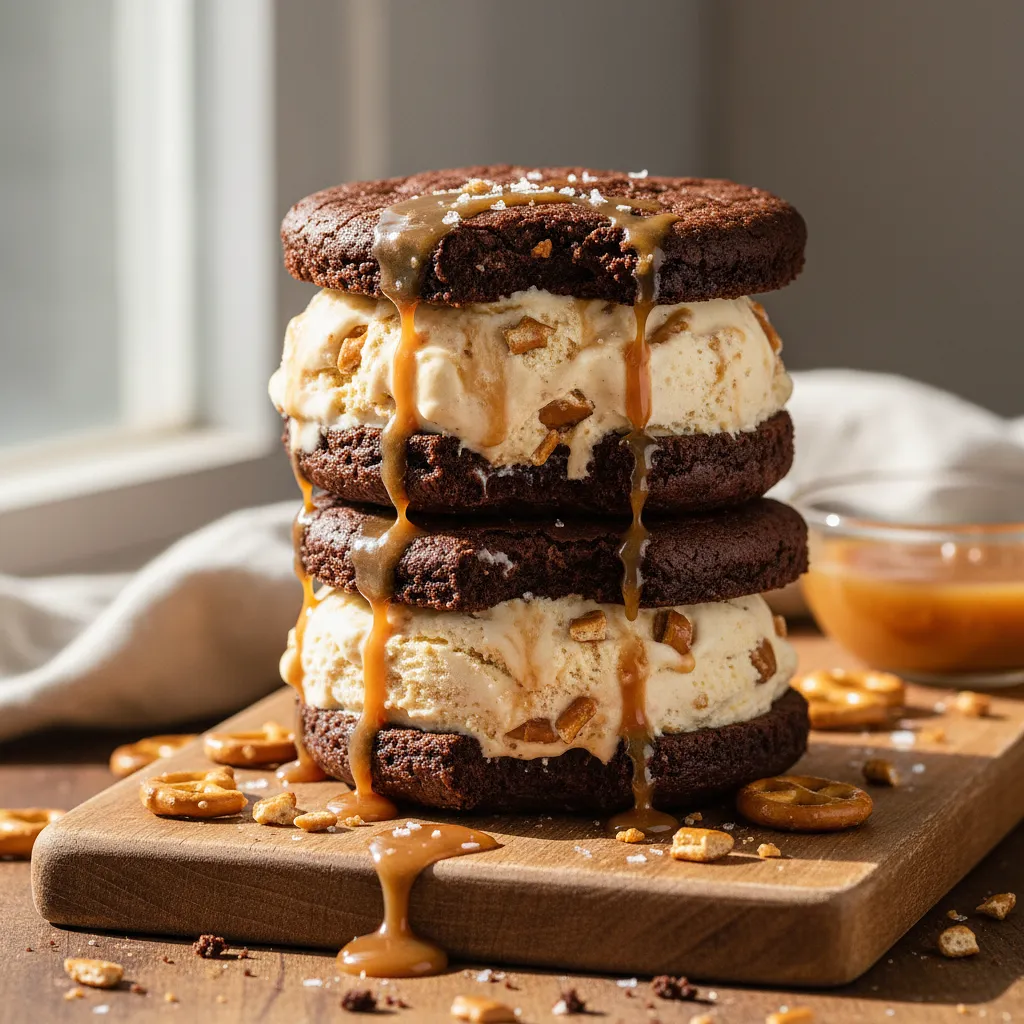
Start by preparing the cookies. Preheat the oven to 180°C with the top and bottom heat function. Prepare two large baking sheets and line them with parchment paper. This is a very important step that will prevent the cookies from sticking and make it easier to remove them.
Description
Forget about store-bought ice cream sandwiches! Here’s a dessert that will take you to a whole new level of sweet pleasure. Imagine two intensely chocolatey, gooey brownie cookies that envelop velvety homemade salted caramel ice cream. Each bite is the perfect harmony of deep sweetness and subtle saltiness. And that’s not all! The sandwiches are partially dipped in a crunchy milk chocolate coating and sprinkled with pieces of salty pretzels, adding a surprising texture and enhancing the flavor experience. This recipe is the perfect project for a weekend afternoon, and the final result will delight both kids and adults. Perfect for summer parties, birthdays, or just as a luxurious moment for yourself.
Składniki (16)
- Bitter chocolate 70% 180 g
- Masło 82% 120 g
- Eggs 2 szt.
- Light brown sugar 150 g
- Wheat flour type 450 80 g
- Baking powder 2 g
- 36% heavy cream 500 ml
- Sweetened condensed milk 400 ml
- Caramel sauce 150 g
- Milk chocolate 200 g
- Coconut oil 15 ml
- Salted pretzels 50 g
- 🌿 Przyprawy
- Kakao ciemne 20 g
- Fine salt 2 szczypty
- Coarse sea salt 5 g
- ✨ Opcjonalne
- Sea salt flakes 2 g
💡 Kliknij na składnik aby oznaczyć jako użyty
Preparation steps
Brownie Cookies
In a metal or glass bowl, place the broken dark chocolate into small pieces and the diced butter. Melt the ingredients in a water bath – place the bowl over a pot of gently boiling water, ensuring the bottom of the bowl does not touch the water. Stir occasionally until the mixture is smooth and shiny. Remove from heat and let it sit for 5 minutes to cool slightly.
In a large bowl, place the eggs and brown sugar. Using a hand mixer or a stand mixer with a whisk attachment, beat the ingredients on high speed for about 5-7 minutes. The mixture should become very light, thick, and fluffy, tripling in volume. When you lift the beaters, the flowing mixture should create a distinct 'ribbon' on the surface that disappears after a few seconds.
Slowly pour the cooled chocolate mixture into the fluffy egg mixture in a thin stream, while constantly mixing on the lowest speed of the mixer. Mix only until the ingredients are combined, no longer than 30 seconds. The goal is to avoid losing the aeration from the egg mixture.
In a separate, smaller bowl, mix the flour, cocoa powder, baking powder, and salt. Sift the dry ingredients through a fine sieve directly into the chocolate mixture. Using a silicone spatula, gently fold everything together, making motions from the bottom to the top, just until no traces of flour are visible. Do not mix for too long!
Using an ice cream scoop or a regular tablespoon, drop portions of the dough (about 1.5 tablespoons per cookie) onto the prepared baking sheets. Leave large spaces between the cookies (about 5-7 cm), as they will spread significantly. You should get 16 cookies. Bake one sheet at a time in the middle of the oven for 12-14 minutes. The finished cookies will have a cracked, shiny surface and set edges, but the center will remain soft.
Remove the baking sheet from the oven and let it sit for 5 minutes. The cookies will be very delicate. After this time, using a wide, flat spatula, carefully transfer them to a metal rack to cool completely. They must be completely cold before adding the ice cream, which will take about 30-40 minutes.
Salted Caramel Ice Cream
While the cookies are cooling, prepare the whipped cream. In a large, chilled bowl, place very cold heavy cream. Whip it with a mixer on high speed until it becomes thick and stiff. Properly whipped cream should form 'stiff peaks', meaning that when you remove the mixer beaters, the peaks formed on them do not fall.
Pour the whole sweetened condensed milk into the whipped cream. Using a silicone spatula, very gently combine both ingredients. Make slow, circular motions from the bottom of the bowl upwards. Mix only until you achieve a uniform, smooth mixture. The goal is to retain as much air in the mixture as possible.
Pour the caramel sauce on top of the ice cream mixture and sprinkle with coarse sea salt. Using a knife or a skewer, make a few (4-5) gentle movements in the mixture, creating caramel swirls. Do not mix too vigorously so that the caramel does not completely blend with the mixture, but remains visible as appetizing 'veins'.
Transfer the ice cream mixture to a flat, wide container (e.g., a loaf pan lined with plastic wrap or a baking dish). Smooth the surface. Cover tightly with plastic wrap, ensuring it touches the surface of the ice cream - this will prevent ice crystals from forming. Place in the freezer for at least 6 hours, preferably overnight.
Assembly and decoration
When the ice cream is frozen and the cookies are completely cooled, get ready to assemble the sandwiches. Group the cookies into 8 pairs of similar size and shape. One cookie from each pair will be the bottom, and the other will be the top of the sandwich.
On the flat side of one cookie from the pair, place a large scoop (about 2-3 tablespoons) of frozen ice cream. Use an ice cream scoop or a regular spoon for this. Cover with the second cookie (flat side against the ice cream) and gently press down until the ice cream spreads evenly to the edges. Smooth the sides with a knife or a small spatula. Repeat with the remaining cookies.
Arrange the assembled sandwiches on a tray lined with baking paper and place in the freezer for at least 1 hour. This step is very important – the sandwiches must be very firm and frozen so that the chocolate coating sets on them immediately.
At the end of freezing the sandwiches, prepare the coating. Break the milk chocolate into pieces and place it in a bowl along with the coconut oil. Melt in a water bath or in the microwave (using the pulse method, as before). Stir until you achieve a smooth, liquid coating. Place the pretzels in a ziplock bag and gently crush them using a rolling pin or a pestle. Transfer the crumbs to a flat plate.
Remove the sandwiches from the freezer one at a time. Holding the sandwich in your hand, dip half of it in the melted chocolate. Allow the excess chocolate to drip back into the bowl. Then, immediately coat the dipped part in crushed pretzels. Place the finished sandwiches back on the tray lined with parchment paper.
Once all the sandwiches are decorated, place the tray in the freezer for the last 30 minutes to allow the coating to harden completely. After this time, the sandwiches are ready to serve.
Fun Fact
The first ice cream sandwiches appeared on the streets of New York at the turn of the 19th and 20th centuries. They were sold from carts for one cent and consisted of a scoop of vanilla ice cream pressed between two thin wafers. They quickly became a favorite summer treat for Americans.
Best for
Tips
Serve the sandwiches straight from the freezer, as they soften quickly. They can be served on small dessert plates or, for a more casual effect, each sandwich can be wrapped in a piece of baking paper tied with string. It looks charming and makes it easier to eat without getting your hands dirty.
Store the prepared sandwiches in the freezer in an airtight container, layering them with parchment paper to prevent sticking. This way, they will stay fresh and crispy for up to 2 weeks.
📸 Ugotowane przez społeczność
Zaloguj się, aby dodać zdjęcieDodaj zdjęcie gotowej potrawy
Po zatwierdzeniu przez moderatora otrzymasz 10 punktów doświadczenia.
Nikt jeszcze nie dodał zdjęcia. Bądź pierwszy!
Comments (0)
Be the first to comment on this recipe!
Add a comment