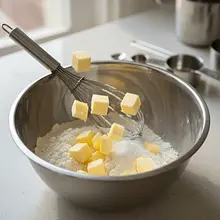
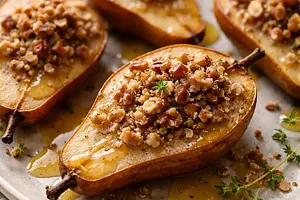
In a medium-sized bowl, add the semolina flour, powdered sugar, and cinnamon. Mix the dry ingredients thoroughly with a spoon or whisk to combine them evenly. This will ensure that the crumble has a uniform flavor.
Description
This is the quintessence of Polish autumnal pastry cuisine. The perfectly moist, dense, and rich buttery cake melts in your mouth. Its sweetness is perfectly balanced by the tart, juicy plums that, when baked, become soft and release a wonderful juice that seeps into the cake. The whole is topped with a generous layer of crunchy, golden crumble with a distinct hint of cinnamon, which adds not only texture but also a wonderful aroma. The cake is incredibly fragrant, and its appearance – with purple splashes of plums and a golden topping – evokes the warmest memories. It is the perfect treat for an afternoon snack, alongside a cup of hot tea or coffee. It is ideal for family gatherings, celebrating the abundance of seasonal fruits.
Składniki (13)
- Mąka pszenna tortowa (typ 450) 400 g
- Butter 200 g
- Cukier drobny do wypieków 12 łyżek
- Eggs 4 szt.
- Milk 3.2% 100 ml
- Baking powder 10 g
- Hungarian plums 800 g
- Wheat flour (for crumble) 180 g
- Cold butter (for the crumble) 100 g
- Powdered sugar (for the crumble) 100 g
- 🌿 Przyprawy
- Ground cinnamon 2 g
- Salt 0.0 szczypt
- ✨ Opcjonalne
- Powdered sugar for dusting 15 g
💡 Kliknij na składnik aby oznaczyć jako użyty
Preparation steps
Preparing the crumble
Take the butter straight from the fridge, cut it into small cubes (about 1x1 cm) and add it to the dry ingredients. Now the most important part: with your fingertips, quickly rub the butter into the flour and sugar. Make movements similar to rubbing until clumps resembling wet sand form. Do not knead for too long to prevent the butter from melting. Place the finished crumble in the fridge while you prepare the rest of the dough.
Preparing plums
Wash the plums thoroughly under running water and dry them with a paper towel. Cut each plum in half lengthwise, gently open it up, and remove the pit. If the plums are very large, you can cut each half in half again. Set the prepared fruit aside.
Preparation of butter dough
Preheat the oven to 180°C (top and bottom heat, no fan). Prepare a rectangular baking dish measuring about 25x35 cm. Line the bottom of the dish with parchment paper, and grease the sides with a thin layer of butter and dust with flour. This will prevent the cake from sticking and make it easy to remove.
In a separate, large bowl, sift the all-purpose flour together with the baking powder and a pinch of salt. Sifting not only removes any lumps but also aerates the flour, making the dough lighter and fluffier. Mix the sifted flour with the baking powder and salt.
In a large mixing bowl, place the soft butter (at room temperature) and the fine sugar. Using the paddle attachment, beat the ingredients on medium speed for about 8-10 minutes. The mixture should become very light, almost white, and noticeably increase in volume, resembling a fluffy cream. This is a crucial moment for the texture of the cake.
Without stopping the mixing (reduce the mixer speed to medium-low), add the eggs one at a time. Only add the next egg when the previous one is completely incorporated into the mixture. This process may take about 3-4 minutes. Slowly adding the eggs prevents the mixture from curdling.
Now you will add the dry ingredients and milk alternately. Reduce the mixer speed to the minimum. Add 1/3 of the flour mixture, mix briefly until combined. Then pour in half of the milk and mix briefly again. Repeat: add the second 1/3 of the flour, the rest of the milk, and finally the last portion of flour. Mix only until the ingredients come together into a uniform, thick batter. Do not mix for too long.
Assembling and baking the cake
Transfer the prepared dough to the previously prepared pan. Using a large spoon or silicone spatula, spread it evenly across the entire surface, trying to level the top. The dough will be quite thick, so you will need to assist it in this.
On a flat surface of the dough, place the halved plums, one next to the other, skin side down. Gently press them into the dough. Arrange them fairly closely, as the dough will rise during baking and envelop the fruit.
Take the chilled crumble out of the fridge. Crumble it with your fingers over the cake, evenly covering the entire surface of the plums. Try to make the pieces of different sizes – from fine sand to larger chunks, which will create a more interesting effect after baking.
Place the pan in the preheated oven at 180°C and bake for about 50-60 minutes. After about 45 minutes, check the cake with a wooden skewer (e.g., for kebabs). Insert it into the center of the cake, in a spot without fruit. If the skewer comes out dry and without traces of raw batter, the bake is ready. The crumble should be beautifully golden brown.
Remove the baked cake from the oven and leave it in the pan on a metal rack for about 15-20 minutes to cool slightly. Then carefully remove it from the pan (you can use a knife to help separate the sides) and transfer it to the rack to cool completely.
When the cake is completely cool, you can further decorate it. Using a small sieve, dust the top of the cake with powdered sugar for a beautiful, 'frosted' appearance.
Fun Fact
Plum cake with crumble, often simply called 'pleśniak' (though in a different version) or 'ucieraniec' in Poland, is a classic of 'grandma's kitchen'. Its popularity comes from the availability of ingredients – flour, butter, eggs, and seasonal fruits like plums, which abundantly bear fruit in Polish orchards at the end of summer.
Best for
Tips
The cake tastes best on the day it is baked, when the crumble is the crispiest, but it is also delicious for the following days. Serve cut into squares. It pairs fantastically with a scoop of vanilla or cream ice cream, which balances its buttery richness. It can also be served with a dollop of whipped cream or Greek yogurt.
Store the cake at room temperature, covered with a cotton cloth or in a cake container, to prevent it from drying out. It will stay fresh for 3-4 days. It can also be frozen – preferably cut into portions, wrapped in plastic wrap, and placed in a ziplock bag. Before serving, simply thaw at room temperature.
📸 Ugotowane przez społeczność
Zaloguj się, aby dodać zdjęcieDodaj zdjęcie gotowej potrawy
Po zatwierdzeniu przez moderatora otrzymasz 10 punktów doświadczenia.
Nikt jeszcze nie dodał zdjęcia. Bądź pierwszy!
Comments (0)
Be the first to comment on this recipe!
Add a comment