Menu

Cold Cheesecake (Classic, Creamy)

Desserts Cakes and Bakes Dishes for Special Occasions 240 min Medium 13 wyświetleń ~57.89 PLN - (0)
Rate:
(0)

Description

Creamy no-bake cheesecake is a delicate, slightly sweet dessert made of a crumbly base from crushed cookies and a cheese filling based on cream cheese, whipped cream, and gelatin. The origin of cheesecakes dates back to European traditions, but the no-bake version is a modern interpretation, popular at parties and large gatherings, as it can be prepared in advance and served impressively. The cheesecake has a smooth, velvety texture, a subtle acidity from lemon and vanilla, and a contrast from the crunchy base. It looks elegant served on a cake stand, decorated with fresh fruits or fruit sauce — the perfect choice for New Year's Eve 2025 and other celebrations.

Składniki (11)

Servings:
10
  • Tea biscuits 300 g
  • Butter 150 g
  • Cream cheese 800 g
  • 30% heavy cream 250 g
  • Powdered sugar 120 g
  • Gelatin (powder) 12 g
  • Water for gelatin 120 g
  • Lemon juice 30 ml
  • Vanilla extract 5 g
  • ✨ Opcjonalne
  • Mixed fruits (strawberries/blueberries) 200 g
  • Fruit sauce / raspberry coulis 100 g
💰 Szacowany koszt dania: ~57.89 PLN (5.79 PLN/porcję)

💡 Kliknij na składnik aby oznaczyć jako użyty

Preparation steps

Base

1

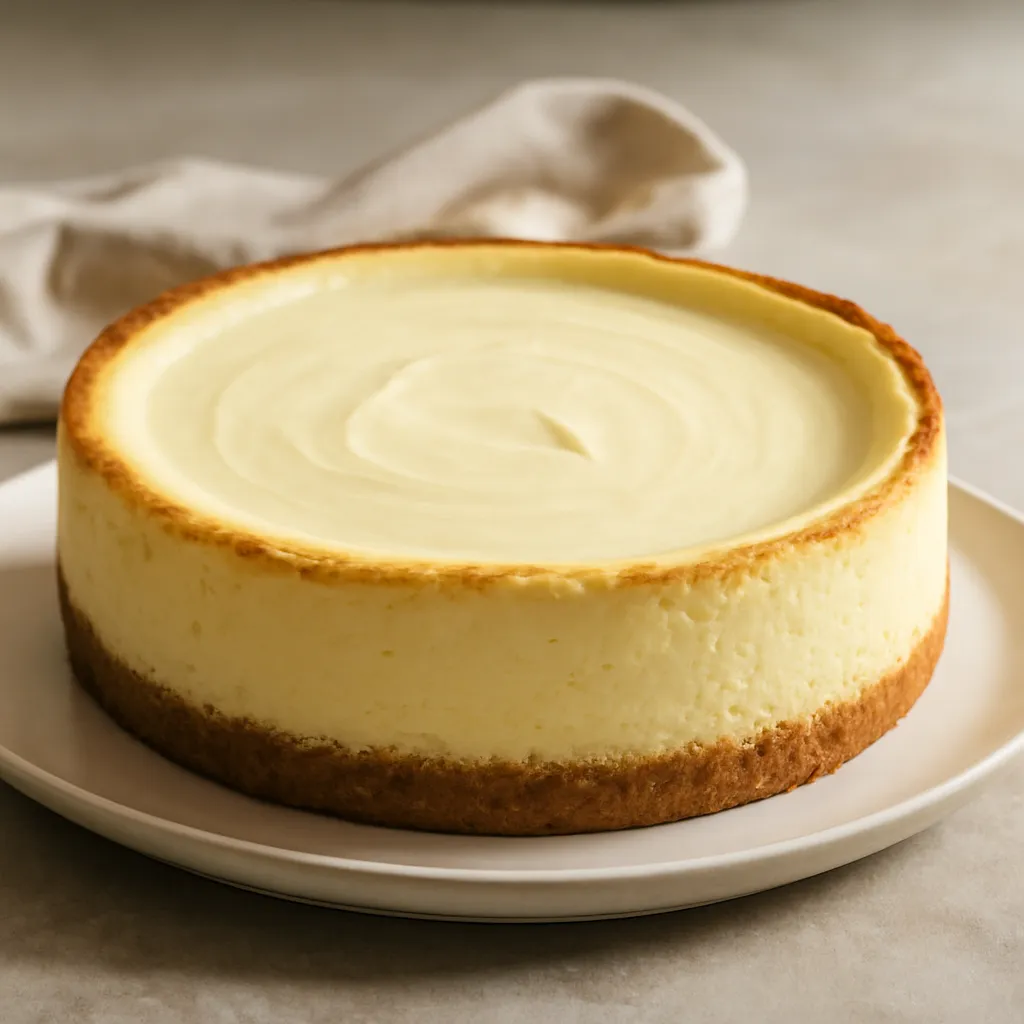
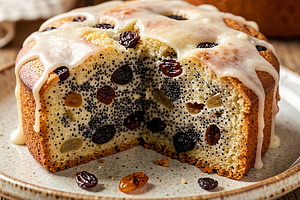
Preparing the springform pan: use a 24 cm diameter springform pan. Line the bottom with a circle of baking paper (trace the bottom and cut it out). Leave the sides of the springform pan unlined with paper so that the batter has something to cling to.

Use a 24 cm springform pan. Parchment paper cut at the edges will make it easier to remove. Tools: kitchen scale, scissors, springform pan.
2

Crush the biscuits: pour 300 g of cookies into a large ziplock bag and remove excess air. Seal the bag and roll it with a rolling pin using vigorous motions until you achieve fine crumbs about 1–3 mm in size (they should resemble wet sand). Alternatively, use a food processor on short pulses, being careful not to blend too long to avoid making too fine a flour.

Ingredients: Tea biscuits
The best tool: a rolling pin or a food processor. Be careful not to grind it to a powder — a slightly grainy base holds the filling better.
3

Melt the butter: transfer 150 g of butter to a small saucepan and melt over low heat, stirring until it is liquid and smooth. Set aside for 2 minutes to cool — it should be warm, not hot.

Ingredients: Butter
Use a heavy-bottomed saucepan or microwave. Do not overheat (do not allow to boil). Tools: saucepan, stirring spoon.
4

Combine the cookie crumbs with the butter: transfer the crushed biscuits to a large bowl, pour in the melted butter, and mix with a wide spoon or your fingers (being careful of the heat) until the mixture is uniform and resembles damp sand. Check: when squeezed in your hand, the mixture should hold together — if it crumbles, add a tablespoon of melted butter.

Ingredients: Tea biscuits, Butter
Use a large bowl and a wooden or silicone spoon. A common mistake: too little butter — the base will crumble. If so, add a maximum of 1-2 tablespoons more butter.
5

Forming the base: transfer the cookie mixture to the prepared springform pan and spread it evenly. Use the bottom of a glass or measuring cup to firmly press the base and achieve a level surface; the edges do not need to be high — about 7–8 mm thick. After pressing, the surface should be compact and slightly shiny from the butter.

Ingredients: Tea biscuits, Butter
Use a flat-bottomed glass or a spoon for whipping. It's best to chill the base in the fridge for 15–30 minutes to firm it up before adding the filling.

Cheese mixture

6

Prepare the cheese: take 800 g of cream cheese out of the fridge 10–15 minutes before use to reach room temperature. Place it in a large bowl and mix with a mixer using flat beaters (starting on low speed) for 1–2 minutes to soften the cheese and break up any lumps.

Ingredients: Cream cheese
Use a stand mixer or a hand mixer with a flat attachment. If the cheese has lumps, mix briefly to avoid incorporating too much air into the mixture.
7

Add powdered sugar and vanilla: to the softened cheese, add 120 g of powdered sugar and 5 g of vanilla extract. Mix on medium speed for 2–3 minutes until the mixture is smooth and free of visible sugar crystals. The mixture should be creamy, heavier than whipped cream, but smooth.

Ingredients: Powdered sugar, Vanilla extract, Cream cheese
Start at low speed so that the sugar doesn't fly out of the bowl. Make sure the powdered sugar is lump-free (sift if necessary).
8

Whip the cream: pour 250 ml of 30% cream into a chilled bowl and beat with a mixer on medium speed until soft peaks form (about 2–3 minutes). Soft peaks mean that the cream holds its shape, but the tips slightly droop — do not whip to stiff peaks, as it will be difficult to combine with the cheese mixture.

Ingredients: 30% heavy cream
Use a separate bowl for whipping the cream and well-chilled cream. A common mistake: overwhipping the cream — it will become grainy and won't combine nicely.
9

Prepare the gelatin for use (gelling agent): pour 12 g of gelatin into a bowl, add 60 g of cold water, and mix well. Set aside for 5–10 minutes until the gelatin swells and forms a thick jelly-like preparation (this is the blooming stage).

Ingredients: Gelatin (powder), Water for gelatin
Use a small, clean bowl. Do not mix with hot water at the beginning — the gelatin must first swell in cold water, otherwise it will be rubbery. Tool: small teaspoon.
10

Dissolving gelatin: after it has bloomed, pour in another 60 g of hot, but not boiling water (temperature around 60°C) into a bowl. Stir vigorously for 10–20 seconds until the gelatin is completely dissolved and becomes completely clear. Set aside to cool for 2–3 minutes — it should be slightly warm (about 35–40°C), not hot.

Ingredients: Gelatin (powder), Water for gelatin
You can heat it in the microwave for 8–12 seconds or use a small saucepan — do not allow it to boil, as the gelatin will lose its properties. Tool: thermos or mixing spoon.
11

Tempering gelatin and combining with the mixture: take 2–3 tablespoons of the cheese mixture (blended cheese with sugar) and slowly pour in about 2 tablespoons of melted, slightly cooled gelatin, mixing quickly to temper the gelatin. Then pour this tempered mixture back into the rest of the cheese mixture, blending slowly until combined (30–45 seconds).

Ingredients: Gelatin (powder), Cream cheese
This is a key step — if you pour in hot gelatin without tempering, lumps will form. Use a metal spoon and a mixer on low speed.
12

Add lemon juice: to the cheese mixture with gelatin, pour in 30 g of fresh lemon juice and blend briefly (15–20 seconds). Check the taste: the mixture should be slightly tangy, which balances the sweetness. If you want a stronger flavor, add a maximum of another 5–10 g of juice.

Ingredients: Lemon juice
Use a strainer when squeezing the lemon to remove seeds and larger fibers. Add the juice after dissolving the gelatin, but before adding the whipped cream.
13

Combining with whipped cream: gently fold in 250 ml of whipped cream into the cheese mixture in 2–3 batches using a wide spatula. Movements: folding, from bottom to top, until the mixture is uniform and free of streaks of cream. The mixture should have a smooth, fluffy consistency and a slightly shiny surface.

Ingredients: 30% heavy cream, Cream cheese
Do not mix too vigorously — you will lose fluffiness. Use a silicone spatula. A common mistake: mixing too harshly causes a loss of volume.
14

Pouring the mixture onto the base: pour the prepared cheese mixture evenly onto the chilled base in the springform pan. Use a spatula to smooth the top. The ideal height of the cheesecake is about 3–4 cm of mixture above the base in a 24 cm springform pan.

Ingredients: Cream cheese
Gently pour the mixture to avoid disturbing the set bottom. If air bubbles appear on the surface, gently tap the springform pan on the counter to release them.

Cooling and serving

15

Chilling: place the cheesecake in the refrigerator for at least 4 hours, preferably overnight (8–12 hours). The filling should be completely set — when touched, the surface should be firm and not runny. The longer it chills, the better the texture and flavor.

Place the springform pan on a flat shelf in the refrigerator. Do not cover it tightly right away — after about 30–60 minutes, you can loosely cover it with plastic wrap. A common mistake: shortening the cooling time results in spilling when cut.
17

Cutting and serving: before cutting, warm the knife by immersing it in hot water, dry it with a paper towel, and make the first, confident cut with a slight sawing motion. Between pieces, reheat the knife. Serve chilled (refrigerator temperature), cut into 10 equal pieces.

Use a long, hot, thin knife for clean cuts. A common mistake: cutting right after taking it out of the fridge without warming the knife leaves jagged edges.

Glaze and decoration

16

Decorating with fresh fruit and sauce (optional): just before serving, arrange 200 g of fresh fruit in the center and on the sides of the cheesecake or drizzle with a thin layer of 100 g of raspberry sauce. If you are using warm sauce, let it cool to room temperature before drizzling. Do not add the fruit to the cheesecake more than 30 minutes before serving to prevent it from releasing juice.

Ingredients: Fruit sauce / raspberry coulis
Additionally, you can add mixed fruits or coulis to enhance the flavor/texture. Use a teaspoon or tablespoon to aesthetically spread the sauce.

Fun Fact

💡

Cheesecake is one of the oldest known desserts — it was already known in ancient Greece. The modern 'no-bake' version developed thanks to the availability of cream cheese and gelatin.

Best for

Tips

🍽️ Serving

Serve chilled, decorated with fresh fruit or fruit sauce. For an elegant effect on New Year's Eve, arrange the fruit symmetrically and add mint leaves. Cutting with a knife heated in hot water yields smooth slices.

🥡 Storage

Store in the refrigerator, tightly covered (loosely with plastic wrap after initial setting) for up to 3 days. Do not freeze cheesecake with whipped cream — the texture will change after thawing. If you prepare the crust and filling in advance, store them separately and assemble a maximum of 12 hours before serving.

📸 Ugotowane przez społeczność

Zaloguj się, aby dodać zdjęcie
Dodaj zdjęcie gotowej potrawy

Po zatwierdzeniu przez moderatora otrzymasz 10 punktów doświadczenia.

🍲

Nikt jeszcze nie dodał zdjęcia. Bądź pierwszy!

Comments (0)

Be the first to comment on this recipe!

Add a comment

You might also like

Recipe Categories

Desserts
Desserts in: Christmas Eve Dinner

Desserts are a sweet ending to a meal that brings joy to both children and adults. In this category, we present recipes for a variety of sweets - from simple creams and mousses, to elegant panna cottas, and exquisite fruit tarts. Our desserts include both classics of Polish cuisine - fruit jelly,...

See all recipes in this category

Homemade cakes and pastries are the heart of Polish culinary tradition - sweet memories from childhood. In our collection, you will find recipes for classic yeast cakes, shortcrust, sponge, and cheesecake. Apple pie, poppy seed cake, gingerbread, Easter babka, chocolate cake, and New York cheesec...

See all recipes in this category

Dishes for special occasions are culinary masterpieces for birthdays, anniversaries, and holidays. Grilled beef steak with herb butter - restaurant quality at home. Beef Wellington - beef in puff pastry with duxelles. Roast duck with apples - a holiday tradition in a new edition. Pink salmon with...

See all recipes in this category
Reklama