Menu

Sweet Spelt Bread with Honey and Walnuts

Cakes and Bakes Breakfasts Przekąski 180 min Medium 12 wyświetleń ~25.27 PLN - (0)
Rate:
(0)

Description

Here is a recipe for bread that smells of home, warmth, and carefree days. Sweet Spelt Bread with Honey and Walnuts is an artisanal bake that you can successfully prepare in your own kitchen, even if it's your first encounter with yeast dough. Its secret lies in spelt flour, which gives it a slightly nutty flavor and a beautiful golden color. The addition of natural wildflower honey makes the bread subtly sweet, and its crust caramelizes appetizingly during baking. Crunchy pieces of walnuts hidden in the soft, moist crumb are a true delight for the palate. The bread is incredibly versatile – it’s perfect for a lazy breakfast with butter and homemade jam, as an accompaniment to a cheese and cold cuts platter, and also as a standalone, nutritious snack. Its appearance, with a cracked, golden crust and visible walnuts, makes it a centerpiece for any table.

Składniki (10)

Servings:
12
  • Light spelt flour (type 630 or 700) 500 g
  • Fresh yeast 25 g
  • Water 300 ml
  • wildflower honey 40 g
  • Rapeseed oil 30 g
  • Walnuts 100 g
  • Egg 1 szt.
  • 🌿 Przyprawy
  • Salt 8 g
  • ✨ Opcjonalne
  • Sunflower seeds 20 g
  • Dried cranberries 50 g
💰 Szacowany koszt dania: ~25.27 PLN (2.11 PLN/porcję)

💡 Kliknij na składnik aby oznaczyć jako użyty

Preparation steps

Yeast starter

1

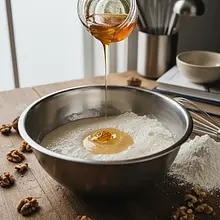
Start by preparing the starter, which means 'activating' the yeast. In a small bowl or cup, place the crumbled fresh yeast. From the total amount of water (300 ml), pour out about 100 ml, ensuring it is pleasantly warm (not hot!). Pour it over the yeast. Add one tablespoon of honey from the measured amount and one tablespoon of spelt flour. Mix everything thoroughly with a small whisk or fork until the yeast is completely dissolved and a smooth, liquid mixture forms. Cover the bowl with a clean cloth and set it in a warm, draft-free place (e.g., near a radiator or in a slightly warmed oven) for about 10-15 minutes. The ready starter should significantly increase in volume and be covered with a thick foam - this is a sign that the yeast is active and ready to work.

Ingredients: Fresh yeast, Water, wildflower honey, Light spelt flour (type 630 or 700)
This is a crucial moment! If after 15 minutes there is no foam on the starter, it means the yeast is inactive. You should then start over with a fresh batch of yeast. Water that is too hot (above 40°C) will kill the yeast!

The actual cake

2

In a large bowl, sift the spelt flour. Sifting will aerate the flour, making the bread fluffier. Add salt and mix it with the flour using a spoon. Then, create a deep well in the center of the flour, resembling a volcano crater.

Ingredients: Light spelt flour (type 630 or 700), Salt
Use a really large bowl, as the dough will double in size. Mixing the salt with the flour at the beginning is important to avoid direct contact with the yeast, which could weaken its action.
3

Pour the risen yeast starter into the well in the flour. Add the remaining warm water, the rest of the honey, and the rapeseed oil. All liquid ingredients should be in the center of the bowl.

Ingredients: Water, wildflower honey, Rapeseed oil
Make sure all liquid ingredients are at room temperature or slightly warm to avoid 'shocking' the yeast.
4

Using a wooden spoon or spatula, start mixing the ingredients, gradually scooping the flour from the edges to the center, until all the ingredients are combined into a uniform, sticky mass. When mixing with the spoon becomes difficult, switch to kneading by hand or use a mixer.

At this stage, the dough will be very sticky - this is normal for spelt dough. Do not add too much extra flour, as the bread may turn out dry and hard.
5

Transfer the dough to a lightly floured surface and start kneading. Knead the dough vigorously for about 8-10 minutes. The technique involves pushing the dough away from you with the heel of your hand, folding it in half, and turning it 90 degrees. Repeat this motion rhythmically. After this time, the dough should become smooth, elastic, and less sticky. Well-kneaded dough should spring back to its shape when pressed with a finger.

If you are using a stand mixer, knead the dough with the hook for about 6-8 minutes on medium speed. Spelt flour has a gentler gluten than wheat flour, so be careful not to 'overwork' the dough – it could become too loose.
6

Flatten the ball of dough on the countertop into a rectangle. Evenly sprinkle chopped walnuts on it. If using, add dried cranberries now as well. Fold the dough like a letter and gently knead for another 1-2 minutes, just until the additions are evenly distributed throughout the mixture. Shape the dough into a smooth ball.

Ingredients: Walnuts, Dried cranberries
You can chop the nuts coarsely or finely, depending on your preference. Try not to tear the dough when adding the nuts, gently knead them in.
7

Grease the inside of the bowl where you kneaded the dough with a little oil. Place the ball of dough in it, turning it so that it is coated with a thin layer of fat all over. Cover the bowl with plastic wrap or a damp cloth and set it aside to rise in a warm place for about 60-90 minutes. The dough is ready when it has doubled in size.

Ingredients: Rapeseed oil
To check if the dough is ready, perform the 'finger test': dust your finger with flour and gently press the dough. If the indentation slowly springs back, the dough is ready. If it bounces back immediately - it needs more time. If it collapses - it has risen too much.

Shaping and Baking

8

Remove the risen dough onto the countertop and gently punch it with your fist to deflate it. Briefly knead to remove air bubbles. Shape the dough into a round loaf or an elongated loaf, folding the edges inward to create tension on the surface. The smooth side should be on top.

Degassing the dough is important for achieving an even crumb structure. Try to make the surface of the loaf as smooth and taut as possible, without cracks.
9

Transfer the shaped loaf to a baking tray lined with parchment paper. Cover it loosely with a clean cloth and set aside for the second rise for about 30-40 minutes. During this time, the bread should noticeably puff up.

The second rising is shorter but equally important. Do not let the bread rise too much, as it may collapse during baking. It should increase in volume by about 50-70%.
10

At the end of the second rising, preheat the oven to 200°C (fan) or 220°C (top-bottom). Place a heatproof dish or an old baking tray at the bottom of the oven and pour a cup of boiling water into it. The steam will create a humid environment in the oven, which will give the bread a crispy crust.

Be careful when pouring boiling water into a preheated oven! Use oven mitts. This simple trick will ensure the bread crust is perfect.
11

In a small bowl, beat the egg with a fork. When the bread has risen, gently brush the entire top with the beaten egg using a kitchen brush. If using, sprinkle the bread with sunflower seeds. Finally, with a very sharp knife or razor blade, make 2-3 quick diagonal slashes on the top of the loaf, about 1 cm deep.

Ingredients: Egg, Sunflower seeds
The slashes not only decorate the bread but also allow it to rise evenly in the oven without uncontrolled cracking. Brushing with egg is optional, but it gives a beautiful shine and color.
12

Carefully place the baking tray with the bread into the preheated oven. Bake for the first 10 minutes at 200°C. After that, reduce the temperature to 180°C and bake for another 25-30 minutes. The bread is ready when it has a deep golden-brown color and sounds hollow when tapped on the bottom.

If the bread starts to brown too quickly on top, you can loosely cover it with aluminum foil for the last 10 minutes of baking. Baking time may vary depending on the oven.
13

Remove the baked bread from the oven immediately and transfer it to a metal cooling rack. Leave it there to cool completely, which will take at least 1-2 hours. Do not slice the bread while it is hot, as its crumb needs to 'set'.

Cooling on a rack is crucial to ensure air circulation and prevent the bottom of the bread from becoming soggy. Patience at this stage will be rewarded with the perfect texture of the slices.

Fun Fact

💡

Spelt is one of the oldest grains cultivated by humans, known since the Bronze Age, around 6000 BC. It is considered an ancestor of modern wheat. In the Middle Ages, it was attributed with medicinal and strengthening properties for the body.

Best for

Tips

🍽️ Serving

This bread is delicious on its own, but its flavor truly blossoms when served warm with a bit of butter and a drizzle of honey. It pairs fantastically with blue cheeses (e.g., gorgonzola), chive cream cheese, and delicate cold cuts like Parma ham. It can also be used as a base for avocado toast topped with a poached egg.

🥡 Storage

To keep bread fresh for as long as possible, store it in a linen bag or bread box at room temperature for up to 3-4 days. Avoid plastic bags, as they make the crust rubbery. Bread can also be sliced and frozen. To defrost, simply place the slices in a toaster or warm them in the oven.

📸 Ugotowane przez społeczność

Zaloguj się, aby dodać zdjęcie
Dodaj zdjęcie gotowej potrawy

Po zatwierdzeniu przez moderatora otrzymasz 10 punktów doświadczenia.

🍲

Nikt jeszcze nie dodał zdjęcia. Bądź pierwszy!

Comments (0)

Be the first to comment on this recipe!

Add a comment

You might also like

Recipe Categories

Homemade cakes and pastries are the heart of Polish culinary tradition - sweet memories from childhood. In our collection, you will find recipes for classic yeast cakes, shortcrust, sponge, and cheesecake. Apple pie, poppy seed cake, gingerbread, Easter babka, chocolate cake, and New York cheesec...

See all recipes in this category

Breakfast is the most important meal of the day - energy for a good start and a tasty morning. Scrambled eggs, fried eggs, poached eggs, and omelets - protein classics. Oatmeal with fruits, nuts, and honey - a healthy and filling fit breakfast. American pancakes and French crepes - a sweet start ...

See all recipes in this category
Przekąski
Przekąski in: Sylwester

Przekąski to idealny sposób na umilenie czasu oczekiwania na północ, powinny być małe, ale efektowne.

See all recipes in this category

Vegetarian cuisine is a wealth of flavors without meat - healthy, colorful, and filling. Plant-based proteins: lentils, chickpeas, beans, peas, and soy take center stage. Cheeses and dairy: feta, halloumi, ricotta, and mascarpone in main dishes. Eggs in various forms: omelets, frittata, shakshuka...

See all recipes in this category
Reklama