Menu

Sweet Spelt Bread with Honey and Walnuts

Cakes and Bakes Breakfasts Snacks 160 min Medium 4 wyświetleń ~12.96 PLN - (0)
Rate:
(0)

Description

Here is a recipe for bread that smells of home and warmth. Sweet Spelt Bread with Honey and Walnuts is an absolutely unique bake, combining the rustic character of spelt flour with the gentle sweetness of natural honey and the crunchiness of walnuts. Spelt, one of the oldest grains cultivated by humans, gives the bread a slightly nutty flavor and a beautiful golden color. Honey not only sweetens but also makes the crumb wonderfully moist and keeps it fresh for longer. Walnuts, toasted inside, release their intense aroma and add a satisfying texture to each slice. The bread has a crispy, golden crust and an incredibly soft, elastic interior. It is perfect for a slow, weekend breakfast, served with butter, cottage cheese, or homemade jam. It also works well as a base for gourmet sandwiches with blue cheese and pear or as an addition to a cheese and cold cuts platter.

Składniki (9)

Servings:
12
  • Light spelt flour (type 630 or 700) 500 g
  • Fresh yeast 25 g
  • Water 300 ml
  • wildflower honey 60 g
  • Rapeseed oil 30 g
  • Shelled walnuts 100 g
  • 🌿 Przyprawy
  • Salt 10 g
  • ✨ Opcjonalne
  • Egg 1 szt.
  • Mountain oats 15 g
💰 Szacowany koszt dania: ~12.96 PLN (1.08 PLN/porcję)

💡 Kliknij na składnik aby oznaczyć jako użyty

Preparation steps

Preparing the yeast starter

1

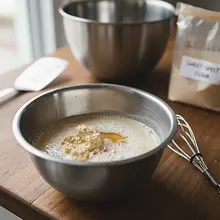
Start by activating the yeast. In a small bowl or cup, place the crumbled fresh yeast. From the total amount of water (300 ml), pour out about 100 ml. Warm it slightly so that it is warm but not hot (the ideal temperature is 37°C, like body temperature). Pour the warm water over the yeast, add one teaspoon of honey from the measured amount, and mix thoroughly with a fork until the yeast is completely dissolved. Set the bowl in a warm place for about 10-15 minutes. After this time, a thick, beige foam, called a 'cap', should appear on the surface. This is a sign that the yeast is active and ready to work.

Ingredients: Fresh yeast, Water, wildflower honey
The most common mistake is using water that is too hot, which 'kills' the yeast. Check the temperature by touching the water with the inner side of your wrist - it should feel pleasantly warm. If after 15 minutes no foam appears, it means the yeast is inactive and you should start over with a fresh batch.

Kneading the dough

2

In a large bowl, sift the spelt flour. Sifting will aerate the flour, making the bread fluffier. Add salt and mix it with the flour using a spoon. We add salt now to prevent it from coming into direct contact with the yeast, which could weaken its action. Make a well in the center of the flour, resembling a volcano crater.

Ingredients: Light spelt flour (type 630 or 700), Salt
Use a large bowl to have enough space for mixing and rising the dough. Sifting the flour through a sieve is an important step that should not be skipped – the bread will have a lighter texture.
3

Pour the prepared, frothy yeast starter into the well in the flour. Add the rest of the warm water, the remaining honey, and the rapeseed oil. Start mixing the ingredients, initially using a wooden spoon or spatula, scooping the flour from the edges to the center, until all the ingredients roughly combine and a sticky, irregular ball of dough forms.

Ingredients: Water, wildflower honey, Rapeseed oil
At this stage, the dough will be very sticky and tacky - this is normal. Do not add more flour just yet. All liquid ingredients should be at room temperature or slightly warm.
4

Transfer the dough to a lightly floured surface or pastry board. Now it's time to knead. Knead the dough vigorously for about 10-12 minutes. Use the heel of your hand to push the dough away from you, then fold it in half and turn it 90 degrees, repeating the process. The dough is ready when it becomes smooth, elastic, and stops sticking to your hands. When pressed with a finger, it should slowly return to its shape. If you are using a stand mixer, knead the dough with the hook for about 7-8 minutes on medium speed.

Ingredients: Light spelt flour (type 630 or 700)
The key is patience. Initially sticky dough, through kneading, will develop a gluten network and become elastic. Dust the surface with only a minimal amount of flour so that the dough does not become too tough. This is the most important step for achieving a fluffy crumb.
5

When the dough is smooth and elastic, flatten it slightly on the countertop. Evenly sprinkle chopped walnuts over its surface. Fold the dough in half and gently knead, just until the nuts are evenly distributed throughout the mixture. Try not to knead for too long to avoid damaging the structure of the dough.

Ingredients: Shelled walnuts
You can chop the nuts into larger or smaller pieces, depending on your preference. If you want them to be crunchier, you can toast them in a dry pan for 5-7 minutes and let them cool.

First rising

6

Form a smooth ball from the dough, tucking the edges underneath. Wash the bowl in which you mixed the ingredients, dry it, and grease it with a thin layer of oil. Place the ball of dough in it and turn it once so that the entire surface is coated with fat. Cover the bowl with a clean kitchen towel or plastic wrap and set it in a warm, draft-free place for about 60-90 minutes. The dough should double in size.

Ingredients: Rapeseed oil
The ideal place for rising is a slightly warmed oven (up to 30-40°C, then turned off) or a spot near a radiator. To check if the dough is ready, perform the 'finger test': dust your finger with flour and gently press the dough. If the indentation slowly fills in, the dough is ready. If it springs back immediately - it needs more time.

Shaping and second rising

7

Take the risen dough out onto the countertop and gently punch it down with your fist to release the gas. Flatten it with your hands into a rectangle about 2 cm thick. Then roll the dough tightly, starting from the shorter side, like a roulade. While rolling, press the dough to eliminate air bubbles. Finally, seal the end and sides well by tucking them under the loaf. This will create tension on the surface of the dough, which will help it rise nicely in the oven.

Use a loaf pan measuring approximately 25x12 cm. Grease it thoroughly with butter and dust with flour or line it with baking paper to prevent the bread from sticking.
8

Transfer the shaped loaf to the prepared loaf pan, seam side down. Cover the pan with a cloth and set aside for the second rise for about 30-40 minutes. The bread should rise and fill the pan, reaching its edges.

The second rise is shorter than the first. Be careful not to let the dough overproof, as it may collapse during baking. In the meantime, preheat the oven.

Baking

9

20 minutes before the end of the rising time, start preheating the oven to 200°C (fan) or 220°C (top-bottom). Place a heatproof dish or tray on the lowest rack of the oven and pour a cup of boiling water into it. The steam generated at the beginning of baking will give the bread a crispy crust and help it rise better.

Be careful when pouring boiling water into a hot oven. Use oven mitts. Steam is crucial for achieving the perfect crust, so don't skip this step.
10

When the bread has risen, just before placing it in the oven, you can decorate it. In a small bowl, beat an egg with a tablespoon of water. Using a kitchen brush, gently brush the top of the loaf. Then, if you like, sprinkle it with oats. Finally, using a very sharp knife or razor blade, make a longitudinal cut on the top about 1 cm deep. This will help control the bread's cracking during baking.

Ingredients: Egg, Mountain oats
Brushing with egg is optional, but it gives a beautiful shine and color. If you want a vegan version, you can brush the bread with plant milk. Make the cut in one confident motion.
11

Place the loaf pan in the preheated oven on the middle rack. Bake for 10 minutes at 200°C (fan) / 220°C (top and bottom). After this time, reduce the temperature to 180°C (fan) / 200°C (top and bottom) and bake for another 30-35 minutes. The bread is ready when it has a deep golden-brown color and sounds hollow when tapped on the bottom.

If the top of the bread starts to brown too quickly, you can loosely cover it with a piece of aluminum foil. To check if it is baked, carefully remove it from the pan and tap the bottom – a hollow sound is a sign that it is ready.
12

Immediately remove the baked bread from the pan and transfer it to a metal cooling rack. This is a very important step, as leaving it in the hot pan will cause the bottom crust to steam and become soggy. Leave the bread on the rack to cool completely, which will take at least 1-2 hours. Slicing hot bread can ruin its structure.

We know that the smell of freshly baked bread is tempting, but patience will be rewarded. The cooled bread will have a perfectly crispy crust and a springy crumb. Use a cooling rack or an oven rack to ensure air circulation from all sides.

Fun Fact

💡

Spelt is one of the oldest grains in the world, cultivated since the Bronze Age. It was a staple in the diet of ancient Romans, who valued it for its nutritional properties and believed it gave strength to gladiators. Unlike common wheat, its genetic structure has remained virtually unchanged for millennia.

Best for

Tips

🍽️ Serving

The bread tastes exquisite still slightly warm, with a thick layer of real butter melting on the porous crumb. You can also serve it with cottage cheese and honey, homemade plum or fig jam. It makes an excellent base for more sophisticated sandwiches, e.g., with goat cheese, arugula, and caramelized pear.

🥡 Storage

To keep bread fresh for as long as possible, store it in a linen bag or bread box at room temperature. Avoid the refrigerator, which speeds up staleness. Bread will stay fresh for 3-4 days. You can also slice it and freeze it, then thaw individual portions in a toaster or oven.

📸 Ugotowane przez społeczność

Zaloguj się, aby dodać zdjęcie
Dodaj zdjęcie gotowej potrawy

Po zatwierdzeniu przez moderatora otrzymasz 10 punktów doświadczenia.

🍲

Nikt jeszcze nie dodał zdjęcia. Bądź pierwszy!

Comments (0)

Be the first to comment on this recipe!

Add a comment

You might also like

Recipe Categories

Homemade cakes and pastries are the heart of Polish culinary tradition - sweet memories from childhood. In our collection, you will find recipes for classic yeast cakes, shortcrust, sponge, and cheesecake. Apple pie, poppy seed cake, gingerbread, Easter babka, chocolate cake, and New York cheesec...

See all recipes in this category

Breakfast is the most important meal of the day - energy for a good start and a tasty morning. Scrambled eggs, fried eggs, poached eggs, and omelets - protein classics. Oatmeal with fruits, nuts, and honey - a healthy and filling fit breakfast. American pancakes and French crepes - a sweet start ...

See all recipes in this category
Snacks
Snacks in: New Year's Eve

Snacks are the perfect way to make the wait for midnight more enjoyable; they should be small but impressive.

See all recipes in this category
Reklama