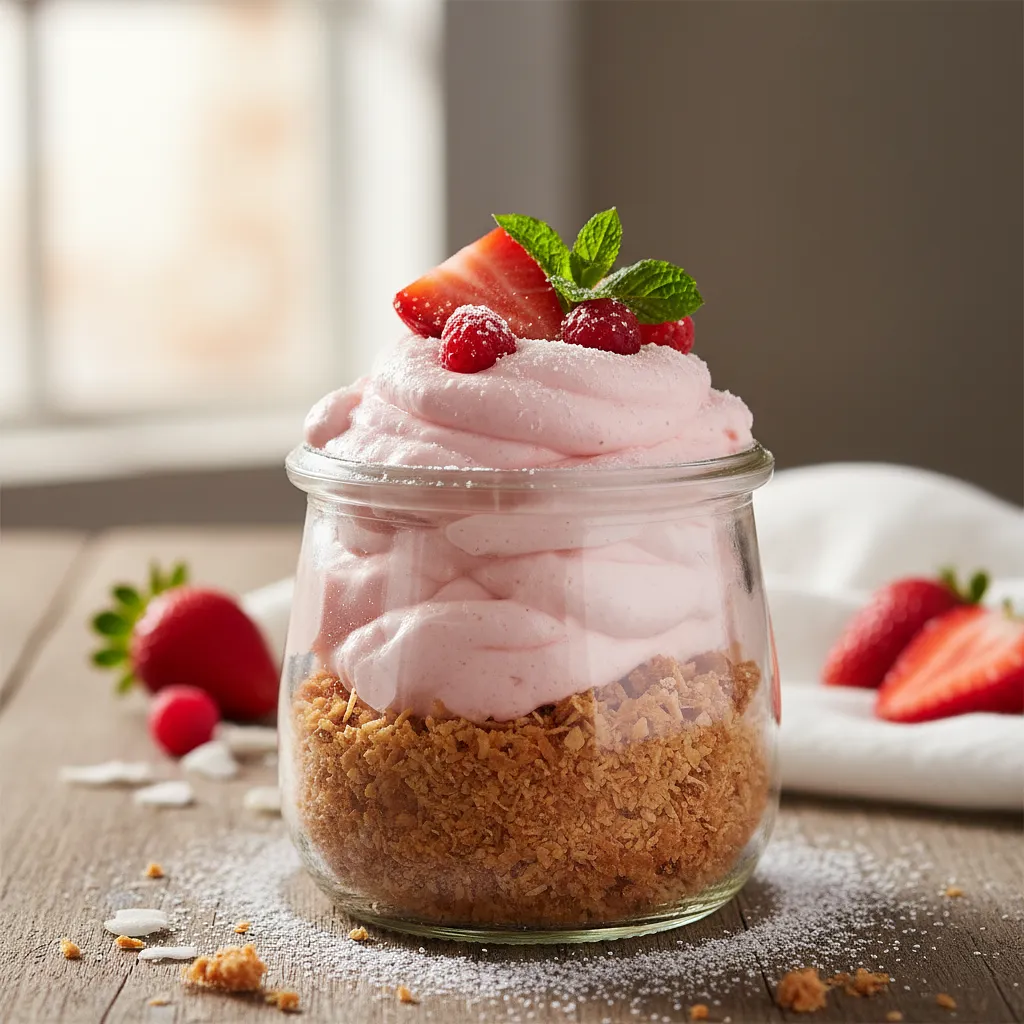
Here is a dessert that is the essence of summer captured in the form of a light as a cloud no-bake cake. "Strawberry Cloud on a Coconut Base" is the perfect combination of three layers that together create an unforgettable composition of flavors and textures. At the very bottom is a crunchy, buttery base made from biscuits enriched with a hint of toasted coconut, which adds an exotic aroma. The middle layer is a velvety, fluffy cream based on mascarpone cheese and Greek yogurt – it is gently sweet, with a refreshing note of vanilla and lemon, and its texture literally melts in your mouth. Topping it all off is a shiny, ruby layer of jelly, in which an artistic mosaic of fresh, juicy strawberries is embedded. This cake not only tastes exquisite but also looks stunning, making it the star of any table. Perfect for hot days, garden parties, or as a light dessert after a family dinner. Its preparation does not require the use of an oven, which is an additional advantage, and the final effect will surely delight all guests.
Prepare a 24 cm springform pan. Open it and place a sheet of parchment paper at the bottom, so that the edges stick out. Then close the springform ring, tightening the paper. You can cut off any excess paper sticking out with scissors. This way, after cooling, the cake will be easy to transfer to a serving plate.
The best choice is a springform pan. Make sure it is clean and dry. Lining the bottom with paper is crucial to prevent sticking.
2
Place the biscuits in a sturdy ziplock bag. Seal it, releasing most of the air. Using a rolling pin or a meat mallet, crush and smash the biscuits until you achieve a fine sand-like consistency. You can also use a food processor or a blender – pulse the cookies for several seconds.
Ingredients:
Biscuits
Be careful not to leave too large pieces of biscuits, as the base will crumble. On the other hand, don't blend into a powder – fine crumbs will add texture. The bag method is great if you don't have a food processor.
3
Place the butter in a small saucepan and heat it on low power until completely melted. Be careful not to burn it. You can also melt the butter in a bowl in the microwave, heating it in 30-second intervals.
Ingredients:
Butter
When the butter starts to foam, remove it from the heat. Lightly browned butter (known as beurre noisette) will add a nutty flavor, but it requires attention to avoid burning.
4
In a large bowl, add the crushed biscuits. If using, add the coconut flakes. Pour in the melted butter and mix thoroughly with a spoon or spatula until all the dry ingredients are evenly moistened. The mixture should resemble wet sand.
Ingredients:
Biscuits, Butter, Coconut flakes
This is an important step – make sure that the entire cookie dough is sticky from the butter. If it is too dry, the bottom will crumble after cooling.
5
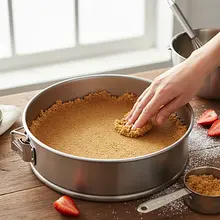
Transfer the cookie dough to the prepared springform pan. Spread it evenly, then press it firmly to the bottom using the bottom of a glass or the rounded side of a spoon. Create an even, compact layer. Place the springform pan in the refrigerator for at least 30 minutes to allow the base to set.
The more you press down the bottom, the more stable it will be and easier to cut. A level surface is important for the aesthetics of the subsequent layers. Chilling is essential!
Cheese mixture
6
In a small bowl, place the powdered gelatin. Pour 80 ml of hot (but not boiling!) water over it. Whisk vigorously with a small whisk or fork for about a minute until all the lumps dissolve and the liquid is perfectly smooth. Set aside to cool slightly.
Ingredients:
Gelatin, Water
The temperature of the water is crucial – boiling water can weaken the properties of gelatin. If there are lumps, you can briefly place the bowl over a pot of steaming water and stir until they dissolve.
7
In a large bowl, place the chilled mascarpone cheese, Greek yogurt, powdered sugar, and vanilla extract. Using a mixer on medium speed, beat the ingredients for 2-3 minutes, just until they combine into a smooth, uniform, and thick cream. Do not whip for too long to avoid the mixture curdling.
All ingredients for the filling should be at room temperature (except for the mascarpone, which is better whipped when chilled), as this will make it easier to combine them. Start mixing at a low speed to prevent the powdered sugar from flying into the air.
8
To the bowl with slightly cooled but still liquid gelatin, add two large tablespoons of the prepared cheese mixture. Mix vigorously to combine the ingredients. This process is called "tempering" the gelatin. Then pour the tempered gelatin into the bowl with the rest of the cheese mixture and immediately blend everything on low speed until perfectly combined.
Ingredients:
Gelatin
This is the most important step! Directly pouring gelatin into a cold mixture will create unsightly "clumps." Tempering equalizes the temperatures and ensures a smooth consistency of the cream. Act quickly once you have combined the gelatin with the mixture.
9
Take the springform pan with the chilled base out of the fridge. Pour the prepared cheese mixture onto it. Gently smooth the surface using a spatula or the back of a spoon. Return the cake to the fridge for about 1-2 hours, until the cheese mixture is clearly set and stable to the touch.
You can gently tap the springform pan on the countertop to remove air bubbles and level the mixture. The mixture must be well chilled before pouring the jelly on top; otherwise, the layers will mix.
Fruit and Jelly Layer
10
While the cheese mixture is setting, prepare the strawberries. Wash them thoroughly under running water, then gently dry with a paper towel. Remove the green stems. Leave some of the prettiest strawberries whole or cut them in half, and slice the rest.
Ingredients:
Strawberries
It is very important that the strawberries are dry. Excess water can thin the jelly. Remove the stems with a small knife, cutting out the cone at the base of the fruit.
11
Take the dough out of the fridge. Check with your finger if the top is firm. Arrange the prepared strawberries on the set cheesecake layer, creating a decorative mosaic. You can alternate them – halves, slices, whole fruits – to create an interesting pattern.
Ingredients:
Strawberries
Be creative! You can arrange the fruits in circles, spirals, or an artistic mess. Remember that the arranged fruits will be visible through the transparent jelly.
12
Pour both packets of jelly into a bowl or pitcher. According to the instructions on the package, dissolve them in hot water (usually a total of about 800-900 ml, but check the instructions - it's worth using 100 ml less water than the recipe states for a firmer jelly). Stir vigorously until the powder is completely dissolved. Set the jelly aside at room temperature to cool COMPLETELY. It must be cool but still liquid.
Ingredients:
Strawberry jelly, Water
It is absolutely crucial that the jelly is cold before pouring it onto the cake. Hot or even warm jelly will melt the cheese mixture and ruin the layered effect. The cooling process can take about an hour.
13
When the jelly is cold, very carefully and slowly pour it over the layer of strawberries. To avoid disturbing the arranged fruits and cheese mixture, pour the liquid over the convex side of a large spoon, holding it just above the surface of the cake. Place the cake in the refrigerator for at least 4-6 hours, or preferably overnight, for the jelly to fully set.
Ingredients:
Strawberry jelly
The technique with the spoon disperses the flow of liquid, which is very important for maintaining the aesthetics of the cake. Patience is key – do not try to speed up the setting in the freezer.
Serving
14
Before serving, gently run a thin, sharp knife along the inner edge of the springform pan to separate the cake from the mold. Then carefully open and remove the ring. Decorate the top of the cake with fresh mint leaves. Serve immediately, cutting into portions with a sharp knife dipped in boiling water and dried.
Ingredients:
Listki świeżej mięty
Heating the knife will allow it to smoothly glide through the layer of jelly and cream, creating perfectly even and clean pieces of cake. This is a professional pastry chef trick!
Fun Fact
💡
No-bake cakes, especially no-bake cheesecakes, gained immense popularity in the United States in the 1930s with the widespread adoption of refrigerators in homes and the invention and commercialization of packaged gelatin and cream cheese. They were marketed as modern, quick, and labor-saving desserts for homemakers.
Always serve the cake well chilled, straight from the fridge. It cuts perfectly with a knife that has a long, thin blade, which should be dipped in hot water and wiped dry before each cut. Each portion can be additionally decorated with a dollop of whipped cream or a scoop of vanilla ice cream.
🥡Storage
Store the cake in the refrigerator, covered with plastic wrap or under a dome, to prevent it from absorbing odors. It is best within 2-3 days of preparation. After that time, the biscuit base may become softer. The dessert is not suitable for freezing.
Homemade cakes and pastries are the heart of Polish culinary tradition - sweet memories from childhood. In our collection, you will find recipes for classic yeast cakes, shortcrust, sponge, and cheesecake. Apple pie, poppy seed cake, gingerbread, Easter babka, chocolate cake, and New York cheesec...
Recipes for kids are tasty, healthy, and visually appealing dishes - for little picky eaters and food lovers. Colorful and fun dishes: animals made from vegetables, faces from food, and rainbow plates. Hidden vegetables: spinach in pancakes, carrots in sauce, and zucchini in batter. Energetic bre...


Comments (0)
Be the first to comment on this recipe!
Add a comment