This savory galette is the essence of spring elegance in a rustic form. It is a type of open, freely shaped tart on a flaky, buttery crust that does not require a specialized baking dish. Its irregular shape is its greatest charm. It is filled with juicy pieces of chicken, tender, slightly crunchy asparagus, and creamy, flavorful goat cheese, all brought together by a velvety sauce based on crème fraîche. The golden, crispy crust perfectly contrasts with the rich, moist filling. The dish is incredibly versatile – it tastes great both warm, straight from the oven, and at room temperature, making it an ideal candidate for a work lunch, an elegant picnic snack, or a light dinner alongside a salad. Its appearance is as impressive as its taste, drawing the eye with the green of the asparagus and the white of the cheese against the golden backdrop of the pastry.
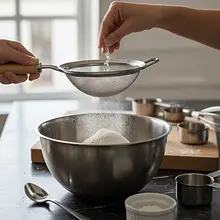
In a large bowl, sift the flour, add 2 pinches of salt (2g) and mix. Take the very cold butter out of the fridge and cut it into small cubes (about 1x1 cm). Add the butter cubes to the flour. Now, using only your fingertips, quickly rub the butter into the flour until the mixture resembles wet sand with visible pea-sized lumps of butter. Work quickly to prevent the butter from warming up.
Ingredients:
Wheat flour (type 450 or 500), Butter, Salt
The most important thing is to keep the butter cold. The heat from your hands will melt it, and the dough will turn out hard instead of crumbly. You can also use a pastry cutter or a food processor (a few pulse movements), which is even faster and safer for the temperature of the butter.
2
In a small bowl, beat the egg with a fork. Separate the yolk from the white (keep the white for brushing the dough). Add the yolk and 2 tablespoons of ice-cold water (30 ml) to the mixture of flour and butter. Quickly combine the ingredients using a fork or spatula, then knead them with your hands just until they form a cohesive ball. Do not knead the dough for too long.
Ingredients:
Egg, Ice-cold water
Excessive kneading of shortcrust pastry develops gluten, which makes it hard and chewy after baking. Just a few movements are enough to combine the ingredients. If the dough is too dry and crumbles, add another teaspoon of cold water.
3
Shape the dough into a ball, slightly flatten it, wrap it tightly in plastic wrap, and place it in the refrigerator for at least 30 minutes, preferably for an hour. Chilling the dough is crucial for its structure.
This step allows the butter to firm up again, which will ensure a layered, flaky texture after baking. The gluten in the flour will also 'rest', making the dough easier to roll out and preventing it from shrinking during baking.
Preparation of the Filling
4
Wash the asparagus. Hold each asparagus spear by both ends and bend it – it will break at the point where the tough, woody part ends (discard this part). Leave the tips whole and cut the stems into 2-3 cm pieces. Bring a pot of water with a little salt to a boil. Add the prepared asparagus to the boiling water and cook for 2-3 minutes (this is called blanching). Drain them immediately and rinse with cold water to stop the cooking process and preserve their beautiful green color.
Ingredients:
Green asparagus
Blanching makes the asparagus have a more intense color and remain slightly crunchy after baking. Rinsing with cold water is called 'shocking' - this is a very important step.
5
Clean the chicken fillet of membranes, wash it, and dry it with a paper towel. Cut it into small cubes (about 1.5 x 1.5 cm). Season with salt (1 pinch - 1g) and freshly ground pepper (2 pinches - 2g). In a pan, heat a tablespoon of oil (15 ml) over medium heat. Fry the chicken for 5-7 minutes, stirring occasionally, until golden and fully cooked. Remove from the pan and set aside.
Use a non-stick frying pan with a diameter of about 24-26 cm. Do not overcook the chicken to avoid it becoming dry. It should be juicy on the inside.
6
Peel the red onion and cut it into thin feathers. In the same pan where the chicken was cooked (you don't need to wash it), heat the remaining oil if necessary. Add the onion and sauté over low heat for about 8-10 minutes, until it softens, becomes translucent, and lightly caramelizes, gaining sweetness.
Ingredients:
Red onion
Frying the onion over low heat allows its natural sweetness to be released without burning. Stir it occasionally to ensure it cooks evenly.
7
In a medium bowl, combine the cooked chicken, sautéed onion, chopped asparagus stalks (reserve the tips for garnish), crème fraîche, and half of the crumbled goat cheese (50g). Season with salt (1 pinch - 1g) and pepper to taste. If using, add chopped fresh thyme leaves. Gently mix everything together.
Gently mix the ingredients to avoid crushing the pieces of chicken and asparagus. The filling should be thick and creamy.
Shaping and Baking the Galette
8
Preheat the oven to 200°C (fan) or 220°C (top-bottom). Take the chilled dough out of the fridge. On a lightly floured countertop, roll out the dough into a circle about 30-32 cm in diameter and 3-4 mm thick. Don't worry if the edges are not perfectly even – that's part of the charm of a galette. Transfer the rolled-out dough to a large baking sheet lined with parchment paper.
The easiest way to transfer the dough is to loosely roll it onto a rolling pin and unroll it onto the baking sheet. If the dough starts to stick while rolling, sprinkle it with a little flour or chill it again in the fridge for 10 minutes.
9
In the center of the dough, evenly spread the prepared filling, leaving a free margin of about 4-5 cm from the edge. On top of the filling, decoratively arrange the reserved asparagus tips and crumble the remaining goat cheese (50g) over it.
Ingredients:
Soft goat cheese
Leaving a free edge is key, as you will soon fold it over the filling, creating the characteristic 'envelope' for the galette.
10
Fold the free edges of the dough inward over the filling, creating pleats every few centimeters. Press them lightly to adhere to the filling. The center of the galette remains uncovered.
Don't try to make perfectly even folds. A relaxed, slightly careless look is desirable and adds a rustic character to the dish.
11
In a bowl, whisk the egg white that was left over from preparing the dough with a fork. Using a kitchen brush, brush the wrapped edges of the dough with it. This will give them a beautiful golden color and shine after baking. Place the tray in the preheated oven and bake for about 30-35 minutes, until the edges of the dough are deep golden and crispy, and the filling is appetizingly baked.
Ingredients:
Egg
Remember that every oven bakes a little differently. Keep an eye on the galette towards the end of baking. If the edges are browning too quickly, you can loosely cover them with aluminum foil for the last 10 minutes.
12
Remove the galette from the oven and let it sit on the baking sheet for about 10 minutes to cool slightly. This will allow the filling to set a bit, making it easier to slice. Before serving, if using, sprinkle the top with coarsely chopped, toasted walnuts for added crunch. Serve warm or at room temperature.
Ingredients:
Walnuts
To toast the nuts, place them in a dry skillet and heat over low heat for 3-4 minutes, until they start to smell. Be careful not to burn them.
Fun Fact
💡
The word 'galette' comes from Old French and originally meant a flat cake. They were originally simple, rustic baked goods made from buckwheat flour, typical of Brittany. Today's form of galette, as a freely shaped tart, pays tribute to this rustic simplicity and the lack of need for specialized molds.
The galette is delicious on its own, but it pairs perfectly with a simple salad of arugula, cherry tomatoes, and lemon vinaigrette. It can also be served with a dollop of natural yogurt or a light garlic sauce. It is cut like a pizza, into triangular pieces.
🥡Storage
The remaining galette can be stored in the refrigerator, covered with foil, for 2-3 days. It is best to reheat it in an oven preheated to 180°C for 10-15 minutes, which will help the pastry regain its crispness. Reheating in the microwave will make the pastry soft.
Takeaway dishes are a tasty and practical solution for busy people - prepared to eat outside the home. Recipes for lunch boxes that transport well and taste great even cold. Salads in jars, wraps, panini sandwiches, and Japanese-style bento boxes. Dishes that can be reheated in the microwave: cur...
Dishes for special occasions are culinary masterpieces for birthdays, anniversaries, and holidays. Grilled beef steak with herb butter - restaurant quality at home. Beef Wellington - beef in puff pastry with duxelles. Roast duck with apples - a holiday tradition in a new edition. Pink salmon with...
Comments (0)
Be the first to comment on this recipe!
Add a comment