Menu

Caramel-Nut Ice Cream Sandwiches with Oatmeal Cookies

Desserts Desserts for Kids Dishes for Special Occasions 90 min Medium 4 wyświetleń ~88.09 PLN - (0)
Rate:
(0)

Description

Here is a recipe for a dessert that will take you back to the world of childhood joy, but in a decidedly more refined version. Caramel-Pecan Ice Cream Sandwiches are a combination of two perfectly crunchy yet chewy oatmeal cookies with a hint of cinnamon, filled with velvety homemade caramel ice cream made without an ice cream maker. The ice cream, enriched with a sweet and salty caramel sauce and crunchy pecan pieces, creates the perfect contrast to the spiced flavor of the cookies. This dessert delights not only with its taste but also with its texture – from the softness of the cookies, through the creaminess of the ice cream, to the crunchiness of the nuts. Perfect for a summer afternoon, a children's party, or as a special treat after a long day. Making them at home gives you full control over the quality of the ingredients and allows you to create a dessert that is much tastier than store-bought versions.

Składniki (16)

Servings:
8
  • Butter 150 g
  • Brown sugar 150 g
  • White sugar 50 g
  • Egg 1 szt.
  • Vanilla extract 5 g
  • Wheat flour 200 g
  • Baking soda 5 g
  • Mountain oats 250 g
  • Sweetened condensed milk 400 ml
  • 36% heavy cream 500 ml
  • Caramel sauce 150 g
  • Pecan nuts 80 g
  • 🌿 Przyprawy
  • Ground cinnamon 2 g
  • Salt 0.1 szczypt
  • ✨ Opcjonalne
  • Chopped dark chocolate 50 g
  • Nut topping 30 g
💰 Szacowany koszt dania: ~88.09 PLN (11.01 PLN/porcję)

💡 Kliknij na składnik aby oznaczyć jako użyty

Preparation steps

Oatmeal Cookies

1

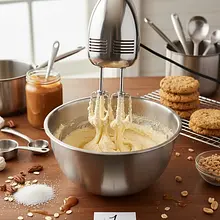
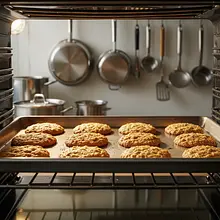
Start by preparing the cookies. Preheat the oven to 180°C (conventional mode, no fan). Line two large baking sheets with parchment paper. In a large bowl, place the softened butter (taken out of the fridge about 1 hour earlier), brown sugar, and white sugar.

Ingredients: Butter, Brown sugar, White sugar
Use a hand mixer or a stand mixer with a paddle attachment. If you don't have a mixer, you can use a sturdy wooden spoon and the strength of your own hands. The baking sheets need to be large, as the cookies will spread during baking.
2

Beat the butter with the sugars on high speed for about 3-4 minutes. The mixture should become light, fluffy, and creamy. The sugar should partially dissolve. Occasionally stop the mixer and scrape down the sides of the bowl with a silicone spatula to ensure everything is evenly combined.

This step is crucial! Properly aerating the butter with sugar will ensure that the cookies have the right texture. Do not shorten the creaming time. The mixture is ready when there are no visible lumps of butter.
3

Reduce the mixer speed to the minimum. Add the egg (at room temperature) and vanilla extract. Mix only until the ingredients are combined, about 30 seconds. Do not mix too long to avoid over-aerating the mixture.

Ingredients: Egg, Vanilla extract
An egg at room temperature will blend more easily with the butter mixture and will not cause it to curdle. If you forgot to take the egg out earlier, immerse it for 5 minutes in a bowl of warm water.
4

In a separate medium bowl, mix the dry ingredients. Add the all-purpose flour (it's a good idea to sift it to aerate), baking soda, cinnamon, and salt. Mix thoroughly with a whisk to ensure all ingredients are evenly distributed.

Ingredients: Wheat flour, Baking soda, Ground cinnamon, Salt
Thoroughly mixing the dry ingredients is important to ensure that the baking soda and cinnamon are evenly distributed in each cookie. This way, all the cookies will rise and taste the same.
5

Add the dry ingredients to the wet ones in two or three batches, mixing on the lowest speed just until the ingredients are combined. Then turn off the mixer, add the oats (and optionally the chopped chocolate) and gently fold them in using a spatula or wooden spoon.

Ingredients: Mountain oats, Chopped dark chocolate
Do not mix the dough too long after adding the flour, as this may cause the cookies to be tough. Stir only until the white traces of flour disappear. The dough will be quite thick and sticky.
6

Using an ice cream scoop or a regular tablespoon, scoop portions of the dough (about 1.5 tablespoons per cookie) and form balls. Place them on the prepared baking sheets with plenty of space in between (about 5-7 cm), as the cookies will spread significantly. Gently flatten each ball with your hand.

Using an ice cream scoop ensures that all cookies will be the same size, which is important when assembling sandwiches. If you don't have an ice cream scoop, try to scoop out equal portions of dough. About 8 cookies should fit on one large baking sheet.
7

Bake the cookies for 12-15 minutes at 180°C. They should be golden at the edges but still soft in the middle. After removing from the oven, leave them on the baking sheet for 5 minutes to firm up slightly, then carefully transfer them using a wide spatula to a wire rack to cool completely. They must be completely cold before adding the ice cream.

Do not bake the cookies too long, as they will become hard and crumbly after freezing. Slightly underbaked in the middle, they will be perfectly chewy. Cooling on a rack ensures air circulation and prevents the cookies from 'steaming' on the bottom.

Homemade Caramel Ice Cream

8

While the cookies are cooling, prepare the ice cream. Pour very cold 36% heavy cream into a large, chilled bowl. Whip it with a mixer on high speed, starting at a lower speed and gradually increasing. Whip until stiff peaks form - when you lift the beaters, the mixture should form peaks that do not fall.

Ingredients: 36% heavy cream
The key to success is very cold cream and a chilled bowl (you can put it in the freezer for 15 minutes). Be careful not to overwhip the cream, as it will turn into butter. The whipping process usually takes 3-5 minutes.
9

Slowly pour the condensed milk into the whipped cream in a thin stream. Using a silicone spatula, gently mix the mixture, making movements from the bottom to the top to retain as much air as possible. Mix only until the ingredients are combined into a smooth, creamy mass.

Ingredients: Sweetened condensed milk
This is the 'folding' technique. Don't use the mixer anymore! The goal is to gently combine the ingredients without destroying the fluffy structure of the whipped cream. Too vigorous mixing will result in the ice cream being dense and hard.
10

Add caramel sauce, coarsely chopped pecans, and a pinch of salt to the ice cream mixture. Gently mix with a spatula, making only 2-3 movements. The goal is to create visible swirls of caramel in the ice cream, not to color it uniformly.

Ingredients: Caramel sauce, Pecan nuts, Salt
To achieve a nice 'swirl' effect, pour the caramel sauce in several places on the surface of the mixture and gently swirl it with the tip of a knife or a skewer. If the nuts were not roasted, it's worth to toast them for 3-4 minutes in a dry pan to bring out their aroma.
11

Pour the prepared ice cream mixture into a metal or glass container (e.g., a loaf pan) with a capacity of about 1.5 liters. Smooth the surface with a spatula. Cover the container tightly with plastic wrap, ensuring it touches the surface of the ice cream - this will prevent ice crystals from forming. Place it in the freezer for at least 6 hours, preferably overnight.

A metal container conducts cold more quickly, which speeds up the freezing process. Freezing time is crucial - the ice cream must be completely frozen and hard in order to shape the sandwiches.

Assembly of Ice Cream Sandwiches

12

When the ice cream is fully frozen and the cookies are completely cooled, proceed to assemble the sandwiches. Pair the cookies by similar size. Turn one cookie from each pair upside down.

Work quickly, as the ice cream melts fast. Prepare all the pairs of cookies in advance and have a plate or tray lined with baking paper ready to place the finished sandwiches on.
13

Take the ice cream out of the freezer. Using an ice cream scoop, place a large portion of ice cream on an inverted cookie. Cover with a second cookie (bottom side down) and gently press until the ice cream spreads evenly to the edges.

If the ice cream is very hard, dip the ice cream scoop in hot water for a few seconds, then wipe it dry. This will make it easier to scoop perfect balls. You can level off any excess ice cream that spills over the sides with a small knife or spatula.
14

Optionally: if you want the sandwiches to look even more appetizing, pour the nut sprinkle onto a small plate. Roll the sides of each sandwich in the sprinkle, gently pressing to make it stick.

Ingredients: Nut topping
This step is not necessary, but it makes the dessert look like it came from the best patisserie. You can use chopped nuts, chocolate chips, or colorful sprinkles.
15

Wrap each finished ice cream sandwich tightly in parchment paper or plastic wrap. Place them on a tray and put them in the freezer for at least 1-2 hours to allow the ice cream to firm up again and for the entire sandwich to hold together well. After this time, they are ready to serve.

The last freezing step is very important. It prevents the sandwiches from falling apart while eating. Individual packaging prevents the sandwiches from sticking together and protects them from odors in the freezer.

Fun Fact

💡

Ice cream sandwiches gained popularity in the USA in the early 20th century. The first versions were sold on the streets of New York from carts for one cent and consisted of a scoop of vanilla ice cream pressed between two plain wafers.

Best for

Tips

🍽️ Serving

Serve the sandwiches straight from the freezer so that the ice cream is perfectly frozen. They can be served on small plates with additional caramel sauce or chocolate sauce. They pair wonderfully with fresh berries, which will add a touch of acidity.

🥡 Storage

Wrap each sandwich tightly in plastic wrap or baking paper. Store in the freezer in an airtight container or ziplock bag for up to 2 weeks. Thanks to the individual packaging, they won't stick together and will maintain the freshness and crunchiness of the cookies.

📸 Ugotowane przez społeczność

Zaloguj się, aby dodać zdjęcie
Dodaj zdjęcie gotowej potrawy

Po zatwierdzeniu przez moderatora otrzymasz 10 punktów doświadczenia.

🍲

Nikt jeszcze nie dodał zdjęcia. Bądź pierwszy!

Comments (0)

Be the first to comment on this recipe!

Add a comment

You might also like

Recipe Categories

Desserts
Desserts in: New Year's Eve

A sweet ending to the New Year's Eve dinner is a must-have that will put everyone in a joyful mood for the new year.

See all recipes in this category
Desserts for Kids
Desserts for Kids in: For Kids

Desserts for kids are sweet treats without guilt - less sugar, more flavor. Banana ice cream without sugar - frozen bananas blended to a creamy consistency. Chocolate mousse with avocado - creamy and healthy. Vanilla pudding with fruit - a childhood classic. Carrot and apple muffins - hidden vege...

See all recipes in this category

Dishes for special occasions are culinary masterpieces for birthdays, anniversaries, and holidays. Grilled beef steak with herb butter - restaurant quality at home. Beef Wellington - beef in puff pastry with duxelles. Roast duck with apples - a holiday tradition in a new edition. Pink salmon with...

See all recipes in this category
Reklama