Menu

Marble Chocolate-Nut Bundt Cake with Cocoa Crumble

Cakes and Bakes Desserts Dishes for Special Occasions 210 min Medium 9 wyświetleń ~50.39 PLN - (0)
Rate:
(0)

Description

This babka is the essence of homemade baking at its finest. It is a rich, buttery yeast dough, reminiscent of French brioche in texture, filled with a velvety, intensely chocolate filling with crunchy pieces of roasted hazelnuts. Each bite is a perfect balance between fluffy, delicate dough and a decadent, almost molten cream when warmed. The whole is topped with a crunchy cocoa crumble, adding another layer of texture and flavor. Visually, the babka delights with its marbled cross-section, where light strands of dough intertwine with dark swirls of chocolate. It is perfect as the star of the holiday table, an elegant dessert for special occasions, a luxurious element of brunch, or simply as a companion to afternoon coffee. Its taste and appearance make it a bake that lingers in memory for a long time.

Składniki (16)

Servings:
8
  • Wheat flour type 550 550 g
  • Fresh yeast 25 g
  • Milk 3.2% 180 ml
  • White sugar 130 g
  • Egg 2 szt.
  • Egg yolk 2.2 szt.
  • Masło 82% 210 g
  • Bitter chocolate 70% 150 g
  • Powdered sugar 60 g
  • Hazelnuts 100 g
  • Brown sugar 30 g
  • 🌿 Przyprawy
  • Salt 0.2 szczypt
  • Kakao ciemne 40 g
  • ✨ Opcjonalne
  • Water 50 ml
  • Vanilla extract 5 g
  • Ground cardamom 1 g
💰 Szacowany koszt dania: ~50.39 PLN (6.30 PLN/porcję)

💡 Kliknij na składnik aby oznaczyć jako użyty

Preparation steps

Cocoa Crumble

1

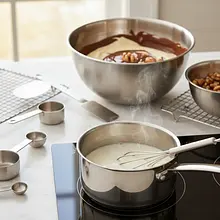
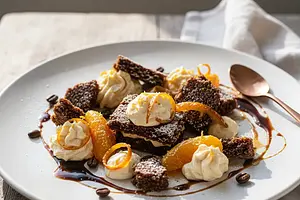
Start by preparing the crumble. In a small bowl, combine 50g of all-purpose flour, 30g of brown sugar, and 10g of dark cocoa powder. Mix the dry ingredients with a fork or a small whisk until they are evenly combined and there are no lumps of cocoa.

Ingredients: Wheat flour type 550, Brown sugar, Kakao ciemne
Use a small or medium bowl. Sifting the cocoa through a sieve will help avoid lumps and ensure the crumble has a uniform color.
2

Add 30g of cold butter, cut into small cubes. Using your fingertips, quickly rub the butter into the dry ingredients until clumps resembling wet sand form. Do not knead for too long to prevent the butter from melting. Place the prepared crumble in the refrigerator while you prepare the cake.

Ingredients: Masło 82%
The key is cold butter and quick work with your fingers. The heat from your hands can melt the butter, creating a uniform mass instead of crunchy bits. You can also use a pastry cutter.

Yeast Cake

3

Prepare the yeast mixture. In a small saucepan, heat 180 ml of milk to a temperature of about 37°C. It should feel pleasantly warm to the touch, like bath water for a baby, but not hot. Crumble 25 g of fresh yeast into a bowl, add one tablespoon of sugar (from the measured 80 g), and pour in the warm milk. Mix thoroughly with a fork until the yeast is completely dissolved. Set aside in a warm place for 10-15 minutes. After this time, a thick, beige foam should appear on the surface, indicating that the yeast is active.

Ingredients: Fresh yeast, Milk 3.2%, White sugar
The most common mistake is using milk that is too hot, which kills the yeast. Check the temperature by dropping a drop on the inside of your wrist. If there is no foam after 15 minutes, the yeast is inactive and you need to start over.
4

In a large bowl of a stand mixer, add 500g of flour, the remaining sugar (70g), and 5g of salt. Mix briefly. Make a well in the center and pour in the prepared yeast mixture. Add 2 whole eggs and 2 egg yolks. If using, also add 5g of vanilla extract. Start mixing on low speed with a dough hook (or manually with a wooden spoon) until the ingredients combine into a uniform, sticky mass.

Ingredients: Wheat flour type 550, White sugar, Salt, Egg, Egg yolk, Vanilla extract
Use a stand mixer with a dough hook - it will make your work much easier. If you are kneading by hand, be prepared for a sticky dough at the beginning - that's normal. Do not add more flour than specified in the recipe.
5

Increase the mixer speed to medium and knead the dough for about 5 minutes. Then, without stopping the kneading, start adding one tablespoon (about 15g) of very soft butter (100g) at a time. Only add the next portion of butter when the previous one has completely combined with the dough. This process will take a few minutes.

Ingredients: Masło 82%
The butter must be very soft, with a paste-like consistency, but not melted. Adding it gradually is key to achieving the perfect, silky texture of the dough. Be patient, the dough may initially look 'separated'.
6

After adding the whole butter, continue kneading the dough on medium speed for another 10-12 minutes. The finished dough should be extremely smooth, elastic, shiny, and pull away from the sides of the bowl. It should pass the 'windowpane test': take a small piece of dough and gently stretch it with your fingers – it should stretch into a thin, almost transparent membrane before tearing.

Hand kneading at this stage will take about 15-20 minutes. The dough will be very sticky, but as you knead, the gluten will become more elastic. Avoid adding flour. This long kneading is the key to the fluffiness of the cake.
7

Shape the kneaded dough into a ball. Grease a large bowl with a little oil, place the dough in it, and turn it so that it is coated with a thin layer of fat. Cover the bowl with plastic wrap or a clean kitchen towel and set it in a warm, draft-free place for about 1.5 hours, or until it doubles in size.

The ideal place for rising is a slightly warmed (up to 30°C) and turned-off oven with the light on. Greasing the bowl and the dough with oil will prevent drying out and the formation of a crust.

Chocolate-Nut Filling

8

While the dough is rising, prepare the filling. Heat a dry skillet over medium heat. Add 100g of hazelnuts and toast them for 5-7 minutes, stirring frequently, until they start to smell fragrant and their skins begin to crack. Transfer the hot nuts to a clean cloth, wrap it up, and rub vigorously to remove most of the skins. Once cooled, chop them coarsely with a knife.

Ingredients: Hazelnuts
Be careful not to burn the nuts, as they will become bitter. Removing the skins is not absolutely necessary, but it improves the flavor and appearance of the filling. Alternatively, you can roast the nuts in the oven at 180°C for 8-10 minutes.
9

In a small saucepan, place 150g of chopped dark chocolate and 80g of butter. Set the pan over a bowl of gently simmering water (a bain-marie) and stir until the ingredients melt and combine into a smooth mixture. Remove from heat, add 60g of powdered sugar and 30g of cocoa. Whisk vigorously until you achieve a smooth, thick paste. Set aside to cool slightly.

Ingredients: Bitter chocolate 70%, Masło 82%, Powdered sugar, Kakao ciemne
Make sure that the bottom of the pot with chocolate does not touch the surface of the water. You can also melt the chocolate with butter in the microwave, heating in 30-second intervals and stirring each time.

Shaping the Bundt Cake

10

Remove the risen dough onto a lightly floured surface. Gently deflate it by punching the center. Roll out the dough into a rectangle measuring about 30x40 cm. Try to keep the thickness even across the entire surface.

Use as little flour as possible for dusting the surface to avoid changing the proportions in the dough. If the dough shrinks while rolling, let it rest for 5 minutes and try again.
11

Evenly spread the prepared and slightly cooled chocolate filling on the rolled-out dough. Use a spatula or the back of a spoon for this. Leave about 1-2 cm of free margin along one of the longer edges.

The filling should be cool enough not to melt the dough, but still fluid enough to spread easily. A small margin will help seal the roll at the end.
12

Evenly sprinkle the chopped, toasted hazelnuts over the layer of chocolate.

Ingredients: Hazelnuts
You can gently press the nuts with your hand into the filling to help them stick better and not fall out while rolling and cutting.
13

Start rolling the dough into a tight log, beginning from the longer side that is completely covered with filling. Roll slowly and carefully to ensure the roll is compact. Finish at the edge without filling and seal it well by pressing with your fingers.

The tighter you roll the cake, the more layers and a nicer pattern you'll achieve in the finished cake. Place the roll seam side down.
14

Using a very sharp knife or a pizza cutter, cut the roll lengthwise in half, along its entire length. You will get two long strips with visible layers of dough and filling.

This is a key moment for the appearance of the cake. A sharp knife is essential to avoid tearing the dough. Don't worry if the filling spills out a bit - that's normal.
15

Place both strands next to each other, cut side up. Braid them together like a braid, placing one strand over the other. Try to keep the layers with the filling facing upwards at all times. Gently tuck the ends of the braid underneath.

Work gently but firmly. Keeping the cross-section on top ensures a beautiful, marbled pattern on the baked cake.
16

Prepare a loaf pan measuring approximately 25x12 cm. Grease it thoroughly with butter and line the bottom and the longer sides with parchment paper. Carefully transfer the braided dough to the pan.

Baking paper will make it easier to remove the hot cake from the mold. If the braid is longer than the mold, gently squeeze it. If it is shorter, lightly stretch it.

Baking

17

Loosely cover the pan with plastic wrap or a cloth and set aside for the second rise for about 45-60 minutes. The babka should noticeably rise and fill the pan.

The second rising is shorter than the first. The dough is ready for baking when, after gently pressing it with your finger, the indentation slowly returns to its original shape.
18

At the end of the rising time, preheat the oven to 180°C (fan) or 190°C (top-bottom). Take the crumble out of the fridge and evenly sprinkle it over the risen cake.

Make sure the oven is fully preheated before placing the dough inside. This will help achieve a good oven spring.
19

Place the pan in the preheated oven and bake for about 40-45 minutes. After 25-30 minutes, check the degree of browning. If the top is browning too quickly, loosely cover it with a sheet of aluminum foil. To check if the cake is done, insert a wooden skewer into the center – it should come out dry, without any raw batter.

Every oven bakes differently, so keep an eye on the time. The skewer may be moist from melted chocolate, but there should be no raw batter on it.

Syrup (Optional)

20

While the cake is baking, prepare the syrup. In a small saucepan, place 50g of sugar and 50ml of water. Heat over low heat, stirring until the sugar is completely dissolved. Remove from heat. If using, add a pinch of cardamom and mix.

Ingredients: Water, White sugar, Ground cardamom
The syrup will keep the cake moist and fresh for longer. This is an optional step, but highly recommended for a professional result.
21

As soon as you take the cake out of the oven, immediately brush the top with the prepared syrup using a pastry brush. The hot cake will absorb the syrup, giving it a beautiful shine and extra moisture.

Soaking should be done on hot cake. Do not pour all the syrup at once, but gently brush it on.

Cooling and Serving

22

Leave the cake in the pan for 15-20 minutes to cool slightly. Then, using the overhanging parchment paper, carefully remove it from the pan and transfer it to a wire rack to cool completely. Cut only after it has fully cooled.

Cooling on a rack ensures air circulation and prevents the bottom of the cake from becoming soggy. Cutting into a warm cake can cause it to crumble.

Fun Fact

💡

Yeast babka originates from the Jewish culinary tradition of Eastern Europe, particularly Poland and Ukraine. The name 'babka' likely refers to the fluted shape in which it was originally baked, resembling a grandmother's skirt. The modern braided version with chocolate has been popularized worldwide by bakeries in Israel and New York.

Best for

Tips

🍽️ Serving

Babka tastes best on the day it's baked, slightly warm or at room temperature. It can be served on its own or with additions. It pairs wonderfully with a dollop of mascarpone cheese, a scoop of vanilla ice cream, or fresh fruits, such as raspberries, which will balance the sweetness of the chocolate. Before serving, it can be dusted with powdered sugar.

🥡 Storage

Store the cake tightly wrapped in plastic wrap or in a cake container at room temperature for up to 3 days. To refresh, individual slices can be heated for 10-15 seconds in the microwave or for a few minutes in the toaster. The cake can also be frozen - whole or in slices, wrapped double in foil. Thaw at room temperature.

📸 Ugotowane przez społeczność

Zaloguj się, aby dodać zdjęcie
Dodaj zdjęcie gotowej potrawy

Po zatwierdzeniu przez moderatora otrzymasz 10 punktów doświadczenia.

🍲

Nikt jeszcze nie dodał zdjęcia. Bądź pierwszy!

Comments (0)

Be the first to comment on this recipe!

Add a comment

You might also like

Recipe Categories

Homemade cakes and pastries are the heart of Polish culinary tradition - sweet memories from childhood. In our collection, you will find recipes for classic yeast cakes, shortcrust, sponge, and cheesecake. Apple pie, poppy seed cake, gingerbread, Easter babka, chocolate cake, and New York cheesec...

See all recipes in this category
Desserts
Desserts in: Christmas Eve Dinner

Desserts are a sweet ending to a meal that brings joy to both children and adults. In this category, we present recipes for a variety of sweets - from simple creams and mousses, to elegant panna cottas, and exquisite fruit tarts. Our desserts include both classics of Polish cuisine - fruit jelly,...

See all recipes in this category

Dishes for special occasions are culinary masterpieces for birthdays, anniversaries, and holidays. Grilled beef steak with herb butter - restaurant quality at home. Beef Wellington - beef in puff pastry with duxelles. Roast duck with apples - a holiday tradition in a new edition. Pink salmon with...

See all recipes in this category
Reklama