Cheesecake Balls with Chocolate

Snacks Easter Desserts 90 min Medium 26 wyświetleń ~34.90 PLN * - (0)
Rate:
(0)
Start Cooking

Description

Delicate cheesecake balls with chocolate are small, elegant snacks perfect for an Easter table. They are made from creamy cheese, butter, and biscuits; they have a creamy, slightly tangy hint of lemon and vanilla, and are coated in a thin shell of dark chocolate, which can be additionally sprinkled with coconut flakes or colorful sprinkles. They are handy, look beautiful, and pair wonderfully with a cup of coffee, dessert tea, or as a sweet accent to a festive buffet. I suggest serving them on a platter lined with pastel-colored paper and decorating with fresh mint leaves or edible flowers — they look impressive, and the preparation is simple even for beginners.

Ingredients Used

Ingredients (10)

Servings:
24
  • Semi-fat cottage cheese 500 g
  • Butter 50 g
  • Powdered sugar 100 g
  • Biscuits 200 g
  • Lemon zest 5 g
  • Vanilla extract 5 g
  • Bitter chocolate 200 g
  • Rapeseed oil 15 g
  • ✨ Opcjonalne
  • Coconut flakes 50 g
  • Colored sprinkles 30 g
💰 Szacowany koszt dania: ~34.90 PLN (1.45 PLN/porcję)
* Brak cen dla niektórych składników

💡 Kliknij na składnik aby oznaczyć jako użyty

Preparation steps

Cheese dough

1

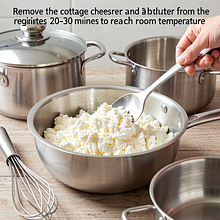
Take the cottage cheese and butter out of the fridge 20–30 minutes in advance to reach room temperature — the butter should be soft but not melted. Place the cottage cheese in a large bowl. Add the soft butter, sifted powdered sugar, vanilla extract, and grated lemon zest. Use a hand mixer on low speed or a spatula and beat/spatula for 3–4 minutes until the mixture is smooth, uniform, and slightly fluffy. Scrape down the mixture from the sides of the bowl while mixing.

Ingredients: Semi-fat cottage cheese, Butter, Powdered sugar, Vanilla extract, lemon zest
Use a hand mixer with whisk attachments or a large spatula. If you don't have a mixer, vigorously stir with a wooden spoon for 5–7 minutes. The mixture is ready when you don't feel any grains of the cottage cheese and the consistency is creamy.
2

Place the biscuits in a sturdy ziplock bag and crush them with a rolling pin into fine crumbs (you can also use a blender in pulse mode). Gradually add the crushed biscuits to the cheese mixture — first half, gently mix with a spatula, check the consistency, then add the rest to achieve a pliable mixture that can be shaped into balls (the mixture should be slightly sticky but not runny).

To crush the cookies, use a rolling pin or the end of a blender. If the mixture is too loose, add more crushed biscuits in increments of 10–15 g. The mixture is ready when it holds its shape when scooped with a spoon.
3

Cover the bowl with plastic wrap and place the mixture in the refrigerator for at least 20–30 minutes to firm up — this will make it easier to shape the balls. The mixture should become firmer but still pliable.

Ingredients: Semi-fat cottage cheese
Use transparent film to check the consistency without opening the fridge. If after 30 minutes the mixture is still very soft, chill for another 15 minutes.

Shaping

4

Prepare a baking tray lined with parchment paper. Using a spoon or a small ice cream scoop, place portions of the mixture weighing about 40 g each (you can weigh the first portion on a kitchen scale to ensure the others are uniform). Wet your hands with water or lightly coat them with a thin layer of oil, take a portion, and quickly form a ball, making gentle movements between your hands — avoid kneading for too long, as the mixture will warm up. Arrange the balls about 2 cm apart on the prepared tray.

Ingredients: Semi-fat cottage cheese, Rapeseed oil
Use a kitchen scale for even portions and a glass of water nearby to moisten your hands. If the mixture sticks too much, chill it for 10 minutes in the fridge and try again.

Chocolate glaze

5

Prepare the glaze: finely chop the dark chocolate and place it in a metal or glass bowl. Set the bowl over a pot of gently simmering water (bain-marie) so that the bottom of the bowl does not touch the water. Stir the chocolate with a wooden spoon until it is completely melted and reaches a temperature of about 40–45°C (it should be liquid and smooth to the touch). Remove the bowl from the pot and add the rapeseed oil, mixing quickly — the oil will make the glaze shiny and easier to spread. If you don't have a stove, melt the chocolate in the microwave in 20–30 second intervals, stirring in between, being careful not to overheat (microwave at 50% power).

Ingredients: Bitter chocolate, Rapeseed oil
For melting, use a large metal bowl and a pot with a wide bottom. A candy thermometer is helpful: 40–45°C is the melting temperature, after adding oil cool to about 31–32°C before dipping (for the best texture). Avoid steam in the chocolate — a few drops of water will cause the chocolate to seize and 'clump'.
6

Dip the balls: use two forks or a special dipping spoon; scoop a ball and carefully dip it in the melted chocolate, turn it, then remove it and tap the fork against the edge of the bowl to let the excess chocolate drip off. Place the balls on parchment paper. If you want to coat some in coconut flakes or sprinkles, sprinkle them immediately after dipping — while the chocolate is still wet.

Ingredients: Bitter chocolate, Coconut flakes, colored sprinkles
Use two forks and a spoon to prevent the balls from breaking. Work quickly, the chocolate can set; when it starts to thicken, gently reheat it in short bursts (microwave) or place the bowl back over warm water for a few seconds.

Decoration and cooling

7

After dipping, place the tray with the balls in the refrigerator for 30–60 minutes, until the chocolate is completely set. Before serving, take the balls out 10–15 minutes in advance so that the chocolate is not too cold and the flavor of the cheesecake can be better released. Arrange the balls on a serving platter, optionally decorate with mint leaves or edible flowers.

Ingredients: Bitter chocolate
Use a flat tray and parchment paper to easily transfer the balls to the refrigerator. Do not store directly next to strongly scented products — the cheesecake absorbs odors.

Serving

8

Serve chilled as an Easter snack. The balls look great in mini cupcake liners or on a rustic platter. If you prepare them in advance, take them out 10–15 minutes before serving so the mixture regains its creamy consistency.

Use small paper liners to conveniently serve the balls to guests. If you want to transport them, layer them with parchment paper in a box.

Fun Fact

💡

Cheesecake balls are a modern variation of miniature cheesecake desserts, popular in catering and cafes — their ease of shaping and decorating makes them perfect for holiday tables.

Best for

Tips

🍽️ Serving

Serve on a flat platter in several variations: drizzled with chocolate, rolled in coconut flakes, and sprinkled with colorful toppings — guests will happily choose different flavors. The taste of cheese and dark chocolate balances nicely with a cup of strong coffee or tea.

🥡 Storage

Store in an airtight container in the refrigerator for up to 5 days. To maintain the crunchiness of the topping, it is best not to freeze; however, if you do freeze it, thaw in the refrigerator for a few hours before serving, then let it sit at room temperature for 10–15 minutes.

📸 Ugotowane przez społeczność

Zaloguj się, aby dodać zdjęcie
Dodaj zdjęcie gotowej potrawy

Po zatwierdzeniu przez moderatora otrzymasz 10 punktów doświadczenia.

🍲

Nikt jeszcze nie dodał zdjęcia. Bądź pierwszy!

Comments (0)

Be the first to comment on this recipe!

Add a comment

You might also like

Recipe Categories

Snacks
Snacks in: New Year's Eve

Snacks are the perfect way to make the wait for midnight more enjoyable; they should be small but impressive.

See all recipes in this category

Easter is one of the most important holidays in the Christian calendar, celebrated in spring, commemorating the resurrection of Jesus. It is a time of joy, hope, and communal celebration with family around a bountiful table. The culinary traditions associated with Easter are incredibly rich and d...

See all recipes in this category

Desserts are a sweet ending to every meal - from simple puddings to exquisite creamy cakes. Our collection includes recipes for homemade ice cream, chocolate mousses, panna cotta, tiramisu, crème brûlée, and lemon tart. Summer fruit desserts: jellies, sorbets, parfaits, and fruit salads with whip...

See all recipes in this category
Reklama