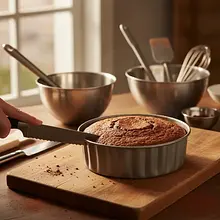
Preheat the oven to 175°C (top and bottom heat, no convection). Prepare a 24 cm round cake pan. Line the bottom of the pan with parchment paper. Do not grease the sides – this allows the cake to 'climb' the walls and rise evenly.
Description
An intensely chocolatey cake that is the epitome of elegance and a perfect finale to a festive dinner. It consists of moist cocoa sponge layers, filled with a velvety cream made from mascarpone cheese and real dark chocolate. The entire cake is enveloped in a glossy ganache glaze that deliciously drips down the sides, creating stunning streaks. Its flavor is deep, rich, and balanced – not too sweet, with a distinct note of high-quality cocoa. Perfect for special occasions, such as New Year's Eve, where its exquisite appearance and decadent taste will delight all guests. Served with a glass of champagne, it creates an unforgettable culinary experience, worthy of bidding farewell to the old year and welcoming the New Year.
Składniki (16)
- Mąka pszenna tortowa (typ 450) 200 g
- Dark cocoa 50 g
- Cukier drobny 200 g
- Eggs 4 szt.
- Rapeseed oil 100 g
- Milk 3.2% 150 ml
- Baking powder 10 g
- Baking soda 5 g
- Gorąca woda 150 ml
- Serek mascarpone 500 g
- Śmietanka 36% 350 ml
- Dark chocolate 70% 300 g
- Powdered sugar 45 g
- 🌿 Przyprawy
- Salt 0.0 szczypt
- ✨ Opcjonalne
- Fresh raspberries 100 g
- Edible gold glitter 1 szczypta
💡 Kliknij na składnik aby oznaczyć jako użyty
Preparation steps
Preparing the sponge cake
In a large bowl, combine the dry ingredients. Sift the all-purpose flour, cocoa powder, baking powder, baking soda, and salt. Then mix them thoroughly with a whisk to ensure they are evenly distributed. This will prevent lumps from forming and ensure the cake rises evenly.
In a second, separate bowl, place the eggs (at room temperature) and sugar. Beat them with a mixer on high speed for about 8-10 minutes. The mixture should become very light, thick, and fluffy, tripling in volume and resembling the consistency of eggnog. It should leave a clear trace on the surface when you lift the beaters.
To the whipped egg mixture, while mixing on a low speed, slowly pour in the milk in a thin stream, followed by the oil. Mix only until the ingredients are combined, no longer, so that the mixture does not lose its fluffiness.
Add the sifted dry ingredients to the wet ingredients in two or three batches. Mix very gently using a spatula or on the lowest speed of the mixer, just until the ingredients are combined and no dry flour is visible. Overmixing will cause the sponge cake to be tough and dense (a failure).
Finally, pour hot (but not boiling) water into the batter. Mix quickly and gently with a spatula until you achieve a uniform, fairly runny consistency. Don't worry that the batter is liquid - that's the intended texture.
Pour the finished batter immediately into the prepared springform pan. Place it in the preheated oven and bake for about 35-40 minutes. To check if the cake is done, insert a wooden stick (e.g., a skewer) into the center. If it comes out dry, the sponge cake is baked.
After baking, remove the sponge cake from the oven and leave it in the pan on a rack to cool completely (at least 2-3 hours). Do not try to cut the warm sponge cake, as it will crumble. It is best to bake it the day before and let it cool overnight.
Preparation of chocolate cream
Prepare 200g of dark chocolate. Break it into small pieces and place it in a heatproof bowl. Melt the chocolate in a water bath: set the bowl over a pot of gently simmering water, making sure the bottom of the bowl does not touch the water. Stir until the chocolate is smooth. Remove from heat and let it cool slightly for about 10-15 minutes. It should still be liquid but not hot.
In a large bowl, place well-chilled mascarpone cheese and powdered sugar. Using a mixer on medium speed, mix briefly, just until the ingredients are combined and a smooth mixture is achieved. Overmixing can cause the cheese to curdle.
Add the cooled, melted chocolate to the mascarpone mixture. Blend quickly on low speed just until the ingredients are combined into a smooth, thick chocolate cream.
In a separate, clean, and well-chilled bowl, whip 250 ml of very cold 36% cream. Use a mixer on high speed and whip until stiff peaks form. Be careful not to 'overwhip' the cream, as it will turn into butter.
Add the whipped cream to the chocolate-mascarpone mixture in two or three batches. Gently fold in each batch using a silicone spatula, making motions from the bottom to the top. Mix only until combined - the goal is to maintain the fluffiness of the cream.
Assembling the cake
Remove the completely cooled sponge cake from the mold. Place it on a cutting board. Using a long serrated knife (e.g., a bread knife), cut the sponge cake horizontally into three equal layers. You can help yourself by rotating the cake and gently scoring it all around before cutting through to the center.
Place the first (bottom) layer of the cake on a serving platter or plate. Spread about 1/3 of the prepared chocolate cream on top and evenly distribute it using a spatula or knife, leaving about 1 cm of space from the edge.
Cover the cream with the second layer of sponge cake, pressing it down gently. Spread another 1/3 of the cream and smooth it out evenly again. Place the last, third layer on top, pressing it down gently to stabilize the cake.
Spread the remaining cream on the top and sides of the cake, creating a thin layer (the so-called 'crumb coat'). Its purpose is to 'seal' all the cake crumbs so they don't get into the final layer of frosting. Place the cake in the refrigerator for at least 30-60 minutes to let the cream set.
Preparation of the glaze (ganache) and decoration
Prepare the glaze. Chop 100g of dark chocolate into small pieces and place it in a bowl. Heat 100ml of 36% cream in a small saucepan until just about to boil (bubbles should appear at the edges). Pour the hot cream over the chopped chocolate. Let it sit for 2-3 minutes without stirring, then gently mix with a whisk until smooth and glossy.
Set the glaze aside for about 10-15 minutes to cool. It should thicken slightly to the consistency of a thick syrup. If it is too hot, it will run off the cake, and if it is too cold, it will be difficult to spread. Take the chilled cake out of the refrigerator.
Pour the glaze in the center of the chilled cake. Allow it to flow freely down the sides, creating natural drips. You can gently assist it with a spatula, spreading it on top and pushing it towards the edges in a few places to achieve a more controlled 'drip' effect.
Before the glaze completely sets, decorate the top of the cake. Arrange fresh raspberries in the center or in a wreath shape along the edge. Additionally, for a New Year's effect, you can sprinkle the cake with edible gold glitter.
Place the finished cake in the refrigerator for at least 2-3 hours, preferably overnight. During this time, the flavors will meld, the cream and glaze will set, and the sponge will absorb additional moisture. The cake will also be much easier to slice.
Fun Fact
The first chocolate cake, in the form we know today, was created in 1886 in Austria by Franz Sacher. The famous 'Sacher Cake' was so revolutionary that it remains one of the most recognizable cakes in the world and a culinary symbol of Vienna to this day.
Best for
Tips
Cut the cake with a knife dipped in boiling water and dried - this will give you perfectly smooth pieces. Serve slightly chilled. It pairs wonderfully with a scoop of vanilla ice cream, a dollop of whipped cream, or a sauce made from sour fruits (e.g. raspberry). For a New Year's Eve occasion, a glass of chilled Prosecco or dry champagne will be the perfect companion.
Store the cake in the refrigerator, in an airtight cake container, for up to 4 days. The container will prevent the cake from drying out and absorbing odors from the fridge. The cake freezes well (without fruit decoration) - it can be frozen whole or in portions, wrapped in plastic wrap, for up to 3 months.
📸 Ugotowane przez społeczność
Zaloguj się, aby dodać zdjęcieDodaj zdjęcie gotowej potrawy
Po zatwierdzeniu przez moderatora otrzymasz 10 punktów doświadczenia.
Nikt jeszcze nie dodał zdjęcia. Bądź pierwszy!
Comments (0)
Be the first to comment on this recipe!
Add a comment