Homemade Potato Chips (Paprika Flavor)

Snacks Party Recipes 60 min Easy 21 wyświetleń ~15.29 PLN - (0)
Rate:
(0)
Start Cooking

Description

Crispy homemade paprika chips are a simple yet impressive way to enjoy a snack inspired by home cooking. Thinly sliced potato slices fried in deep oil or baked in the oven, seasoned with sweet paprika and freshly ground pepper. Perfect as a snack for social gatherings, a side for beer, or a family movie night. The baked version will be a bit lighter, while the fried version will be exceptionally crispy and aromatic. In the recipe, I provide step-by-step tips on how to achieve even slices, how to dry them well, how to control the frying temperature, and how to season the chips so that the spices adhere well. Additionally, I suggest a simple dip made from sour cream and dill as a serving option.

Ingredients Used

Ingredients (7)

Servings:
4
  • Potatoes 4 szt. (~600 g)
  • Rapeseed oil 900 g
  • 🌿 Przyprawy
  • Sweet paprika 8 g
  • Salt 0.2 szczypt (~5 g)
  • Black pepper 2 szczypty (~1 g)
  • ✨ Opcjonalne
  • Sour cream 200 g
  • Dill 0.8 pęczek (~15 g)
💰 Szacowany koszt dania: ~15.29 PLN (3.82 PLN/porcję)

💡 Kliknij na składnik aby oznaczyć jako użyty

Preparation steps

Preparing the potatoes

1

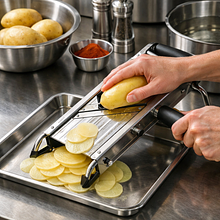
Wash the potatoes under cold running water, removing dirt and any 'eyes'. If you prefer chips with skin, do not peel; if you want them smooth, peel the potatoes with a peeler. Dry each potato with a cloth.

Use a vegetable brush if the potatoes are very dirty. The peeler should be sharp to avoid crushing the potato.

Slicing

2

Slice the potatoes into very thin slices, about 1–1.5 mm thick. The easiest way is to use a mandoline set to 1–1.5 mm; if you don't have a mandoline, use a sharp knife and slice very thinly, keeping your fingers in a 'claw' position. Try to ensure the slices are of even thickness - this will ensure even frying.

Use a mandoline with a safety guard; if you're using a knife, place a stable cutting board underneath and work slowly. Uneven slices will fry at different rates: thicker ones will be soft, thinner ones will burn.

Rinsing and drying

3

Transfer the slices to a large bowl of cold water and rinse, mixing with your hand, until the water becomes cloudy — this will remove excess starch. Change the water and repeat 2–3 times, until the water is relatively clear. Then drain the slices in a colander and spread them out on a clean towel. Cover with another towel and dry thoroughly: gently press with the towel to remove moisture.

Remove the starch — this will make the chips crispier. Don't skip the drying step: moisture causes the oil to splatter and results in soft chips.

Heating the oil

4

In a large pot with a thick bottom or a deep pan, pour in the rapeseed oil so that the layer of oil is at least 4–5 cm (for deep frying). Heat the oil over medium heat to a temperature of 170–175°C. If you don't have a thermometer, drop in a piece of potato slice — it should start to foam and float to the surface, and the bubbles should be vigorous but without immediate strong browning.

Use a candy thermometer for precision. If the temperature is too low, the chips will absorb too much fat; if too high, they will burn quickly.

Frying

5

Fry the slices in batches — do not overcrowd the pot. Place the slices in a single layer using a slotted spoon. Fry for 2–3 minutes per batch, gently stirring every 30 seconds, until the slices are golden and crispy. Remove with a slotted spoon and place on paper towels to drain excess fat. Monitor the color: the chips darken quickly, so once they reach a light golden color, remove the batch.

The best tool for removing is a slotted spoon. If the oil starts to smoke heavily, lower the heat or wait — it’s too hot.

Seasoning

6

When the chips are still hot and slightly greasy, transfer them to a large bowl, sprinkle with sweet paprika, salt, and pepper. Gently stir the bowl, covering it with your hand or a lid and shaking a few times — the spices will evenly coat the chips. Taste and add more salt if needed.

Seasoning while hot is key — the spices stick to the warm chips. Don't overdo the salt right away; it's better to add more after the first taste.

Alternative: baking (lighter version)

7

If you don't want to fry, preheat the oven to 200°C with fan. Arrange the slices on a baking sheet lined with parchment paper in a single layer, brush lightly with oil on both sides and bake for 10–15 minutes, flipping halfway through, until golden and crispy. The time depends on the thickness of the slices — watch them closely.

Baking gives a less crispy but healthier version. Do not stack the slices on top of each other, as they will not bake evenly.

Preparation of the dip (optional)

8

If you are using a dip: finely chop the dill (about 1 tablespoon of chopped dill from the provided bunch). In a bowl, mix the sour cream with the dill and a pinch of freshly ground pepper. Season lightly with salt, taste. Chill for 10–15 minutes before serving to let the flavors meld.

Use a sharp knife or herb scissors. If you want a lighter dip, mix sour cream with natural yogurt in a 1:1 ratio.

Serving

9

Transfer the chips to a bowl or a plate lined with paper towels to absorb any excess fat. Serve immediately after cooling to a warm temperature, with a dip on the side. The chips taste best on the same day, when they are the crispiest.

Serve in a wide bowl so people can easily reach in. If you're preparing for a party, fry the last batches just before serving.

Fun Fact

💡

The first commercial chips appeared in the 19th century in the United States as a response to a customer dissatisfied with fries; homemade versions gained popularity due to their simplicity and the ability to season them to personal taste.

Best for

Tips

🍽️ Serving

Serve the chips in a paper or ceramic bowl lined with parchment paper. Add small bowls with dip (sour cream with dill) and optionally arrange lemon slices for a fresh squeeze. A board with smoked cheese and pickles can be a nice addition.

🥡 Storage

Chips lose their crunch in a humid environment. Store cooled chips in an airtight container at room temperature for 1–2 days. Do not put them in the fridge — the moisture there will make them soft. To reheat, use a hot oven (180°C) for 3–5 minutes to regain some crunch.

📸 Ugotowane przez społeczność

Zaloguj się, aby dodać zdjęcie
Dodaj zdjęcie gotowej potrawy

Po zatwierdzeniu przez moderatora otrzymasz 10 punktów doświadczenia.

🍲

Nikt jeszcze nie dodał zdjęcia. Bądź pierwszy!

Comments (0)

Be the first to comment on this recipe!

Add a comment

You might also like

Recipe Categories

Snacks
Snacks in: New Year's Eve

Snacks are the perfect way to make the wait for midnight more enjoyable; they should be small but impressive.

See all recipes in this category

Quick and impressive dishes that are perfect for various events, from birthdays to themed parties.

See all recipes in this category
Reklama