Chicken cutlet with homemade fries and sauerkraut salad

Pikantne Main dishes Additions 90 min Medium 30 wyświetleń ~43.50 PLN * - (0)
Rate:
(0)
Start Cooking

Description

Chicken Kiev is a classic Polish-French dish: a thinly pounded piece of chicken breast filled with aromatic herb butter (sometimes with the addition of ham or cheese), breaded and fried to a golden color. In this version, we serve it with baked, crispy potato fries and a winter, sweet-and-sour coleslaw made from sauerkraut, carrots, and apples. The dish combines the creamy, buttery interior of the cutlet with a crunchy coating, tender meat, and a vibrant, refreshing coleslaw — perfect for a Sunday dinner or family gathering. Visually, the contrast between the golden cutlets, golden fries, and light, colorful coleslaw makes the plate appetizing and pleasing to the eye.

Ingredients Used

Ingredients (20)

Servings:
4
  • Chicken egg 2 szt. (~120 g)
  • Chicken breast 720 g
  • Butter 100 g
  • Wheat flour 100 g
  • Breadcrumbs 150 g
  • Potatoes 6.7 szt. (~1000 g)
  • Rapeseed oil 120 g
  • Garlic 2 ząbki (~10 g)
  • Sauerkraut 400 g
  • Carrot 1.3 szt. (~100 g)
  • Apple 0.8 szt. (~150 g)
  • Onion 1 szt. (~150 g)
  • Apple cider vinegar 15 ml
  • Sugar 10 g
  • 🌿 Przyprawy
  • Salt 6 g
  • Black pepper 4 szczypty (~2 g)
  • Sweet paprika 4 g
  • Parsley 30 g
  • ✨ Opcjonalne
  • Ham 100 g
  • Cheese 80 g
💰 Szacowany koszt dania: ~43.50 PLN (10.88 PLN/porcję)
* Brak cen dla niektórych składników

💡 Kliknij na składnik aby oznaczyć jako użyty

Preparation steps

Preparing the filling

1

Take the butter out of the fridge 20–30 minutes before preparation to soften it (it should be pliable but not liquid). Finely chop the parsley (remove the thicker stems). Peel the garlic and crush it with a press or chop it finely. In a bowl, mix the softened butter with half of the chopped parsley and all the garlic, season with 1/2 teaspoon of salt and 1/4 teaspoon of freshly ground pepper. Taste the butter — it should be distinctly herby and slightly spicy. Shape the butter into a log about 2–3 cm in diameter, wrap it in plastic wrap, and place it in the fridge for 15 minutes to firm up and make it easy to slice.

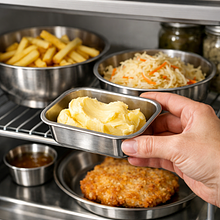
Use a small bowl and a spoon for mixing. If the butter is too soft, chill in the fridge for 10–15 minutes; if too hard, let it sit for 5–10 minutes. Serve the butter firm — it will be easier to shape inside the cutlet.

Meat preparation

2

Place each chicken breast on a cutting board. If the breast is thick, cut it horizontally, without cutting all the way through, and open it like a book (butterfly). Cover with a piece of plastic wrap and use a meat mallet (or the bottom of a heavy pot) to pound the breast to a thickness of about 5–7 mm: gently strike from the center towards the edges to achieve an even surface. If you don't have a mallet, use a bottle and press down slowly. Repeat for all 4 breasts.

Use a cutting board with a handle and plastic wrap so the meat doesn't tear; the pounding should be even — there's no need for very strong strikes. The meat is ready when it is uniformly thin and about 5 mm thick.

Assembly of the cutlets

3

Remove the chilled butter from the fridge and cut it into 4 equal slices (about 2–3 cm each). Place a slice of butter along one edge of the flattened chicken breast, optionally adding a slice of ham and a slice of cheese on top of the butter (if using). Roll the breast tightly into a cylinder so that the butter is sealed inside. Sew or secure the roll with toothpicks/kitchen twine every 2–3 cm to prevent the filling from leaking during frying. Repeat for the remaining breasts.

Use kitchen twine or 3–4 long toothpicks for the cutlet. If you are using ham and cheese, lay them thinly so that the cutlet rolls easily. Check if the roll is tight — it should not fall apart when you lift it.

Breading

4

Prepare three shallow dishes: 1) all-purpose flour, 2) beaten egg, 3) breadcrumbs. Season the flour with 1/2 teaspoon of salt and a bit of pepper. Next, coat each rolled cutlet in the flour — shake off the excess — then dip in the egg, allowing the excess to drip off, and finally coat thoroughly in the breadcrumbs, pressing with your hands to ensure the coating adheres well. Arrange the prepared cutlets on a tray and set aside for 10 minutes to let the coating 'set'.

Use a large flat tray or plate; do the breading with your arms straight to prevent the breadcrumbs from sticking to your fingers. If the coating comes off, add a little more egg and press down.

Frying and finishing the cutlets

5

Heat a 26–28 cm (or two) frying pan over medium heat. Pour in 30 g of rapeseed oil (about 2 tablespoons) and heat for 1–2 minutes — the oil should be hot but not smoking. Place the cutlets breaded side down and fry for 3–4 minutes on one side until the breading is golden. Gently flip and fry for another 3–4 minutes. Add 10 g of butter to the pan, spoon it over the cutlets for 30–60 seconds to add flavor and brown them evenly. After browning, transfer the cutlets to a baking dish and place in an oven preheated to 180°C for 8–10 minutes, until the meat is cooked through (the internal temperature should reach 74–75°C).

Use a heavy-bottomed pan; for frying, canola oil or a mixture of oil and butter is best. Check for doneness by pressing the cutlet — it should be firm, and the butter should be slightly runny when cut. If you don't have a thermometer, cut one cutlet in half: the meat should not be pink.

Preparing the fries

6

Peel the potatoes and cut them into sticks about 1 cm thick (standard thickness). Transfer the cut potatoes to a large bowl of cold water and rinse several times until the water is no longer cloudy (removing starch helps achieve crispiness). Let them soak for 20–30 minutes in cold water (this can be done while the cutlets are being breaded). After soaking, drain the potatoes and dry them very thoroughly with a clean kitchen towel or paper towel. In a large bowl, mix the dry fries with 80 g of rapeseed oil, 1 teaspoon of salt (about 3 g), and 2 teaspoons of sweet paprika (4 g). Spread them in a single layer on a baking sheet lined with parchment paper so that the pieces do not touch. Bake in an oven preheated to 220°C for 30–35 minutes, turning the fries after 15–20 minutes, until they are golden and crispy.

Use a large baking tray and do not overcrowd it — the fries need space to brown. Thoroughly drying the potatoes is key; cutting them into similar pieces ensures even baking.

Preparing the salad

7

Drain the sauerkraut. If it is very sour, rinse it with cold water and squeeze it well in your hands. Chop the cabbage finely and place it in a large bowl. Grate the carrot on a coarse grater, grate the apple (you can leave the skin on if it is thin), and slice the onion into very thin half-rings. Add the vegetables to the cabbage. In a small cup, mix apple cider vinegar (15 g), 1 teaspoon of sugar (10 g), 1/2 teaspoon of salt (about 2–3 g), and 2 tablespoons of rapeseed oil (30 g). Pour the dressing over the salad and mix vigorously with your hand or a spoon. Taste and adjust with salt or sugar if needed — the salad should be distinctly sour with a hint of sweetness. Set aside for 10–15 minutes to let the flavors meld.

Use a large wooden spoon or your hand (clean) for mixing — your hand will blend the ingredients better. The salad tastes even better after 20–30 minutes, when the ingredients have marinated.

Finishing and serving

8

Remove the cutlets from the oven and let them rest for 2–3 minutes (this will allow the juices to settle). Remove the kitchen twine or toothpicks. On a plate, place a portion of fries, next to it place the chicken cutlet — if you like, cut the cutlet diagonally in half to reveal the melted butter and any cheese inside. Add a portion of salad next to it. Optionally, sprinkle the plate with fresh chopped parsley.

Use a kitchen thermometer to ensure that the meat has reached 74–75°C. Slicing after a short rest prevents juices from running out and makes the meat juicy.

Final tips

9

Serve the cutlets hot, and the fries best right after taking them out of the oven (they will be the crispiest). The salad can be prepared in advance — it will gain flavor after a few hours in the fridge. If you are making a larger quantity, the cutlets can be finished in the oven without the coating, and the coating can be fried just before serving to regain its crispiness.

For serving, use large, warm plates; if you want to serve sauce, a good addition is table mustard or mushroom sauce with light cream.

Fun Fact

💡

Chicken cutlet (sometimes called de volaille) became popular in Poland in the 20th century as an elegant version of a pork chop or chicken cutlet — often served at parties. The name comes from the French word 'de volaille' meaning 'from poultry'.

Best for

Tips

🍽️ Serving

Serve the cutlet sliced diagonally to reveal its buttery interior. It pairs well with slightly spicy mustard, pickled peppers, or a delicate mushroom sauce. You can replace the fries with celery puree or buckwheat for a change.

🥡 Storage

Store the patties and fries separately in the refrigerator for up to 2 days in an airtight container. Before serving, reheat the patties in the oven at 180°C for 8–10 minutes, and the fries for 10–12 minutes to regain their crispiness. The salad can be stored for up to 3 days — it tastes best after a few hours in the refrigerator.

📸 Ugotowane przez społeczność

Zaloguj się, aby dodać zdjęcie
Dodaj zdjęcie gotowej potrawy

Po zatwierdzeniu przez moderatora otrzymasz 10 punktów doświadczenia.

🍲

Nikt jeszcze nie dodał zdjęcia. Bądź pierwszy!

Comments (0)

Be the first to comment on this recipe!

Add a comment

You might also like

Recipe Categories

Main dishes
Main dishes in: New Year's Eve

Main dishes for New Year's Eve should be hearty and impressive to satisfy the palates of all guests.

See all recipes in this category
Additions
Additions in: Valentine's Day

Delicious additions that will enhance the main dishes and enrich the Valentine's table.

See all recipes in this category
Reklama