Cabbage and Mushroom Kulebiak

Main Dishes Regional Cuisine of Poland 120 min Hard 19 wyświetleń ~24.15 PLN * - (0)
Rate:
(0)
Start Cooking

Description

Kulebiak with cabbage and mushrooms is a classic, hearty dish from Polish regional cuisine, often served on festive tables and during family celebrations. It consists of fluffy yeast dough surrounding an aromatic filling of sour fermented cabbage and dried forest mushrooms, seasoned with onion, marjoram, and cream. The dish combines a contrast of textures — soft, delicate dough and slightly moist, juicy filling — as well as a contrast of flavors: the acidity of the cabbage, the earthy aroma of the mushrooms, and the buttery-yeasty note of the dough. It can be served warm as a main dish with young potatoes or cooler as a sliced snack. Visually, it presents beautifully — a golden crust that reveals a layered interior with visible mushrooms and cabbage when cut. The recipe includes a detailed description of each step, making it suitable for beginners who are working with yeast dough and filling for the first time.

Ingredients Used

Ingredients (16)

Servings:
6
  • Wheat flour 500 g
  • Milk 250 ml
  • Fresh yeast 25 g
  • Sugar 25 g
  • Chicken egg 3 szt. (~180 g)
  • Butter 100 g
  • Sauerkraut 800 g
  • Dried mushroom 30 g
  • Onion 2 szt. (~300 g)
  • Rapeseed oil 30 g
  • Sour cream 100 g
  • 🌿 Przyprawy
  • Salt 10 g
  • Black pepper 4 szczypty (~2 g)
  • Marjoram 2 g
  • ✨ Opcjonalne
  • Raisin 50 g
  • Parsley 1 pęczek (~30 g)
💰 Szacowany koszt dania: ~24.15 PLN (4.02 PLN/porcję)
* Brak cen dla niektórych składników

💡 Kliknij na składnik aby oznaczyć jako użyty

Preparation steps

Cake

1

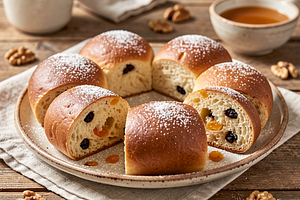
Activating the yeast: heat the milk to a temperature of about 35–37°C (check the inside of your wrist — it should feel pleasantly warm, not hot). Crumble the fresh yeast into a bowl, add 10 g of sugar (from the prepared 25 g) and pour in the warm milk. Stir with a spoon until the yeast dissolves in the milk. Set aside for 10 minutes in a warm place — after this time, a frothy layer (foam) should appear on the surface.

Ingredients: Milk, Fresh yeast, Sugar
Use a small bowl and a kitchen thermometer if you have one. If there is no foam after 10 minutes, the yeast is likely inactive — start over with fresh yeast.
2

Preparation of dry ingredients: sift the wheat flour into a large bowl. Make a small well in the center of the flour so that the liquid ingredients go in there first. Add salt (10 g) to the edge of the flour, not directly to the yeast. Crack two eggs (120 g) into a small bowl and lightly beat with a fork.

Ingredients: Wheat flour, Salt
Use a large metal or glass bowl. Do not add salt directly to the active yeast — it can limit their effectiveness.
3

Combine the ingredients: pour the yeast mixture and the beaten egg into the center of the flour. Start mixing with a wooden spoon or use a mixer with a dough hook on low speed, gathering the flour from the edges to the center. When the ingredients are combined, add 50 g of soft butter cut into pieces and knead the dough for 8–10 minutes until it becomes smooth, elastic, and stops sticking to your hands. If the dough is too dry, add a tablespoon of milk; if too wet, sprinkle in a little flour.

Ingredients: Wheat flour, Fresh yeast, Milk, Butter, Salt
Use a mixer with a hook (preferably) or knead by hand on a well-floured surface for 10–12 minutes. The dough is ready when it springs back slightly when pressed with a finger and is smooth.
4

First rise: shape the dough into a ball, lightly brush the surface with a spoonful of rapeseed oil, place it in a large bowl, and cover with a cloth or plastic wrap. Set aside in a warm place for 45–60 minutes, until the volume of the dough doubles.

Ingredients: Rapeseed oil
Use a bowl with a capacity of at least 3 l so that the dough has room to rise. Do not place it in a draft; the ideal place is a closed oven with the baking function turned off.

Filling

5

Soaking the mushrooms: place the dried mushrooms in a bowl and pour 200 ml of warm (not boiling) water over them. Let them sit for 30 minutes until softened. After soaking, remove the mushrooms, keeping the soaking water (filter through a fine sieve or cheesecloth to remove any sand). Cut the soaked mushrooms into smaller pieces.

Ingredients: dried mushroom
Use a glass bowl. If the mushrooms are large (porcini), slice them thinly; the finer they are chopped, the more evenly they will distribute in the filling.
6

Preparing the cabbage: if the sauerkraut is very sour, rinse it with cold water and squeeze it in your hands or through a sieve to remove excess acidity. Chop the cabbage into smaller pieces (if there are long strands). Then, squeeze it thoroughly so that the filling is not too wet.

Ingredients: Sauerkraut
Use gloves or a clean cloth for squeezing. Well-squeezed cabbage will help avoid overly moist dough during baking.
7

Frying the filling ingredients: heat 15 g of butter and 15 g of rapeseed oil in a large pan (part of the butter was used for the dough). Add chopped onion (300 g) and sauté over medium heat for 6–8 minutes until the onion becomes translucent and lightly browned. Add the chopped mushrooms and fry together for 4–5 minutes. Add the chopped cabbage (800 g) and sauté everything for 8–12 minutes, stirring occasionally, until the cabbage slightly softens and some moisture evaporates.

Ingredients: Butter, Rapeseed oil, Onion, dried mushroom, Sauerkraut
The best pan is 28–30 cm in diameter. Use a wooden spoon for stirring to avoid damaging the pan. Control the heat to prevent the ingredients from burning.
8

Seasoning the filling: pour in about 50–80 ml of filtered mushroom soaking water (more if the filling is too dry), add 100 g of sour cream and 2 g of marjoram. Season with black pepper (2 g) and if necessary, add 5–10 g of sugar (depending on the acidity of the cabbage). Fry for another 2–3 minutes until the flavors combine. Taste the filling and season with salt (carefully — the cabbage may be salty). If you decided to add raisins (optional), drain and add them now.

Ingredients: Sour cream, Marjoram, Black pepper, Sugar, Raisin
Taste the filling with a spoon — it should have a balanced acidity and mushroom aroma. Gradually add the mushroom water, the filling should not be liquid, but slightly moist.
9

Cooling the filling: transfer the filling to a wide dish and spread it evenly to cool faster. The filling should be warm, but not hot, when you place it on the dough (about 20–30 minutes to cool). Hot filling will soften the dough and make the kulebiak wet inside.

Use a large flat plate or tray for quick heat evaporation. You can spread the filling slightly in a thin layer.

Assembly

10

Shaping the kulebiak: after the second rising of the dough (after about 45–60 minutes), gently deflate the dough with your fist, transfer it to a lightly floured work surface, and roll it out into a rectangle about 40×30 cm (thickness 5–7 mm). If the dough shrinks, let it rest for 5 minutes and try again. Leave about 2 cm of free edge on one longer side of the rolled-out dough — this is where you will brush the edges with water to seal better. Evenly spread the chilled filling in the center of the rectangle, leaving 4–5 cm of free space on each side for folding.

It is best to use a rolling pin and a work surface measuring at least 50×40 cm. If you don't have exactly those dimensions, try to ensure that the filling layer is not too thick (about 2–3 cm).
11

Rolling: tightly roll the longer side of the dough around the filling to form a log. Seal the edges with water or the remaining 60 g of beaten egg and thoroughly connect the seams to prevent the filling from leaking during baking. Transfer the kulebiak to a baking sheet lined with parchment paper seam side down. Shape the ends so that they are not open.

Use a spatula to move the roll onto the baking sheet without tearing it. If the seam doesn't want to stick, you can use a spoonful of water from the table.

Baking

12

Maturing and glazing: loosely cover the kulebiak with a cloth and let it rest for 20–30 minutes to rise slightly. In the meantime, preheat the oven to 180°C. Before placing it in the oven, brush the top with beaten egg (the remaining 60 g) for a golden crust. Decorative slits can be made on top, but not too deep.

Use a silicone brush for spreading. It's a good idea to preheat the oven for at least 10 minutes.
13

Baking: place the baking tray in the preheated oven and bake for 35–45 minutes at 180°C. After about 25 minutes, check the color of the crust — if it is browning too quickly, gently cover the kulebiak with aluminum foil. The pastry is done when the crust is evenly golden and the bottom sounds hollow when tapped (you can move the pastry to a rack and gently tap the bottom).

Use the convection setting if the oven bakes unevenly (then lower the temperature by 10–15°C). Do not open the oven frequently — you will lose temperature.

Serving

14

Cooling and serving: take the kulebiak out of the oven and set it on a rack to cool for 10–15 minutes — this allows the filling to slightly 'settle' and makes it easier to slice. Cut into slices 2–3 cm thick with a sharp knife. Serve warm with a sprinkle of fresh parsley on top (optional) and with young potatoes or a salad of young vegetables.

Ingredients: Parsley
Use a long, sharp knife for cutting, making the cut in one smooth motion. Leaving the kulebiak for 10–15 minutes before cutting prevents the filling from spilling out.

Fun Fact

💡

Kulebiak has its roots in East Slavic and Tsarist cuisine, where it was prepared with various fillings — from fish to meat and cabbage. In Poland, it has settled in as an elegant holiday and feast dish.

Best for

Tips

🍽️ Serving

Kulebiak is best served slightly warm, sliced into pieces. It pairs well with young potatoes with dill, a light salad of radishes and cucumber, or borscht. Sprinkle with fresh parsley just before serving.

🥡 Storage

Store in the refrigerator in an airtight container for up to 48 hours. To reheat: place in a preheated oven at 160°C for 10–15 minutes to restore the crispness of the crust. Do not microwave for too long — the filling will become watery.

📸 Ugotowane przez społeczność

Zaloguj się, aby dodać zdjęcie
Dodaj zdjęcie gotowej potrawy

Po zatwierdzeniu przez moderatora otrzymasz 10 punktów doświadczenia.

🍲

Nikt jeszcze nie dodał zdjęcia. Bądź pierwszy!

Comments (0)

Be the first to comment on this recipe!

Add a comment

You might also like

Recipe Categories

Main Dishes
Main Dishes in: Valentine's Day

Exquisite main dishes that will delight with their flavor and aroma, perfect for a romantic dinner.

See all recipes in this category

Traditional recipes from various regions of Poland that showcase the richness of local flavors and ingredients.

See all recipes in this category
Reklama