Pistachio Crinkle Cookies are a sophisticated variation of classic chocolate crinkle cookies. They are characterized by their extraordinary appearance – the deep, natural green of the pistachios contrasts with the white of the powdered sugar, creating an appetizing, cracked crust on the surface. The flavor is absolutely unique: intensely nutty, with a noticeable, noble hint of pistachio, complemented by the freshness of lemon zest, which adds lightness and elegance. Their texture is their greatest asset – crunchy on the outside, yet wonderfully soft, moist, and chewy on the inside, just like the best chewy cookies. They pair perfectly with a cup of strong espresso or delicate green tea. They are an excellent idea for an elegant homemade treat for special occasions, holidays, or simply as a sweet gift for a loved one. The process of making them, although it requires a moment of patience for chilling the dough, is incredibly satisfying, and the final result will delight any gourmet.
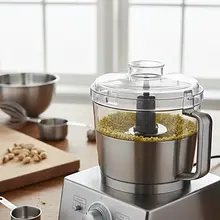
Start by preparing the 'pistachio flour'. Place shelled, unsalted pistachios in the bowl of a food processor or a good blender. Pulse in short bursts of 2-3 seconds until the pistachios reach a fine sand-like consistency. Be careful not to blend too long, as the pistachios will start to release oil and turn into pistachio butter. You should end up with a dry, green powder.
Ingredients:
Shelled, unsalted pistachios
The best option is a food processor with an 'S' blade. If you don't have a food processor, you can use a coffee grinder, grinding the pistachios in batches. Regularly check the consistency, scraping the mixture from the sides of the bowl.
2
In a medium-sized bowl, combine the dry ingredients. Add the sifted all-purpose flour, baking powder, and a pinch of salt. Add the previously ground pistachios. Mix everything thoroughly with a whisk to ensure the ingredients are evenly distributed. This will help the cookies rise evenly and have a uniform texture.
Ingredients:
Mąka pszenna tortowa typ 450, Baking powder, Salt
Use a sieve to sift the flour and baking powder. This simple step aerates the ingredients and prevents lumps from forming in the batter. A whisk is perfect for mixing the dry ingredients.
3
In a large mixing bowl, place the soft butter and fine sugar. Using the paddle attachment, beat the ingredients on medium speed for about 3-4 minutes. The mixture should become light, fluffy, and creamy. During the beating, add freshly grated lemon zest – its aroma will be released by the heat and fat.
Ingredients:
Masło 82%, Drobny cukier do wypieków, Lemon zest
Use a stand mixer with a flat beater or a hand mixer. The butter must be soft but not melted. Take it out of the fridge about an hour before you start working. Scald the lemon with boiling water and zest only the yellow part of the peel; the white part (albedo) is bitter.
4
To the whipped butter-sugar mixture, add an egg at room temperature. If using, also add the vanilla extract now. Increase the mixer speed and beat everything for another 2 minutes, until the ingredients are perfectly combined and the mixture becomes even fluffier. Don't worry if the mixture looks slightly curdled – everything will come together once you add the flour.
Ingredients:
Egg, Vanilla extract
A room temperature egg prevents the butter mixture from curdling. If you forgot to take it out earlier, you can place it in a bowl of warm (not hot!) water for 5 minutes.
5
Reduce the mixer speed to the minimum and gradually, tablespoon by tablespoon, add the dry ingredient mixture to the egg-butter mixture. Mix only until the ingredients are combined and there are no traces of dry flour visible. Overmixing can make the cookies tough. The dough will be quite soft and sticky – this is normal.
Do not mix the batter too long! It's only about combining the ingredients. You can finish mixing with a silicone spatula, scraping the batter from the sides of the bowl to ensure everything is evenly mixed.
Chilling and Shaping the Cookies
6
Transfer the prepared dough onto a piece of plastic wrap. Shape it into a flat disk, wrap it tightly in the wrap, and place it in the refrigerator for at least 1 hour, preferably for 2 hours. This step is absolutely crucial! The chilled dough will firm up, allowing for the formation of balls and preventing excessive spreading of the cookies during baking.
Do not skip the cooling step! It's the secret to perfect crinkle cookies. If you're in a hurry, you can put the dough in the freezer for 30 minutes, but cooling in the fridge gives better results.
7
While the dough is cooling, prepare your coating station. In one smaller bowl, pour about 50g of powdered sugar. In the other, larger and deeper bowl, pour the remaining 100g. Double coating will ensure a thick layer of sugar that will beautifully crack during baking. Also, prepare two large baking sheets and line them with parchment paper.
Ingredients:
Powdered sugar
Use two separate bowls. The first, thinner layer of sugar will absorb moisture from the dough, while the second, thicker layer will remain on top and create a cracking effect. This is a technique that guarantees success.
8
Take the chilled dough out of the fridge. Preheat the oven to 180°C (fan). Using an ice cream scoop or a regular tablespoon, scoop out portions of dough (the size of a walnut, about 25-30g) and quickly roll them into smooth balls in your hands. First, coat each ball in a bowl with a smaller amount of powdered sugar, then transfer it to a second bowl and coat it very generously, so that it is completely covered with a thick layer of sugar.
Ingredients:
Powdered sugar
Work quickly so that the dough doesn't warm up too much in your hands. If it starts to stick, you can dust your hands with a little flour or cool them under cold water. Don't shake off the excess sugar from the second layer – the more you use, the better the effect.
Baking
9
Place the coated balls on the prepared trays, leaving plenty of space (about 5 cm) between them, as the cookies will rise and spread out. This batch should yield about 20-24 cookies.
Do not flatten the balls! They will spread in the oven to the perfect shape. Maintaining the right spacing is important so the cookies do not stick together.
10
Place the tray in the preheated oven and bake for about 12-14 minutes. The cookies are ready when their edges are slightly browned and firm, while the center still feels soft to the touch. Characteristic deep cracks should appear on the surface. Do not bake them too long, or they will lose their wonderful, gooey texture inside.
Every oven bakes differently, so keep an eye on the cookies towards the end of baking. It's better to take them out a minute early than a minute late. After removing them from the oven, the center will firm up as they cool.
11
Remove the baking sheet from the oven and let the cookies sit on the sheet for about 5 minutes. During this time, they will firm up slightly. Only after this time, using a wide, flat spatula, gently transfer them to a wire rack to cool completely. Hot cookies are very fragile and could break apart when attempting to move them.
Use a metal rack to ensure air circulation from below. This will prevent the cookies from steaming and help them maintain a crispy crust. The full flavor will develop only after they have completely cooled down.
Fun Fact
💡
Pistachios, known as 'green almonds', originate from the Middle East, and their cultivation dates back to the Bronze Age. In ancient Persia, owning pistachio groves was a symbol of wealth and high social status. Legend has it that the Queen of Sheba valued pistachios so much that she reserved entire harvests exclusively for herself and her court.
Cookies look best arranged on a white platter or a rustic wooden board. They can be served as an accompaniment to strong espresso, cappuccino, or matcha tea. They also look great packaged in cellophane bags and tied with a ribbon as an edible gift.
🥡Storage
Once completely cooled, store the cookies in an airtight metal or glass container at room temperature for up to 5 days. Over time, the powdered sugar may slightly absorb moisture, but the cookies will still be delicious. Do not store them in the refrigerator, as they will lose their crunchiness.
Homemade cakes and pastries are the heart of Polish culinary tradition - sweet memories from childhood. In our collection, you will find recipes for classic yeast cakes, shortcrust, sponge, and cheesecake. Apple pie, poppy seed cake, gingerbread, Easter babka, chocolate cake, and New York cheesec...
Desserts are a sweet ending to a meal that brings joy to both children and adults. In this category, we present recipes for a variety of sweets - from simple creams and mousses, to elegant panna cottas, and exquisite fruit tarts. Our desserts include both classics of Polish cuisine - fruit jelly,...
Dishes for special occasions are culinary masterpieces for birthdays, anniversaries, and holidays. Grilled beef steak with herb butter - restaurant quality at home. Beef Wellington - beef in puff pastry with duxelles. Roast duck with apples - a holiday tradition in a new edition. Pink salmon with...
Comments (0)
Be the first to comment on this recipe!
Add a comment