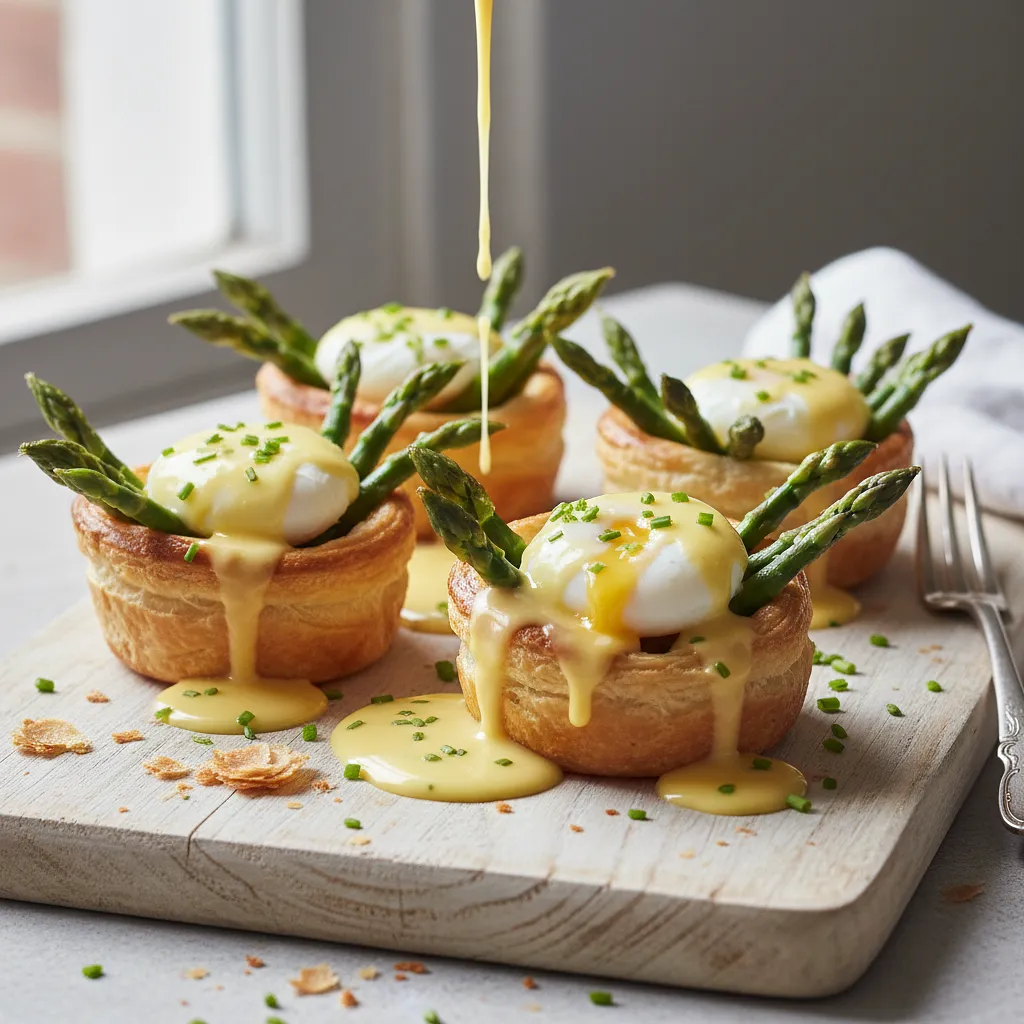
Preheat the oven to 200°C (fan) or 220°C (top-bottom). Line a large baking tray with parchment paper. Take the puff pastry out of the fridge just before use to keep it cold and easy to handle.
Description
This is an exquisite and incredibly appetizing appetizer that is perfect when you don't have a big appetite but crave something special. The dish combines the crispiness of buttery puff pastry, the tenderness of seasonal green asparagus, the richness of a runny quail egg yolk, and the velvety, slightly tangy note of classic hollandaise sauce. Visually, it resembles small, edible works of art – golden nests filled with spring treasures. Although this dish appears complicated, it is within reach even for a beginner cook if they follow the detailed instructions. It is ideal as an elegant starter during a formal lunch, a component of a lavish brunch, or simply as a culinary indulgence on a lazy afternoon.
Składniki (12)
- Puff pastry (fresh, chilled) 275 g
- Green asparagus 0.5 pęczek
- Quail eggs 48 g
- Chicken egg 1 szt.
- Egg yolks 2 szt.
- Masło klarowane 6.7 łyżek
- Lemon juice 15 ml
- Cold water 15 ml
- 🌿 Przyprawy
- Salt 0.1 szczypt
- Pieprz czarny świeżo mielony 2 szczypty
- ✨ Opcjonalne
- Fresh chives 0.3 pęczków
- Cayenne pepper 2 szczypty
💡 Kliknij na składnik aby oznaczyć jako użyty
Preparation steps
Preparation of pastry nests
Roll out the puff pastry on a lightly floured surface. Using a round cutter or a glass with a diameter of about 10 cm, cut out 4 equal circles. These will be the bases for our nests. Place them on the prepared baking sheet.
From the remaining dough, cut out another 4 circles of the same size. Then, using a smaller cutter (about 8 cm in diameter), cut out the center of each to create 4 rings. Gently brush the edges of the circles on the baking sheet with water or beaten egg and place the prepared rings on top. This will create raised edges – 'nests'.
In a small bowl, beat the chicken egg with a fork. Using a kitchen brush, thoroughly coat the top and sides of the pastry rings. Then, using a fork, gently prick the bottom of each shell in several places. This will prevent the center from rising excessively during baking.
Place the tray with the nests in the preheated oven and bake for 15-20 minutes. The nests are ready when they become puffed, golden brown, and crispy. After baking, remove them from the oven and let them cool slightly. If the centers have still risen, gently press them down with a teaspoon.
Preparing the asparagus
While the nests are baking, prepare the asparagus. Wash them under cold water. To remove the woody ends, hold each asparagus with both hands and gently bend it. It will naturally snap at the point where the tough part ends. Discard the ends. Cut the tips and tender stems into pieces about 3-4 cm long.
Bring a small amount of water to a boil in a pot. Add a pinch of salt. Drop the chopped asparagus into the boiling water and cook for 2-3 minutes (this is called blanching). They should be slightly soft but still firm and intensely green. Drain them immediately in a colander and rinse with cold water to stop the cooking process and preserve the color.
Preparing hollandaise sauce
Prepare a water bath: pour water into a small pot to a height of about 3 cm and bring it to a gentle simmer (only small bubbles should appear). Place a metal or glass bowl on top of the pot that fits it but does not touch the bottom of the water. In a separate small saucepan, melt the clarified butter over very low heat. Keep it warm.
In a bowl placed over steam, add the egg yolks, lemon juice, and cold water. Using a whisk, start vigorously beating the mixture. Continue whisking without interruption for about 3-5 minutes. The mixture should become pale, fluffy, and double in volume, with traces left by the whisk on its surface.
Remove the bowl from the steam. Without stopping whisking, start adding the warm, melted clarified butter. Pour it in very slowly, in a thin stream, initially drop by drop. Each portion of butter must be absorbed by the egg mixture before you add the next one. As you add the butter, the sauce will thicken, creating a smooth emulsion.
When all the butter has been absorbed and the sauce reaches the consistency of thin mayonnaise, season it to taste with a pinch of salt and freshly ground pepper. Additionally, if you like, you can add a bit of cayenne pepper for a slight kick. Mix and keep the sauce warm (but not on the heat!) until serving.
Dish Assembly
In the baked and slightly cooled puff pastry nests, arrange a portion of blanched asparagus. Try to place them decoratively, creating a small 'nest' in the center.
Very carefully crack one quail egg into the center of each nest, placed on the arranged asparagus. Try not to damage the yolk. Quail eggs are delicate, so it's best to first crack them into a small bowl and then gently transfer them to the nest.
Place the tray with the sockets back in the oven preheated to 180°C for about 3-5 minutes. Bake just until the egg white sets and the yolk remains runny. Watch them closely, as this process is very quick.
Remove the finished nests from the oven and immediately transfer them to plates. Generously drizzle each portion with warm hollandaise sauce. If using, sprinkle everything with finely chopped fresh chives. Serve immediately while they are hot and crispy.
Fun Fact
Contrary to its name, hollandaise sauce does not come from the Netherlands, but is one of the five 'mother sauces' of French cuisine. Its name likely originated from the fact that during World War I, there was a shortage of butter in France, and it was imported from the Netherlands.
Best for
Tips
Serve the nests immediately after preparation on individual plates. To enhance the elegance of the dish, you can use plates in a contrasting color, such as graphite. A glass of chilled dry white wine, such as Sauvignon Blanc or Pinot Grigio, pairs perfectly.
This dish is meant for immediate consumption and is not suitable for storage. Baked pastry nests (without filling) can be stored in an airtight container for up to 24 hours, but they will lose their crispness. The hollandaise sauce should not be reheated, as it will separate.
📸 Ugotowane przez społeczność
Zaloguj się, aby dodać zdjęcieDodaj zdjęcie gotowej potrawy
Po zatwierdzeniu przez moderatora otrzymasz 10 punktów doświadczenia.
Nikt jeszcze nie dodał zdjęcia. Bądź pierwszy!
Comments (0)
Be the first to comment on this recipe!
Add a comment