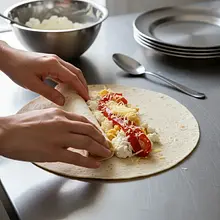
Start by roasting the pepper. Preheat the oven to 220°C (convection or top-bottom). Wash the red pepper, dry it, and place it whole on a baking sheet lined with parchment paper. Put it in the hot oven for about 20-25 minutes. During baking, turn it once or twice for even roasting. The skin should blacken and blister. This is a sign that it is ready.
Description
Here’s a recipe for a snack that will revolutionize your perception of simple tortilla rolls. Instead of classic cream cheese, the base here is a velvety, slightly salty, and refreshing 'whipped feta' paste, which is whipped feta cheese blended into a smooth cream with Greek yogurt and a hint of lemon. The filling hides a wealth of Mediterranean flavors: golden, sautéed pieces of halloumi cheese with its characteristic slightly 'squeaky' texture, the sweetness of roasted red peppers, an intense note of sun-dried tomatoes, and the freshness of spinach and mint leaves. Each bite is the perfect balance of flavors and textures – creaminess, saltiness, sweetness, and crunchiness. Visually, they look incredibly appetizing, creating a colorful mosaic when cut. Perfect for a party, as an elegant appetizer, a lunch for work, or simply a delicious and nutritious snack throughout the day.
Ingredients Used
Ingredients (12)
- Tortilla pszenna (duża) 4 szt. (~240 g)
- Feta cheese 200 g
- Greek yogurt 100 g
- Halloumi cheese 200 g
- Red bell pepper 1.1 szt. (~200 g)
- Sun-dried tomatoes in oil 50 g
- Lemon juice 15 ml
- Olive oil 30 ml
- Fresh mint 0.2 pęczków (~15 g)
- Spinach 50 g
- 🌿 Przyprawy
- Black pepper 4 szczypty (~2 g)
- ✨ Opcjonalne
- Pine nuts 20 g
💡 Kliknij na składnik aby oznaczyć jako użyty
Preparation steps
Preparation of ingredients
Remove the hot pepper from the oven and immediately transfer it to a glass bowl, then cover it tightly with plastic wrap or a plate. Leave it for 10-15 minutes. The steam that collects in the bowl will make the skin come off the flesh very easily. After this time, remove the wrap, and then gently peel off the charred skin with your fingers or a small knife. Remove the seed pod and cut the flesh of the pepper into thin strips about 1 cm wide.
Now prepare the halloumi cheese. Remove it from the packaging and dry it very thoroughly with a paper towel. This is crucial for achieving a crispy crust. Cut the cheese into slices about 0.5 cm thick. In a non-stick skillet, heat 1 tablespoon of olive oil (15 ml) over medium heat. When the oil is hot, place the halloumi slices in the skillet and fry for 2-3 minutes on each side until they have a beautiful golden-brown color. Remove from the skillet and set aside on a plate to cool slightly.
Pasta with Whipped Feta
It's time to prepare the creamy paste. In a high-powered food processor or blender, place the crumbled feta cheese, Greek yogurt, freshly squeezed lemon juice, the remaining tablespoon of olive oil (15 ml), and freshly ground black pepper. Blend everything on high speed for about 2-3 minutes. While blending, scrape down the mixture from the sides of the bowl with a silicone spatula to ensure everything is evenly combined. Blend until you achieve a perfectly smooth, fluffy, and creamy consistency, with no lumps.
Assembling and rolling
Prepare the remaining ingredients. Drain the sun-dried tomatoes from excess oil on a paper towel and cut them into thin strips. Tear the mint leaves from the stems and chop them coarsely. If you are using pine nuts, toast them in a dry, clean pan over low heat for 2-3 minutes, until they are lightly browned and start to smell – be careful not to burn them. Wash the spinach and dry it thoroughly.
Place the tortilla on a clean cutting board or countertop. Spread about 1/4 of the prepared whipped feta paste evenly over it, using a butter knife or spatula. Remember to leave a blank margin of about 2 cm along one edge (the one that will be at the end of the rolling). This will prevent the filling from spilling out while rolling.
On the greased tortilla, arrange the ingredients. Start by laying down a handful of spinach leaves. Then, closer to the edge from which you will start rolling, place strips of roasted bell pepper, slices of fried halloumi, and strips of sun-dried tomatoes in a line. Sprinkle everything with chopped mint and (optionally) toasted pine nuts. Try to distribute the ingredients fairly evenly, but concentrate them along one side.
Now the most important moment: rolling. Start rolling the tortilla from the side with the filling towards the empty edge. Roll it very tightly and carefully, gently pressing after each turn to eliminate air bubbles and make the roll compact. The empty edge at the end will 'seal' the roll. Repeat the process for the remaining three tortillas.
Cooling and Cutting
Wrap each rolled tortilla tightly in plastic wrap, twisting the ends like a candy. This step is extremely important as it helps the rolls maintain their shape. Place the wrapped tortillas in the refrigerator for at least 30 minutes, preferably for an hour. Chilling will firm up the filling, making it much easier to slice.
Take the chilled rolls out of the fridge and unwrap them from the foil. Use a very sharp knife, preferably serrated (like a bread knife), to cut the tortilla into slices about 2-2.5 cm thick. First, trim the uneven ends (you can eat them right away!), and then cut even pieces with a firm, slightly sawing motion. Arrange the finished rolls on a platter and serve.
Fun Fact
Halloumi cheese comes from Cyprus and has been known since medieval times. Its unique property – high melting temperature – results from the process of heating the cheese curd before placing it in brine. This makes it perfect for grilling and frying, becoming crispy on the outside and soft on the inside.
Best for
Tips
Arrange the rolls tightly on a large, flat plate or wooden board, creating a colorful composition. You can decorate them with fresh mint or arugula leaves. They taste great on their own, but you can serve them with a light dip, such as a yogurt-based sauce with garlic and cucumber (tzatziki) or a vinaigrette.
Ready, sliced rolls are best eaten the same day. If there are any leftovers, store them in an airtight container in the refrigerator for up to 24 hours. However, keep in mind that after a night in the fridge, the tortilla may become slightly damp. They are not suitable for freezing.
📸 Ugotowane przez społeczność
Zaloguj się, aby dodać zdjęcieDodaj zdjęcie gotowej potrawy
Po zatwierdzeniu przez moderatora otrzymasz 10 punktów doświadczenia.
Nikt jeszcze nie dodał zdjęcia. Bądź pierwszy!
Comments (0)
Be the first to comment on this recipe!
Add a comment