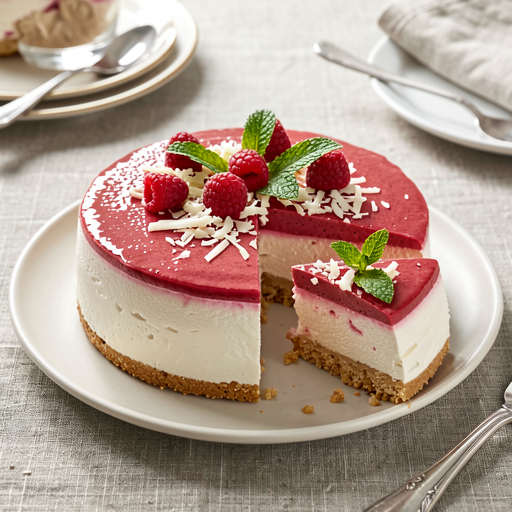
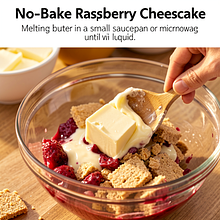
Prepare the pan (springform Ø24 cm). Cut a strip of parchment paper and line the bottom of the pan, which will make it easier to remove the cheesecake. Crumble the biscuits: place the biscuits in a large bowl, cover with a cloth, and crush with a rolling pin or place in a bag and smash with a mallet until you achieve fine crumbs (they don't need to be completely uniform).
Description
A delicate cold cheesecake with raspberries is a light, spring dessert proposal: a creamy mixture of cottage cheese and cream complemented by a sweet-tart juicy raspberry mousse, set on a buttery biscuit base. The recipe is fully vegetarian thanks to the use of agar-agar instead of gelatin. The cheesecake has a velvety texture, fresh raspberry flavor, and a nice contrast of colors — white cream and intense red mousse. Serve chilled as a dessert after dinner, at a party, or as a light menu item during spring gatherings. The recipe includes step-by-step techniques for beginner cooks as well as alternatives and additions (mint, white chocolate) to enhance flavor and appearance.
Ingredients Used
Ingredients (12)
- Biscuits 220 g
- Butter 80 g
- Cottage cheese 600 g
- 30% heavy cream 200 g
- Powdered sugar 80 g
- Vanilla sugar 8 g
- Agar-agar 8 g
- Raspberry 300 g
- Water 120 ml
- Lemon 0.3 szt. (~20 g)
- ✨ Opcjonalne
- Fresh mint 0.3 pęczków (~10 g)
- White chocolate 50 g
💡 Kliknij na składnik aby oznaczyć jako użyty
Preparation steps
Base
Melt the butter in a small saucepan or microwave until liquid. Pour the melted butter into a bowl with the biscuit crumbs and mix with a spoon until all the crumbs are evenly moist and slightly stick together when pressed in your hand.
Pour the biscuit mixture into the prepared springform pan. Using a spoon or the bottom of a glass, press it evenly to the bottom, forming a compact layer. Place the pan in the refrigerator for 10-15 minutes to let the base set.
Cheese dough
Prepare the cottage cheese: if you have lumpy cottage cheese, grind it twice in a meat grinder or blend it with a blender until smooth. Transfer the smooth cottage cheese to a large bowl.
Whip the 30% cream until stiff: in a large, cold bowl, beat the chilled cream with a mixer on medium speed for about 3-5 minutes, until a thick, stable cream forms. At the end of whipping, add the powdered sugar and vanilla sugar, and mix for another 20-30 seconds to combine.
Add half of the whipped cream to the smooth cottage cheese and gently mix with a spatula using a folding motion until the mixture becomes uniform. Taste the mixture and sweeten if necessary (add up to 10 g of powdered sugar more).
Prepare the agar-agar: in a small pot, mix agar-agar (8 g) with 120 ml of water and let it sit for 1-2 minutes to allow the granules to soak. Then heat the mixture, bringing it to a boil and cook for 1-2 minutes, stirring constantly — the agar must dissolve and boil to bind the mixture later. After removing from heat, let it sit for 30 seconds.
Pour 2-3 tablespoons (about 30 g) of hot water with agar into a small portion of the cheese mixture and mix vigorously — this equalizes the temperature and prevents the cold cream from curdling. Then slowly pour the rest of the dissolved agar into the cheese mixture, constantly stirring with a spatula until the mixture is smooth and uniform.
Add the rest of the whipped cream to the mixture and gently fold it in to keep the mixture fluffy. If you want a more vanilla flavor, add a bit of freshly grated lemon zest (optional). Pour the cheese mixture evenly over the chilled biscuit base, smoothing the top with a spatula. Place the dish with the mixture in the refrigerator for about 10 minutes to allow it to thicken slightly before adding the raspberry mousse.
Raspberry jelly and finishing touches
Prepare the raspberry puree: blend half of the raspberries (about 150 g) until smooth with 10 g of powdered sugar and 10 g of lemon juice. Strain through a sieve if you want to remove the seeds. Set aside the remaining raspberries (150 g) for decoration or lightly crush them with a fork.
To prepare the raspberry jelly layer on top: heat about 40 ml of water, dissolve 2 g of agar in it (from the total amount used earlier, if you saved some — otherwise prepare an additional 2 g), bring to a boil for 1 minute. Mix the hot agar with the raspberry puree (about 170-180 g of puree), stir well and wait 1 minute for the mixture to cool slightly, but still remain liquid.
Pour the slightly warm raspberry puree over the slightly set cheese mixture. You can create a marbled effect: spoon the puree on and gently swirl with a toothpick to create patterns. Decorate with the remaining raspberries on top and optionally with white chocolate shavings or fresh mint leaves.
Cooling and serving
Chill the cheesecake in the refrigerator for at least 3-4 hours (preferably overnight) until the filling is completely set and the jelly thickens. Before cutting, run a knife dipped in hot water along the edges of the springform pan to make it easier to release. Remove the springform ring and transfer the cheesecake to a plate.
Serve the chilled cheesecake cut into portions. Additionally, decorate with mint leaves and sprinkle with white chocolate shavings, if using. The cheesecake tastes best slightly chilled and fresh.
Fun Fact
In traditional versions of no-bake cheesecakes, gelatin is often used; agar-agar comes from seaweed and has become popular in vegetarian cuisine. Thanks to it, the cheesecake has a more elastic, slightly jelly-like texture.
Best for
Tips
Serve the cheesecake well chilled, cut with a sharp knife dipped in hot water. On the plate, add a few fresh raspberries and mint leaves for contrast. You can also serve a small scoop of vanilla ice cream on the side.
Store in the refrigerator in a tightly sealed container or covered with plastic wrap for up to 3 days. Do not freeze — the texture of the cream and agar may change. To reheat a piece before serving, simply take it out of the refrigerator 10-15 minutes beforehand.
📸 Ugotowane przez społeczność
Zaloguj się, aby dodać zdjęcieDodaj zdjęcie gotowej potrawy
Po zatwierdzeniu przez moderatora otrzymasz 10 punktów doświadczenia.
Nikt jeszcze nie dodał zdjęcia. Bądź pierwszy!
Comments (0)
Be the first to comment on this recipe!
Add a comment