Recipe for: Baked cheesecake in a fire pit (Polish-modern)

Desserts Regional Cuisine of Poland 60 min Hard 6 wyświetleń ~46.85 PLN - (0)
Rate:
(0)
Start Cooking

Description

Baked cheesecake cooked over an open fire is a rustic variation of the classic Polish cheesecake, enriched with the smoky aroma of embers. It uses seasonal semi-fat curd and simple ingredients available in Poland, and the method of baking in the coals gives the cheese mixture a delicate caramel-smoky note. This dish is perfect as an impressive dessert for a May Day celebration, a bonfire with friends, or a regional gathering; it is best served chilled, with seasonal strawberries and a sprinkle of powdered sugar or rhubarb sauce. Visually: a golden, thin crust, creamy interior, and a browned base made from biscuits. The recipe is advanced — it requires temperature control of the coals and solid protection for the baking pan, but the result is exceptional and worth the effort.

Ingredients Used

Ingredients (12)

Servings:
8
  • Biscuits 200 g
  • Butter 100 g
  • Semi-fat cottage cheese 1000 g
  • Sugar 200 g
  • Chicken egg 4 szt. (~240 g)
  • 18% cream 200 ml
  • Wheat flour 30 g
  • Vanilla bean 1.2 szt. (~6 g)
  • Lemon 1.5 szt. (~120 g)
  • 🌿 Przyprawy
  • Salt 1 g
  • ✨ Opcjonalne
  • Powdered sugar 30 g
  • Strawberry 150 g
💰 Szacowany koszt dania: ~46.85 PLN (5.86 PLN/porcję)

💡 Kliknij na składnik aby oznaczyć jako użyty

Preparation steps

Preparing the fire pit and mold

1

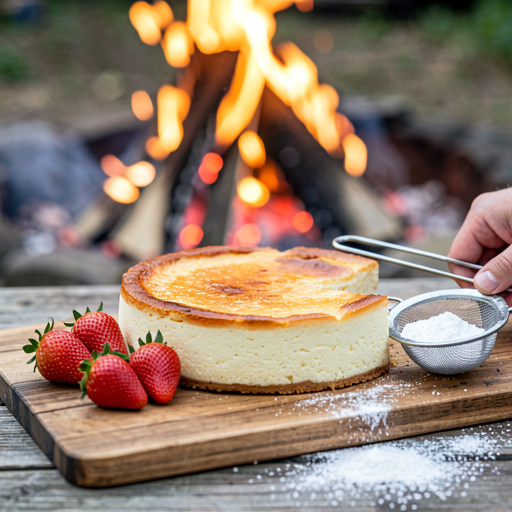
Prepare the fire at least 45 minutes before placing the cheesecake in, so that an even embers is formed. Arrange dry hardwood and a few larger pieces of wood. Light the fire and maintain the hearth until a thick bed of embers with small flames is created (about 30–45 minutes). During this time, prepare the pan — a round pan with a removable bottom of 22–24 cm is best. Line the bottom and sides with a double layer of strong aluminum foil, so that the pan can be tightly wrapped. Grease the bottom with a thin layer of butter.

Ingredients: Butter
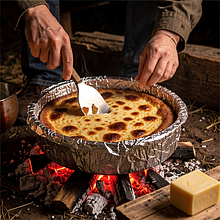
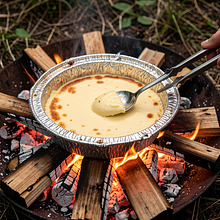
Use protective gloves and long fire tongs. The mold should be tightly wrapped in foil (double layer) — this is a safeguard against ash and direct contact with the embers.

Base

2

Crush 200 g of biscuits in a plastic bag with a rolling pin into fine crumbs (they should look like coarse sand with small pieces). Transfer the crumbs to a bowl, add 100 g of melted, slightly cooled butter and mix with a spoon until the mixture is evenly moist and starts to slightly clump together under finger pressure. Evenly spread the cookie mixture on the bottom of the prepared pan, pressing down with a flat spoon or the bottom of a glass — shape the edges to a height of about 1–2 cm.

Ingredients: Butter
Use a rolling pin or a bottle to crush the biscuits. The best tool is a metal spoon or the bottom of a glass to level the base. If the mixture is too dry, add a teaspoon of butter; if too wet, add 1–2 biscuits.

Cheese dough

3

Take the semi-fat cottage cheese and place it in a large bowl. If the cottage cheese is too grainy, pass it through a sieve or blend it with a hand blender in pulses to achieve a smooth consistency. Add 200 g of sugar to the cottage cheese, the scraped seeds from 1 vanilla pod (first cut the pod lengthwise and use a knife to extract the seeds), 1 pinch of salt, the grated zest and 1 tablespoon of juice from the prepared lemon, 30 g of all-purpose flour, and 200 ml of 18% cream. Crack in 4 eggs (240 g) one at a time and mix on low speed until the ingredients are combined — the mixture should be smooth, without lumps, and have a silky consistency. Do not mix for too long (max. 1–2 minutes) to avoid over-aerating the mixture.

Ingredients: Semi-fat cottage cheese, Sugar, Vanilla bean, Salt, Lemon, Wheat flour, 18% cream
Use a mixer with a flat attachment or a hand mixer on low speed. If you don't have a mixer, stir thoroughly with a wooden spoon for 3–5 minutes until the mixture is uniform. The mixture is ready when it is smooth and pourable, but not watery.

Filling the mold

4

Pour the cheese mixture onto the prepared base in the mold. Smooth the surface with a spatula wet in hot water (a clean, damp spatula will help achieve a smooth surface). Cover the top of the mold with a loose layer of aluminum foil, then wrap the mold with two layers of foil from the bottom and the sides, ensuring there are no punctures. Make an additional outer cover with foil if the heat source is very intense.

Ingredients: Wheat flour, Semi-fat cottage cheese
Use a silicone spatula to smooth it out. The foil must be airtight — check for any holes. If you're worried about leaks, place the dish in a larger ovenproof pot before wrapping it in foil.

Baking in the fireplace

5

When the coals are ready (red, with a thin layer of ash), move the heated pieces of wood to the side to create a nest with an even distribution of coals. Place the pan on a framework of larger pieces of wood or directly in the coals (depending on the intensity) and cover the pan with half of the coal pile and lit logs to create an even heat environment. Bake in the coals for about 35–45 minutes; every 15 minutes, gently (with a quick motion of tongs) adjust the position of the pan so that the coals do not settle only on one side. The cheesecake is ready when, upon a light shake, the center is slightly set but not completely firm — it should jiggle slightly.

Ingredients: Semi-fat cottage cheese
Use long tongs and gardening gloves. The baking time is approximate and depends on the temperature of the coals; check by gently shaking. If the cheesecake browns too much, remove some of the coals from the top layer.

Cooling and aging

6

After baking, remove the pan using tongs and set it in a safe place away from the fire. Leave the pan wrapped in foil and let it cool gradually for 1 hour at room temperature (this will prevent the cheesecake from collapsing suddenly). Then, unwrap the foil and place the pan in the refrigerator for at least 4 hours, preferably overnight — the cheesecake will firm up and achieve a creamy consistency.

Ingredients: Semi-fat cottage cheese
Use a flat wooden box or stone as a base so that the mold does not touch the cold surface. Gradual cooling prevents cracking.

Serving

7

Before serving, gently loosen the springform pan, and transfer the cheesecake to a board or plate. If using, wash and quarter 150 g of strawberries and arrange them on the cheesecake. Optionally, dust the top with 30 g of powdered sugar through a sieve. Cut the cheesecake with a sharp, warm knife (wipe the knife in hot water and dry it before each cut) for smooth slicing.

Ingredients: Strawberry, Powdered sugar
Use a wide spatula to transfer the pieces. A warm knife prevents the cream from crumbling — dip the knife in hot water and quickly wipe it before each cut.

Additional variations

8

For an aromatic twist, you can serve the cheesecake with a quick rhubarb compote (sautéed with a bit of sugar and lemon zest) or drizzle a little honey over each piece. Additionally, you can add fresh herbs (e.g., mint leaves) for decoration to provide a flavor contrast.

If you are adding rhubarb sauce, prepare it in a separate pot — do not pour it over the hot cheesecake right after taking it off the heat, wait until it is cool.

Fun Fact

💡

Baking cakes in the embers was popular in the countryside, where the lack of an oven forced creative methods of preparing dishes; the smoke from the fire adds a delicate, pleasant note that in 19th-century Poland connected the flavors of homemade baking with nature.

Best for

Tips

🍽️ Serving

Serve chilled, cut into thick slices (about 2–3 cm). Garnish with fresh strawberries and a light dusting of powdered sugar. A teaspoon of 12% sour cream or rhubarb sauce will be a nice addition. Cutting with a knife warmed in hot water gives the cleanest slices.

🥡 Storage

Store in the refrigerator for up to 4 days, preferably in a mold or covered with plastic wrap to prevent it from absorbing odors. Do not freeze; freezing changes the texture of the mixture. To refresh the cheesecake after chilling, take it out 15–20 minutes before serving.

📸 Ugotowane przez społeczność

Zaloguj się, aby dodać zdjęcie
Dodaj zdjęcie gotowej potrawy

Po zatwierdzeniu przez moderatora otrzymasz 10 punktów doświadczenia.

🍲

Nikt jeszcze nie dodał zdjęcia. Bądź pierwszy!

Comments (0)

Be the first to comment on this recipe!

Add a comment

You might also like

Recipe Categories

Desserts
Desserts in: New Year's Eve

A sweet ending to the New Year's Eve dinner is a must-have that will put everyone in a joyful mood for the new year.

See all recipes in this category

Traditional recipes from various regions of Poland that showcase the richness of local flavors and ingredients.

See all recipes in this category
Reklama