Rainbow cake with naturally colored cream (4 servings)

Cakes and Bakes Desserts Regional Cuisine of Poland 120 min Medium 54 wyświetleń ~27.20 PLN * - (0)
Rate:
(0)
Start Cooking

Description

Light vanilla sponge cake layered with six colorful layers of cream based on curd and cream — each layer colored with natural Polish ingredients: beetroot, carrot, turmeric, spinach, blueberries, and a mixture for a violet shade. This is a modern reinterpretation of the classic 'rainbow cake': instead of baking many separate colorful layers, we bake one delicate sponge and spread cream in intense, yet natural colors between its thin slices. The cake is visually striking, mild in flavor (without chemical dyes if you prefer), and perfect as a dessert for birthdays, parties, or afternoon coffee. Thanks to the use of creamy curd, the cream is slightly tangy and stable, while the addition of cream gives it a fluffy texture. Serves 4 — a small round cake (diameter about 18 cm).

Ingredients Used

Ingredients (20)

Servings:
4
  • Wheat flour 180 g
  • Sugar 180 g
  • Butter 100 g
  • Milk 60 ml
  • Baking powder 10 g
  • Vanilla extract 5 g
  • Cooked beetroot (puree) 90 g
  • Cooked carrot (puree) 90 g
  • Ground turmeric 2 g
  • Blanched spinach (puree) 60 g
  • Berries (puree) 90 g
  • Cottage cheese 250 g
  • 30% heavy cream 200 ml
  • Powdered sugar 80 g
  • Lemon juice 10 ml
  • Chicken egg 4 szt. (~240 g)
  • 🌿 Przyprawy
  • Salt 2 g
  • ✨ Opcjonalne
  • Gel food colorings 5 g
  • Spirulina (powder) 2 g
  • Fresh fruits for decoration (raspberries/blueberries) 150 g
💰 Szacowany koszt dania: ~27.20 PLN (6.80 PLN/porcję)
* Brak cen dla niektórych składników

💡 Kliknij na składnik aby oznaczyć jako użyty

Preparation steps

Preparation

1

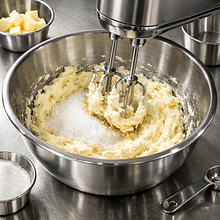
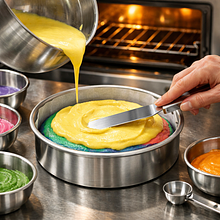
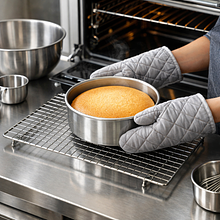
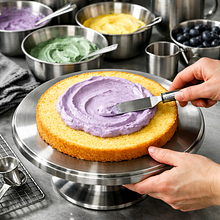
Take the butter and eggs out of the fridge at least 30 minutes before starting, so they reach room temperature — ingredients at a similar temperature combine more easily and the sponge will be fluffier. Preheat the oven to 170°C (top and bottom heating). Prepare a cake pan with a diameter of about 18 cm — line the bottom with baking paper and lightly grease the sides with butter or spray with oil.

Use an 18 cm springform pan; if you don't have one, a smaller pan (16 cm) will yield a taller cake, but the baking time will be longer. Cut the parchment paper into a circle and lightly grease it with butter.

Sponge Cake

2

In a large bowl, beat the butter with half of the sugar (90 g) until light and creamy (3-4 minutes with a mixer on medium speed). Add the eggs one at a time, beating for about 20-30 seconds after each addition until the mixture is smooth. Add the vanilla extract and milk, and mix briefly.

Use a hand mixer or stand mixer with a whisk attachment. The mixture should be smooth and creamy — if you see lumps of butter, whisk for a little longer.
3

In a separate bowl, sift the flour with the baking powder and salt. Add the dry ingredients to the butter mixture in three portions, mixing with a spatula or mixer on the lowest speed just until combined (about 15-20 seconds each time). Do not overmix — the goal is to gently combine the ingredients.

Use a silicone spatula to scrape the flour from the sides. The finished batter should be thick but pourable like thick cream — if it's too thick, add a tablespoon of milk.

Baking

4

Pour the mixture into the prepared springform pan, smoothing the top with a spatula. Place in the preheated oven and bake for 25-30 minutes at 170°C (check with a toothpick: it should come out dry). The top crust should be golden and springy to the touch.

It's best to bake on the middle rack. After 20 minutes, check the color, and if the top starts to brown quickly, gently cover it with aluminum foil.

Cooling and Slicing

5

Remove the sponge cake from the oven and set it on a rack to cool for 30-40 minutes. Once completely cooled, run a knife around the edges and unclip the springform pan. Use a long serrated knife for horizontal cutting and carefully slice the sponge cake into 6 thin, even layers (each about 1–1.5 cm), moving the knife slowly and using a sawing motion.

It's best to sketch with a pencil on the side of the cake pan where you want to cut, or use a special cake saw to ensure the layers are even. If the cake is very delicate, chill it in the refrigerator for 20-30 minutes first.

Preparation of the cream

6

In a bowl, whip the chilled heavy cream to soft peaks (about 2-3 minutes with a mixer). In a separate bowl, blend the cottage cheese with powdered sugar and lemon juice until smooth (1-2 minutes). Gently fold the whipped cream into the cottage cheese using a spatula — scoop and fold the mixture until it is uniform and fluffy.

Use a mixer to whip the cream; the bowl and the beaters should be chilled. Do not whip the cream until stiff — it should be fluffy and slightly loose so that the cream spreads well.

Coloring the cream

7

Divide the prepared cream into 6 small bowls (evenly, about 80–90 g of cream in each). To the first, add beetroot puree (90 g) and gently mix — you will get a red-pink. To the second, add carrot puree (90 g) — orange. To the third, add carrot puree plus 1 g of turmeric (or just 1 g of turmeric and a little puree, mixing carefully) — light yellow. To the fourth, add spinach puree (60 g; make sure to drain excess water well before adding) — green. To the fifth, add berry puree (90 g) — blue-purple. To the sixth, experiment by combining berries with a little beetroot to achieve a deep violet shade. If the color is too weak and you want a more intense effect, add minimal amounts of gel food coloring (optional). Check the consistency: the cream should be thick, not runny; if it is too thin, add 20–30 g of ground cottage cheese or 1–2 tablespoons of powdered sugar.

Use silicone spatulas for mixing, small bowls or cups will make the job easier. If you are adding gel food coloring, add it in small drops — it is very concentrated.

Assembly

8

On a plate or serving platter, place the first (bottom) layer of sponge cake. Evenly spread one portion of colorful cream (about 80–90 g) and smooth it out with a spatula, leaving a thin margin around the edges. Place the second layer of sponge cake and repeat with the next color. Continue until the last layer, finishing with the cream of the last shade. After stacking all the layers, spread a thin layer of cream on the sides to "fix" the crumbs (the so-called crumb coat) and chill the cake in the refrigerator for 20–30 minutes. After chilling, apply a second, decorative layer of cream and smooth the sides and top.

Use a large flat spatula or a pastry spatula. When applying the cream, keep your hand steady and work quickly but gently to avoid tearing the sponge cake.

Decoration

9

Decorate the top with fresh fruits (raspberries, blueberries) and optionally with grated lemon zest for contrast. You can also sprinkle a little powdered spirulina for a green accent (very sparingly). Serve chilled 15–30 minutes after taking it out of the fridge, so the cream thickens slightly but is not icy.

Additionally, you can add fresh mint leaves or edible flowers for an elegant finish. If you are using frozen fruits, thaw and drain them beforehand.

Serving and storage

10

Serve chilled, cutting the portion with a sharp, serrated knife dipped in hot water and dried for clean slicing. Store the remaining pieces in the refrigerator covered with plastic wrap or in a container for up to 48 hours.

To allow the cream to return to softness before serving, take the cake out of the fridge about 15 minutes earlier. Do not leave the cake at room temperature for longer than 4 hours due to the cream cheese and cream.

Fun Fact

💡

Colorful cakes became popular in mass culture in the 21st century, but the use of natural dyes has a long tradition — in Polish cuisine, beets and berries have been used for centuries to color dishes.

Best for

Tips

🍽️ Serving

Serve thin slices (about 1.5–2 cm thick) with a cup of coffee or tea. When cutting, dip the knife in hot water and dry it — this will give you clean slices. For a flavor contrast, serve with a sauce made from warmed berries (a little sugar and lemon juice).

🥡 Storage

Store in the refrigerator covered — the cream cheese and cream mixture is sensitive. You can freeze individual portions (without fruit decoration) for up to 1 month — thaw slowly in the refrigerator for a few hours.

📸 Ugotowane przez społeczność

Zaloguj się, aby dodać zdjęcie
Dodaj zdjęcie gotowej potrawy

Po zatwierdzeniu przez moderatora otrzymasz 10 punktów doświadczenia.

🍲

Nikt jeszcze nie dodał zdjęcia. Bądź pierwszy!

Comments (0)

Be the first to comment on this recipe!

Add a comment

You might also like

Recipe Categories

Homemade cakes and pastries are the heart of Polish culinary tradition - sweet memories from childhood. In our collection, you will find recipes for classic yeast cakes, shortcrust, sponge, and cheesecake. Apple pie, poppy seed cake, gingerbread, Easter babka, chocolate cake, and New York cheesec...

See all recipes in this category

Desserts are a sweet ending to every meal - from simple puddings to exquisite creamy cakes. Our collection includes recipes for homemade ice cream, chocolate mousses, panna cotta, tiramisu, crème brûlée, and lemon tart. Summer fruit desserts: jellies, sorbets, parfaits, and fruit salads with whip...

See all recipes in this category

Traditional recipes from various regions of Poland that showcase the richness of local flavors and ingredients.

See all recipes in this category
Reklama