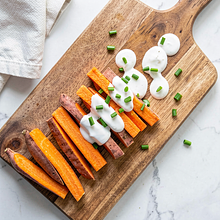
Preheat the oven to 220°C (top-bottom) and place the rack in the middle position. Prepare a large baking sheet lined with parchment paper or a silicone mat — this will prevent sticking and make flipping the fries easier.
Description
Baked sweet potato fries are a light and crispy snack with a sweet and salty note, served with a refreshing yogurt sauce with chives. The dish is inspired by the traditional Polish availability of products (sweet potato as a seasonal novelty in stores) with a twist in the form of a delicate starchy coating that speeds up achieving a golden crust. The fries are perfect as a snack for social gatherings, an addition to spring salads, or as a light dinner. In flavor, they combine the natural sweetness of sweet potato, smoky sweet paprika, and a fresh hint of lemon with chives.
Ingredients Used
Ingredients (11)
- Sweet potato 2 szt. (~800 g)
- Rapeseed oil 30 g
- Corn flour 30 g
- Natural yogurt 300 g
- Garlic 2 ząbki (~10 g)
- Lemon 0.6 szt. (~50 g)
- 🌿 Przyprawy
- Salt 6 g
- Black pepper 4 szczypty (~2 g)
- Sweet paprika 4 g
- Chives 0.3 pęczków (~30 g)
- ✨ Opcjonalne
- Chili flakes 2 szczypty (~2 g)
💡 Kliknij na składnik aby oznaczyć jako użyty
Preparation steps
Preparing the fries
Wash the sweet potatoes under running water and dry them with a paper towel. Peel them if the skin is thick; you can leave thin skin on for added texture. Cut the sweet potatoes into the shape of fries: first, trim the ends, cut them in half lengthwise, and then cut each half into slices about 1 cm thick, then cut the slices into sticks about 1–1.2 cm wide.
Transfer the cut fries to a large bowl of cold water and gently stir. Let them sit for 5 minutes to rinse off excess starch — this will help the fries be less soft after baking and brown better. After 5 minutes, drain the water and dry the fries very thoroughly with a clean cloth or paper towels.
Transfer the dried fries to a dry bowl. Add corn flour and canola oil, then sprinkle with salt, sweet paprika, and pepper. Mix thoroughly with your hands or a large spoon, ensuring each piece is lightly coated — the corn flour will create a delicate layer that will be crispy after baking.
Baking
Arrange the fries in a single layer on the prepared baking sheet so that they do not overlap — this will ensure even browning. Place the baking sheet in the preheated oven and bake for 20 minutes. After 10 minutes, open the oven and use a spatula to turn each fry so that the other side browns as well.
Sauce
While the fries are baking, prepare the sauce: in a bowl, place natural yogurt, add pressed garlic, juice from half a lemon (about 25 g of juice), finely chopped chives, and a pinch of salt. Mix with a fork until smooth. Taste and, if necessary, season with juice from the remaining part of the lemon or salt.
Finishing and serving
After the baking time is up, take the tray out and check the fries — they should be golden at the edges and soft in the middle. If they are not crispy enough, bake for an additional 3–5 minutes. Transfer the fries to a plate, sprinkle with a little salt and optionally with chili flakes, as well as fresh chives. Serve immediately with yogurt sauce.
Fun Fact
Sweet potatoes are commonly used in cuisines around the world, but in Poland, they have gained popularity as a healthier alternative to potatoes — they contain more beta-carotene and often pair better with sweetness and spices.
Best for
Tips
Serve the fries hot, directly after baking, with yogurt sauce in a small bowl on the side. A side of young cabbage coleslaw or arugula and citrus salad pairs well. For a spicy version, add more chili flakes or serve an additional sauce based on mayonnaise and hot pepper.
Store the baked fries in the refrigerator for up to 24 hours in an airtight container. To refresh and restore crispiness, preheat the oven to 200°C and bake the fries for 5–8 minutes. Store the yogurt sauce separately for up to 2 days.
📸 Ugotowane przez społeczność
Zaloguj się, aby dodać zdjęcieDodaj zdjęcie gotowej potrawy
Po zatwierdzeniu przez moderatora otrzymasz 10 punktów doświadczenia.
Nikt jeszcze nie dodał zdjęcia. Bądź pierwszy!
Comments (0)
Be the first to comment on this recipe!
Add a comment