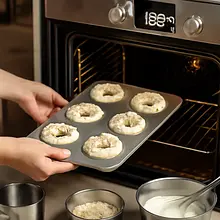
Take the cottage cheese, eggs, and butter out of the fridge 15-30 minutes before starting to bring them to room temperature (they will combine more easily). Open the ingredient packages, prepare the kitchen scale, bowl, sieve, butter knife, mixing bowl, whisk or mixer, piping bag (optional), and baking tray lined with parchment paper. Preheat the oven to 180°C (top-bottom) or 170°C with convection.
Description
Delicate, baked doughnuts inspired by traditional cheese doughnuts, but transformed into a lighter, baked version in the Sweet Blog style. The mixture is based on semi-fat cottage cheese and lemon zest, giving the doughnuts a creamy, slightly tangy flavor and moist texture. Instead of frying, I suggest baking, which results in less fat, and the glaze made from Greek yogurt and powdered sugar with a splash of lemon juice enhances the freshness of the dough. The whole is decorated with an optional crumble of coconut flakes and candied orange peel for a crunchy contrast. Perfect for afternoon coffee, in kids' lunchboxes, for parties, or as a homemade dessert – aesthetic, fragrant with citrus, and very photogenic.
Składniki (14)
- Semi-fat cottage cheese 250 g
- Wheat flour 300 g
- sugar 100 g
- Egg 2 szt.
- Butter 50 g
- Milk 60 ml
- Baking powder 12 g
- Lemon zest (grated) 2.5 łyżeczki
- Powdered sugar 100 g
- Greek yogurt 80 g
- Lemon juice 15 ml
- 🌿 Przyprawy
- Salt 0.0 szczypt
- ✨ Opcjonalne
- Coconut flakes 30 g
- Candied orange peel 30 g
💡 Kliknij na składnik aby oznaczyć jako użyty
Preparation steps
Preparation of ingredients
Preparation of the cheese filling
In a large bowl, place the cottage cheese. If the cottage cheese is grainy, pass it through a sieve or briefly blend it with a blender until smooth (a few 2-second pulses). Add sugar and eggs. Mix with a wooden spoon or a mixer on low speed until combined, about 1-2 minutes. Add the soft butter in pieces and the milk, and mix thoroughly until the mixture becomes creamy. Grate the zest of the lemon without the white part and add it to the mixture. In a separate bowl, sift the flour with baking powder and salt — sifting will aerate the flour and help avoid lumps. Add the dry ingredients to the cheese mixture in batches, mixing with a spatula just until combined; the batter should be thick, homogeneous, slightly sticky, but suitable for portioning. If the mixture is too runny, add a maximum of 1-2 tablespoons (15-30 g) of flour until you achieve the consistency of thick dough for shaping.
Shaping
Prepare a baking tray lined with parchment paper or a silicone mat. If you want to achieve uniform donuts, weigh out portions of the dough: the entire batch should be enough for about 12 pieces; weigh each portion to about 65-70 g. Scoop portions using an ice cream scoop or two spoons. To create the characteristic hole in the center, you have two methods: a) Use a piping bag with a large round tip and pipe circles onto the paper (circles with a diameter of 7-8 cm). b) Form a ball from each portion, gently flatten it in your hand into a patty about 1-1.5 cm thick, then use your finger or a small cap to make a hole in the center, rotating your finger to create an even hole. Leave about 3-4 cm of space between the donuts.
Baking
Place the tray with the shaped donuts in the preheated oven. Bake at 180°C (170°C for fan ovens) for 12–15 minutes. Rotate the tray halfway through the time if the oven bakes unevenly. The donuts are ready when the tops turn light golden, the edges are slightly browned, and a toothpick inserted in the center comes out dry or with a few moist crumbs (no raw dough). After baking, remove the tray and let the donuts sit on the paper for 3-4 minutes, then transfer to a rack to cool completely (at least 15-20 minutes).
Glaze and decoration
Prepare the glaze: in a bowl, mix the sifted powdered sugar (100 g) with Greek yogurt (80 g) and lemon juice (15 ml). Stir with a spoon or whisk until you achieve a smooth, thick, but pourable glaze — the consistency should be such that the glaze coats the doughnut and slightly drips from the edge. If the glaze is too thick, add 1 ml of yogurt at a time; if too thin, add a little powdered sugar. Dip the top of the doughnut or spoon the glaze on top. Immediately sprinkle with coconut flakes and candied orange peel, if using (you can also add both options to enhance flavor/texture). Leave the doughnuts on a rack to let the glaze set for about 20–30 minutes.
Serving
Arrange the doughnuts on a plate or platter — it's best to serve them at room temperature. If the glaze hardens completely, the doughnuts can be transferred to a box, separating the layers with parchment paper to prevent the glaze from sticking. Serve with a cup of coffee, tea, or a glass of milk.
Additional tips
If you want a gluten-free version, use a gluten-free blend instead of wheat flour, adjusting the amount slightly (the mixture may require an additional tablespoon of gluten-free flour). You can also add 1 teaspoon of vanilla extract or 1 teaspoon of potato starch to the mixture for a slightly different texture. For decoration, you can add fresh mint or lemon slices.
Fun Fact
Traditional Polish cheese donuts are usually fried in fat, but baked versions have emerged as a healthier alternative in home and blog kitchens. The combination of cottage cheese with citrus is classic — the acidity of lemon enhances the milky-cheesy flavor of the dough.
Best for
Tips
Serve the doughnuts within 24 hours of baking for the best flavor. For variety, serve with cooked vanilla cream, fresh fruits, or light whipped cream. For photos, arrange a few doughnuts on a wooden board with a slice of lemon and a teaspoon of glaze.
Store the doughnuts in an airtight container at room temperature for up to 48 hours. If you want to keep them longer, place them in the refrigerator (for a maximum of 4 days) — take them out 30 minutes before serving to bring them to room temperature. It's best to apply the glaze just before serving to prevent the cake from becoming too soft. To reheat in the oven, set it to 160°C for 4–6 minutes to refresh the texture.
📸 Ugotowane przez społeczność
Zaloguj się, aby dodać zdjęcieDodaj zdjęcie gotowej potrawy
Po zatwierdzeniu przez moderatora otrzymasz 10 punktów doświadczenia.
Nikt jeszcze nie dodał zdjęcia. Bądź pierwszy!
Comments (0)
Be the first to comment on this recipe!
Add a comment