Menu

Mother-in-Law's Revenge in a New Version (no baking) — creamy coffee layered dessert

Desserts Cakes and Bakes 300 min Medium 14 wyświetleń ~56.15 PLN - (0)
Rate:
(0)

Description

Creamy, no-bake layered dessert inspired by the classic "mother-in-law's revenge cake," but transformed into a light, elegant form perfect for a culinary blog. It consists of a crunchy base made from buttery biscuits, an intense layer of coffee-soaked cookies, a velvety mascarpone and ricotta cream stabilized with gelatin, and a layer of dark chocolate as a topping. The dish combines contrasts: a sweet-buttery base, a distinct coffee note, and the delicate tartness of ricotta—all decorated with nuts and orange zest. Serve chilled, as a dessert after an elegant dinner or for an afternoon coffee gathering—it looks impressive and tastes exceptional, while also being simple to make without an oven.

Składniki (14)

Servings:
10
  • Butter cookies 250 g
  • Butter 150 g
  • Mascarpone 250 g
  • Ricotta 300 g
  • Powdered sugar 80 g
  • 36% heavy cream 400 ml
  • Powdered gelatin 8 g
  • Espresso (strong coffee) 120 ml
  • 70% dark chocolate 150 g
  • Cocoa powder for dusting 10 g
  • 🌿 Przyprawy
  • Salt 0.0 szczypt
  • ✨ Opcjonalne
  • Coffee liqueur (optional) 30 ml
  • Walnuts (optional) 50 g
  • Orange zest (optional) 10 g
💰 Szacowany koszt dania: ~56.15 PLN (5.61 PLN/porcję)

💡 Kliknij na składnik aby oznaczyć jako użyty

Preparation steps

Base

1

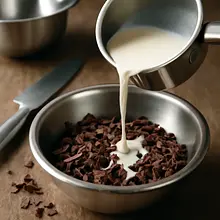
Prepare the base: place the biscuits in a large ziplock bag and crush them with a rolling pin into fine crumbs (they should look like coarse breadcrumbs). If you don't have a rolling pin, put the biscuits in a large bowl and mash them with a potato masher. You will get about evenly sized crumbs.

Ingredients: Butter cookies
Use a thick plastic bag and a rolling pin; protect the dirty surface with a cloth. Do not grind to a powder — it's better to leave a slight texture.
2

Melt the butter in a saucepan over low heat or in the microwave (short 20-30 second intervals) until it becomes liquid but not hot. Pour the melted butter into the cookie crumbs and mix with a wooden spoon or silicone spatula until all the crumbs are evenly moist and start to slightly stick together.

Ingredients: Butter cookies, Butter
The best bowl is made of plastic or metal. If the butter is too hot, let it cool for 1–2 minutes — hot butter will overly soften the bottom.
3

Line a 24–26 cm springform pan with baking paper (bottom and sides). Transfer the cookie mixture to the springform pan and spread it evenly. Press the base mixture down using a spoon, the bottom of a glass, or the base of a small jar, creating a compact, even layer about 1–1.5 cm thick. Place in the refrigerator for at least 20–30 minutes to firm up.

Ingredients: Butter cookies, Butter
Use a springform pan for easy removal. Press firmly, but do not press so hard that you heat the mixture.

Coffee layer

4

Prepare the coffee soak: brew 120 ml of strong espresso. Transfer the hot coffee to a bowl and set aside for 1 minute to cool slightly (it should be hot, but not boiling). If you are using coffee liqueur, add it to the cooled espresso and stir.

Ingredients: Espresso (strong coffee), Coffee liqueur (optional)
Use freshly brewed espresso or very strong instant coffee. Do not use boiling water — too hot liquid can soften the base.
5

Soaking the cookies: take a few (or all, as desired) additional biscuits or ladyfingers (if you have them) and quickly dip them on one side in coffee for 1–2 seconds — do not soak them too long so that the cookies do not fall apart. Arrange the soaked cookies in a tight layer on the chilled base (if you do not want visible whole cookies, you can crumble the soaked pieces and spread them evenly).

Ingredients: Butter cookies, Espresso (strong coffee)
Dip the cookie briefly and take it out immediately — it should be moist inside but not falling apart. Work quickly so the coffee doesn't cool down.

Cream

6

Prepare the gelatin: sprinkle 8 g of gelatin into a small bowl, add 40 ml of cold water and let it sit for 5–8 minutes to swell (a jelly-like mass will form). After swelling, heat the gelatin over a water bath or in very short intervals in the microwave until it becomes liquid and clear (do not allow it to boil). Let it cool for 1–2 minutes — it should be lukewarm.

Ingredients: Powdered gelatin
Use a small, heat-resistant bowl. If the gelatin starts to boil or foam, it will lose its gelling properties. If you want a vegetarian version, use agar-agar and follow the instructions on the package.
7

Whipping cream: pour very cold heavy cream (400 ml) into a large bowl. Use a mixer on low speed, gradually increasing to medium, and whip until soft peaks form (about 2–3 minutes). Do not whip to stiff peaks — we want the cream to be fluffy but still creamy.

Ingredients: 36% heavy cream
A chilled bowl and mixer attachments help whip the cream faster. Be careful not to overwhip — otherwise, the cream will turn into butter.
8

Combine the cheeses: in a separate bowl, mix mascarpone (250 g) with ricotta (300 g), add sifted powdered sugar (80 g) and a pinch of salt. Stir with a wooden spoon or silicone spatula until the mixture is smooth and lump-free. The mixture should be silky, not overly runny.

Ingredients: Mascarpone, Ricotta, Powdered sugar, Salt
If the cheeses were chilled, take them out 10–15 minutes earlier to make them easier to combine. Do not mix too vigorously — maintaining a light texture is beneficial.
9

Adding gelatin to the cream: pour the cooled, still liquid gelatin into the cheese mixture in a thin stream, stirring vigorously to distribute it well (to avoid lumps and immediate gelling in one spot). Immediately combine the cheese mixture with the whipped cream — add in portions (first 1/3 of the cream, mix gently, then the rest), folding from the bottom up with a spatula until the cream is smooth and fluffy.

Ingredients: Powdered gelatin, Mascarpone, Ricotta, 36% heavy cream, Powdered sugar
Pour the gelatin in a thin stream and stir constantly — if you pour it too quickly, the gelatin may clump together. Move the spatula with gentle but firm motions.

Assembly

10

Applying the cream: take the springform pan with the soaked cookies out of the fridge. Pour about 2/3 of the prepared cream over the coffee layer and spread it evenly with a silicone spatula. Level the surface by gently tapping the springform pan on the countertop to remove air bubbles.

Ingredients: 36% heavy cream, Mascarpone, Ricotta
Use a wide spatula. Do not apply too forcefully to avoid shifting the layer of cookies under the cream.
11

You can optionally layer a second, thin layer of cookies on the cream — if you want a more distinct structure, soak a few more cookies and arrange them in a single layer on the cream. Then spread the remaining cream and smooth the surface. Place the springform pan in the refrigerator for at least 4 hours, preferably overnight, to allow the cream to set.

Ingredients: Butter cookies, Espresso (strong coffee), Mascarpone, Ricotta, 36% heavy cream
If you are placing a second layer of cookies, do it gently and quickly so that the cream doesn't start to set while you work.

Chocolate glaze

12

Prepare the glaze: chop 150 g of dark chocolate and transfer it to a bowl. Heat 60 ml of heavy cream (you can use from the previously prepared 400 ml, pouring off before whipping) almost to boiling (small bubbles at the edge). Pour the hot cream over the chocolate, wait 30–40 seconds, then gently stir until you achieve a smooth, glossy mixture. If you want shine, add 10 g of butter and mix.

Ingredients: 70% dark chocolate, 36% heavy cream
Use a metal or glass bowl. Do not mix too vigorously at first — let the chocolate melt under the influence of the hot cream.
13

After the cream has set (after at least 4 hours), take the springform pan out of the fridge. Carefully unclip the ring. Pour the prepared, slightly cooled chocolate glaze in the center of the dessert and spread it to the edges, allowing it to gently flow down the sides. You can help yourself with a spoon to create even drips.

Ingredients: 70% dark chocolate
The glaze should not be hot — if it is too hot, it will melt the cream. The ideal temperature is slightly warm, liquid, and thick.

Decoration

14

Finishing: dust the surface with a thin layer of cocoa (10 g) through a sieve to achieve an even coating. Optionally, sprinkle with chopped, lightly toasted walnuts (50 g) and grated orange zest (10 g) for flavor. Additionally, you can add a few whole cookies on top as decoration.

Ingredients: Cocoa powder for dusting, Walnuts (optional), Orange zest (optional)
Use a fine sieve for cocoa to avoid lumps. If you're adding nuts, toast them in a dry pan for 3–4 minutes until they start to smell — be careful not to burn them.

Serving

15

Before serving, take the dessert out of the fridge for 10–15 minutes to let the topping soften slightly (it will be easier to cut). When cutting, use a long, sharp knife dipped in warm water and wipe the blade between cuts to achieve clean slices.

Ingredients: 70% dark chocolate, Cocoa powder for dusting
Heat the knife with boiling water, wipe it dry, and cut straight down. This way, the pieces will have smooth edges.

Fun Fact

💡

The concept of "mother-in-law's revenge" in the name of the dessert comes from humorous culinary traditions, where sweet dishes often had provocative names — these desserts were often intense in flavor or took on surprising forms to attract attention. No-bake versions have become popular due to their simplicity and impressive appearance.

Best for

Tips

🍽️ Serving

Serve chilled, with a cup of espresso or coffee with milk. Add a bit of fresh orange zest to each piece for contrast or a scoop of vanilla ice cream for a warm-cold version. Cutting with a warm knife gives the slices a perfect appearance.

🥡 Storage

Store in the refrigerator covered or in a closed container for 3–4 days. Do not freeze (gelatin and cream will change texture). If the topping becomes too hard after prolonged chilling, set the dessert aside for 15–20 minutes before serving to let it soften slightly.

📸 Ugotowane przez społeczność

Zaloguj się, aby dodać zdjęcie
Dodaj zdjęcie gotowej potrawy

Po zatwierdzeniu przez moderatora otrzymasz 10 punktów doświadczenia.

🍲

Nikt jeszcze nie dodał zdjęcia. Bądź pierwszy!

Comments (0)

Be the first to comment on this recipe!

Add a comment

You might also like

Recipe Categories

Desserts
Desserts in: Christmas Eve Dinner

Desserts are a sweet ending to a meal that brings joy to both children and adults. In this category, we present recipes for a variety of sweets - from simple creams and mousses, to elegant panna cottas, and exquisite fruit tarts. Our desserts include both classics of Polish cuisine - fruit jelly,...

See all recipes in this category

Homemade cakes and pastries are the heart of Polish culinary tradition - sweet memories from childhood. In our collection, you will find recipes for classic yeast cakes, shortcrust, sponge, and cheesecake. Apple pie, poppy seed cake, gingerbread, Easter babka, chocolate cake, and New York cheesec...

See all recipes in this category
Reklama