Delicate, crunchy cheese sticks with young asparagus and aromatic dill — a Kashubian variation on a classic snack, adapted for the spring season. The dough is buttery and cheesy, with small pieces of blanched asparagus and fresh dill, creating a pleasant contrast of textures: crispy on the outside, slightly moist on the inside. Perfect as a snack for children (handy, easy to hold), they are also great for parties, picnics, and a basket with regional additions. Serve with sour cream mixed with dill or as an accompaniment to sorrel soup — they have a pleasant, slightly salty taste and a golden crust.
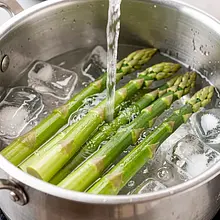
Wash the asparagus under running water. Snap or cut off the tough, woody ends (usually 2–3 cm from the bottom of the stalk) — break at the point where it naturally snaps. Prepare a pot with plenty of salted boiling water (about 1 teaspoon of salt per 1 liter). Add the asparagus to the boiling water and cook for 1.5–2 minutes (for thin stalks) until they become bright green and slightly soft, but still firm. Immediately transfer to a bowl of very cold water (ice) to stop the cooking process. After cooling, drain on a towel and cut into pieces 1–1.5 cm long.
Ingredients:
asparagus, Salt
Use a pot with a diameter of 20–24 cm and tongs for removing the asparagus. Check with a fork: if it goes in easily but the spear remains firm, they are ready. Do not cook for too long — they will become soft and lose their texture.
Cake
2
Prepare the necessary tools: grater, bowl, knife, cutting board, spatula or spoon, optionally a food processor with a mixing attachment. Grate the cheese on a fine grater. Cut the chilled butter into cubes. In a large bowl, sift the flour, add salt and pepper. Add the chopped cold butter and rub it with your fingers (or use a chopper/processor in pulses) until the mixture resembles coarse crumbs (the size of corn kernels). Add the grated cheese, chopped dill (leave 1–2 teaspoons for the dip), and chopped asparagus. In a separate bowl, whisk one egg with milk (set aside the second egg for brushing). Pour the wet ingredients into the dry and quickly mix with a wooden spoon or by hand until the ingredients come together into a cohesive mass — the dough should be slightly moist, not sticky. If too dry, add milk by the teaspoon; if too sticky, sprinkle with flour. Form a disk, wrap in plastic wrap, and chill for 30 minutes in the refrigerator.
Use a food processor with a knife or a mixer if you have one — however, do not knead for too long; the goal is to combine the ingredients, not to develop gluten. Chilling makes rolling easier. If you don't have a mixer, quickly rub the butter with your fingers (5–7 minutes).
Shaping
3
Remove the dough from the refrigerator and lightly dust the work surface with flour. Place the dough between two sheets of parchment paper and roll it out into a rectangle about 3–4 mm thick. Remove the top layer of paper. Using a sharp knife or pastry wheel, cut the rectangle into strips 1.2–1.5 cm wide and 8–10 cm long. You can leave the strips straight or gently twist them (hold both ends of the strip and twist 2–3 times).
Ingredients:
Wheat flour
Use a silicone rolling pin and parchment paper — it makes transferring the sticks easier. If the dough is sticky, chill it for another 10 minutes. Try to make the strips of similar length for even baking.
Baking
4
Preheat the oven to 200°C (top and bottom heat). Line a baking sheet with parchment paper and arrange the sticks with a spacing of about 1–1.5 cm. Beat the reserved egg and brush the tops of the sticks with it using a pastry brush; if you prefer, use milk for brushing. Optionally sprinkle with sesame seeds. Bake in the middle of the oven for 12–15 minutes until the sticks are golden brown and firm. After removing, cool for 5 minutes on a rack — they will become firmer after slightly cooling.
Ingredients:
Sesame
The best is a baking tray with low edges and baking paper. Do not open the oven in the first 8 minutes — sudden cooling can cause them to collapse. The sticks should be golden, not dark brown.
Dip (optional)
5
If you are preparing the dip: in a small bowl, mix the sour cream with the remaining finely chopped dill and a pinch of salt. Taste and season lightly. Let it sit for 10 minutes to allow the flavors to meld. Serve alongside warm breadsticks.
Ingredients:
sour cream, Dill, Salt
Use a small bowl and a spoon. Serve the dip separately to the children so they can decide whether to dip the sticks. Additionally, you can add finely chopped sorrel (seasonal) for a slight acidity — this is an option for adults.
Serving
6
Arrange the sticks on a wooden board or plate in a single row. Place a bowl of dip next to them. Serve slightly warm or at room temperature. For a children's portion, you can add a few sticks with a slice of apple or carrot for color and fun in assembling the plate.
Ingredients:
Cheese, Dill
Use a flat plate with a diameter of 24–28 cm or a cheese board. The sticks look great arranged alternately next to a bowl of dip.
Cleaning and storing leftovers
7
Store the remaining sticks (cooled) in a sealed container in the refrigerator for up to 2 days. Before serving again, refresh them in an oven preheated to 160°C for 5–7 minutes to regain their crispiness. Do not store together with the dip — keep the dip in a separate container for up to 2 days.
Ingredients:
sour cream
Freezing the sticks is possible: arrange in a single layer on a baking sheet, freeze for 1–2 hours, then transfer to a bag. Bake from frozen for 10–12 minutes at 200°C.
Fun Fact
💡
In Kashubian cuisine, cheese and herbs were often combined with the spring gifts of nature — the sticks combine local cheese with young asparagus and dill, giving them a regional character and the freshness of the season.
Serve slightly warm, preferably with sour cream and dill. For adult portions, I suggest adding a slice of lemon or a sorrel dip. Arrange the plate with colorful vegetables (carrots, cucumber) for children.
🥡Storage
Store in the refrigerator in a sealed container for up to 48 hours. To regain crispness, heat in the oven for 5–7 minutes at 160–180°C. You can also freeze individually on a baking sheet, then store in a bag for up to 1 month; bake straight from frozen for 10–12 minutes.
Snacks for kids are healthy treats between meals - for school and the playground. Vegetables with hummus: carrots, cucumbers, and bell peppers in colorful portions. Fruit skewers: strawberries, grapes, and pieces of banana on sticks. Mini sandwiches on crackers - perfect for little hands. Energy ...
Comments (0)
Be the first to comment on this recipe!
Add a comment