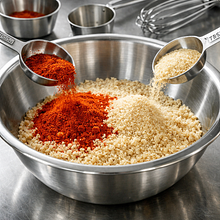
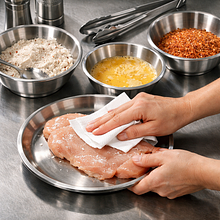
Prepare your workspace: three wide, shallow dishes (plates or trays), one large bowl, and a whisk or fork. In dish number 1, place the flour mixed with half of the salt (about 2–3 g from the prepared 5 g) and 1 g of black pepper; in dish number 2, crack and lightly beat the eggs until the white and yolk are combined; in dish number 3, add the breadcrumbs and then add the paprika, garlic powder, remaining salt, and pepper. If you are using cheese and parsley (optional), add them now to the breadcrumbs and mix well.
Description
Spicy breading for cutlets is an aromatic, crunchy mixture of breadcrumbs and spices that adds character to pork chops, chicken cutlets, or minced meat patties. The recipe is designed to achieve even browning and a strong, spicy note thanks to cayenne pepper and chili powder, while maintaining the classic breading structure (flour → egg → breadcrumbs). The breading pairs wonderfully with traditional Polish sides: mashed potatoes, cucumber salad, or sauerkraut. It is suitable for frying in a pan as well as baking in the oven (a less greasy version). In the description, you will find detailed step-by-step instructions: how to set up the breading station, how to check the oil temperature without a thermometer, how to press the breadcrumbs so that the breading doesn’t fall off during frying, and how to store the prepared mixture.
Ingredients Used
Ingredients (10)
- Wheat flour 150 g
- Chicken egg 2 szt. (~120 g)
- Breadcrumbs 200 g
- Ground hot pepper 4 g
- Rapeseed oil 60 g
- 🌿 Przyprawy
- Czosnek granulowany 2 łyżeczki (~4 g)
- Salt 0.2 szczypt (~5 g)
- Black pepper 4 szczypty (~2 g)
- ✨ Opcjonalne
- Cheese 50 g
- Parsley 0.5 pęczek (~15 g)
💡 Kliknij na składnik aby oznaczyć jako użyty
Preparation steps
Preparing the breading station
Preparing the dry mix
In a large bowl, mix the breadcrumbs with the cayenne pepper and garlic powder thoroughly for 30–60 seconds, until the spices are evenly combined with the breadcrumbs. If you are using cheese, rub the finely grated cheese into the breadcrumbs with your fingers to combine it with the dry mixture. Add the finely chopped parsley and mix.
Preparing the eggs
Beat the eggs (egg) with a fork or whisk in a separate shallow dish until smooth. They should be slightly frothy and uniform, without large pieces of egg white. If you want a lighter 'looser' batter, add 10–15 ml of cold water to the eggs and mix again.
Preparing the flour
Sift the wheat flour into a wide plate and spread it out lightly. The flour is meant to remove moisture from the surface of the meat, which will allow the egg to adhere better and the breadcrumbs to stick evenly.
Breading the cutlets
Before breading, dry the cutlets with a paper towel. The breading process is done in three steps: 1) coat the meat in flour — place the cutlet on the flour, press down and turn it to cover the entire surface; gently shake off the excess flour with your fingers; 2) dip the cutlet in egg — hold it over a bowl, let the egg drip off, but do not leave a puddle under the cutlet; 3) press the cutlet firmly into the breadcrumb mixture — place the cutlet on a plate with breadcrumbs and press down with your hand for 5–7 seconds, moving it to ensure the breadcrumbs stick evenly. Repeat the process for all cutlets. After preparing, set the breaded cutlets aside in the refrigerator or a cool place for 8–10 minutes — this will help the breading "bind" to the meat and reduce the amount that falls off during frying.
Heating the fat
In a 26–28 cm diameter frying pan, pour in rapeseed oil to a height of about 2–3 mm (about 40–60 g). Heat over medium heat for 3–4 minutes until the oil starts to shimmer gently and moves slightly on the surface. Thermometer test: drop a small piece of breadcrumbs — if it sizzles vigorously and browns within 10–15 seconds, the temperature is right (about 170–180°C).
Frying
Fry the cutlets in batches, do not overcrowd the pan (2–3 cutlets at a time depending on the size of the pan). Gently place the cutlets in the oil with the breading side down. Fry over medium heat for 3–5 minutes on one side, until the breading is golden and lifts away from the pan; flip and fry for another 3–5 minutes. The thickness of the cutlet affects the time — thin cutlets (about 5–7 mm) need less time (3 min per side), thicker ones (1–1.5 cm) take longer (4–5 min per side). Once fried, transfer to a plate lined with paper towels to drain excess fat. The breading should be evenly golden, crispy, and not flake off with light pressure.
Serving
Serve the patties hot, right after draining from the oil. To enhance the flavor, lightly drizzle with lemon (optional) or serve with classic sides: mashed potatoes, sautéed beets, or sauerkraut. Sprinkle with fresh parsley for color; if you used parsley in the mixture, you can add an extra fresh touch.
Baked variant (less fat)
If you want to avoid frying, place the breaded cutlets on a baking sheet lined with parchment paper, spray lightly with canola oil, and bake in an oven preheated to 200°C (top-bottom) for 12–18 minutes, flipping halfway through. The coating should be golden and crispy. The time depends on the thickness of the cutlets.
Fun Fact
The traditional breading in Polish cuisine comes from a practical idea – breadcrumbs are a way to use stale bread, and the crispy coating simultaneously protects the meat from drying out during frying.
Best for
Tips
Serve immediately while the coating is still hot and crispy. For a flavor contrast, add a sour element: a slice of lemon, pickled cucumber, or a tablespoon of sauerkraut. For a party version, serve the cutlets sliced on boards with dips: yogurt-garlic or mustard-honey.
Store the prepared dry breading mix in an airtight jar for up to 2 weeks in a cool, dry place. Breaded cutlets are best fried immediately; if you need to store them, keep them in the refrigerator for up to 24 hours on a plate covered with plastic wrap. To reheat, use the oven at 180°C for 8–10 minutes to regain crispiness.
📸 Ugotowane przez społeczność
Zaloguj się, aby dodać zdjęcieDodaj zdjęcie gotowej potrawy
Po zatwierdzeniu przez moderatora otrzymasz 10 punktów doświadczenia.
Nikt jeszcze nie dodał zdjęcia. Bądź pierwszy!
Comments (0)
Be the first to comment on this recipe!
Add a comment